VXDIAG Benz "The Data Are Faulty" Solution

Recently some people reported that they got data faulty error when running VXDIAG Benz C6 HDD xentry software. The error image shown below:
vxdiag-benz-data-faulty
Solution:
Contact us and send your vxdiag benz HDD back to reload the xentry to your HDD.
The problem will be solved.

Note: The solution is for vxdiag benz vcx plus, not for sdc4/c5.

How to use VXDIAG Subaru SSM3 EDR Function?

The EDR function may be accessed through the Airbag Systems portal of the Subaru Select Monitor (SSM III or SSM4).

EDR:
Some Subaru are equipped with an event data recorder (EDR).  The main purpose of an EDR is to record, in certain crash or near crash-like situations such as an airbag deployment or hitting a road obstacle, data that will assist in the understanding how a vehicle’s systems performed.  The EDR is designed to record data related to vehicle dynamics and safety systems for a short period of time, typically 30 seconds or less.

These data can help provide a better understanding of the circumstances in which crashes and injuries occur. NOTE: EDR data are recorded by your vehicle only if a non-trivial crash situation occurs; no data are recorded by the EDR under normal driving conditions and no personal data (e.g., name, gender, age, and crash location) are recorded. However, other parties, such as law enforcement, could combine the EDR data with the type of personally identifying data routinely acquired during a crash investigation.
To read data recorded by an EDR, special equipment is required, and access to the vehicle or the EDR is needed. In addition to the vehicle manufacturer, other parties, such as law enforcement, that have the special equipment, can read the information if they have access to the vehicle or the EDR.

Subaru SSM3 Record Event Data (EDR):
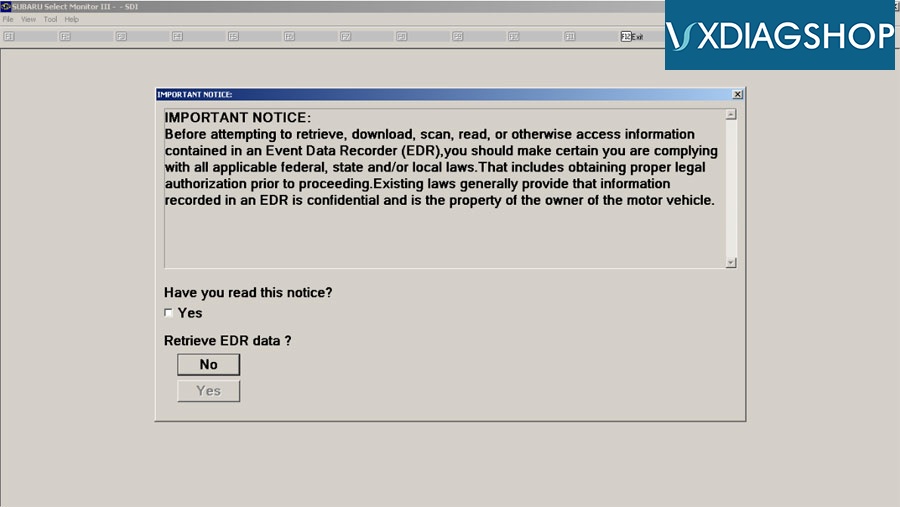
Go to the Main Menu, selecting Each System Check and then Airbag System. Once there, Event Record Data may be selected from the options listed.  Once this area is selected, an Important Noticescreen will appear with the following message:
subaru-ssm3-edr-function
You will then be asked to check a box indicating that you are aware of and in compliance with the areas outlined in the Important Notice message.  Once the box is checked, the “YES” button will become available to select so you can proceed with viewing any data that may have been collected by the EDR.
If you have reached this area in error or have not received proper legal authorization to view any data in the EDR, simply press “NO” to return to the Airbag System menu.

Example: 
Test VXDIAG Subaru SSM3 (not SSM4) on Windows 7 Pro.

Select Airbag System-> Event Record Data
subaru-ssm3-edr-function-1
Page 1 Important Notice
subaru-ssm3-edr-function-2
After agreement page:
subaru-ssm3-edr-function-3
Displayed for all data requests:
subaru-ssm3-edr-function-4
Diagnostic Code(s) Display
subaru-ssm3-edr-function-5
Able to successfully clear this.
Stored Data from Code:
subaru-ssm3-edr-function-6
Multiple module data gathering. It worked for some modules but not all.
subaru-ssm3-edr-function-7
Example when connected to HVAC + Airbag shown below. Also shown is all that is shown under “Current Data Display & Save” for the airbag module.. So I assume you get more data with an EDR report as this data display doesn’t even show vehicle speed. I wasn’t able to find a way to select only certain data points from each module to allow for faster sampling. Data can be recorded and saved, then reviewed just as it appears below (and as it appeared when gathering the data real-time).
subaru-ssm3-edr-function-8

How to Turn on VXDIAG BMW DoIP Switch?

Problem:
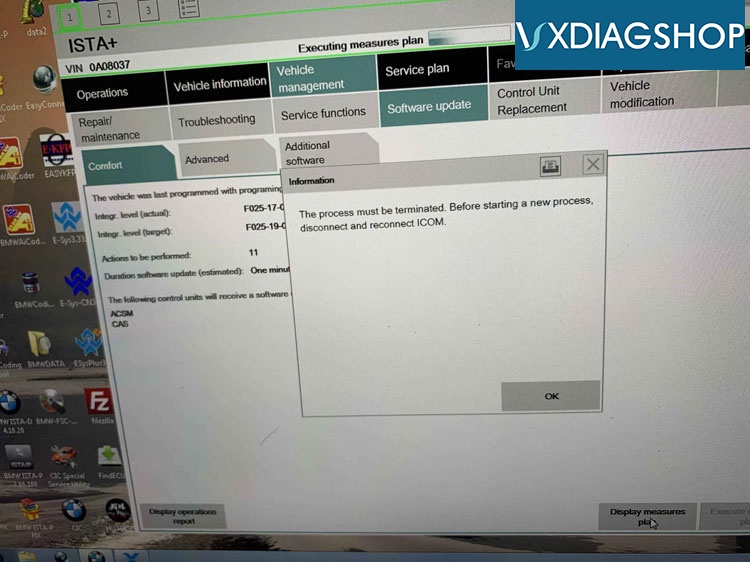
I tried to perform BMW X3 F25 programming with VXDIAG VCX BMW under ISTA+ 4.18, it failed me and showed error:  “The process must be terminated.
Before starting a new process, disconnect and reconnect ICOM.” What can i do?
vxdiag-bmw-f25-coding-error
Vxdiagshop.com solution:

To perform F series programming or coding functions with vxdiag bmw, you should turn on the DoIP switch before operation.
vxdiag-bmw-turn-on-doip-1
Open VCXNet DoIP program on desktop
vxdiag-bmw-turn-on-doip-2
Press Connect VCX (make sure vxdiag vcx has connected with laptop)
vxdiag-bmw-turn-on-doip-3
Press “DoIP ON” to turn on DoIP switch
vxdiag-bmw-turn-on-doip-4
DoIP has been automatically assigned IP.
Now you can do coding or programming.

Here’s a video BMW coding guide using VXDIAG BMW

How to Install VXDIAG Toyota Techstream V15.00.026?

The latest version V15.00.026 Toyota techstream software has been tested and verified working perfectly on vxdiag diagnostic scanners, including VXDIAG VCX NANO ToyotaVCX ProVCX PLUS and VXDIAG Full.

Version: V15.00.026
Software language: Chinese, English, French, Italian, Spanish, German etc
Operating system: Windows 7 or above

Free Download VXDIAG Toyota Techstream V15.00.026 software and Patch
http://blog.vxdiagshop.com/2020/03/12/free-download-toyota-techstream-v15-00-026-for-vxdiag/


How to install VXDIAG Toyota Techstream V15.00.026?
Step 1: Install Techstream setup
install-vxdiag-toyota-techstream-v15-00-026-1
Run Techstream_Setup _V15.00.026
install-vxdiag-toyota-techstream-v15-00-026-2

Select setup language
install-vxdiag-toyota-techstream-v15-00-026-3

Install InstallShield wizard for Techstream
Accept license agreement
install-vxdiag-toyota-techstream-v15-00-026-4

Enter User Name: AADD and company name: 1
Press Install
install-vxdiag-toyota-techstream-v15-00-026-5

Install wizard completed. Press Finish.
install-vxdiag-toyota-techstream-v15-00-026-6

Install .NET Framework 4.7.2, accept license agreement, press Install
If prompt Framework 4.7.2 setup failed, just close the program to ignore
install-vxdiag-toyota-techstream-v15-00-026-7

install-vxdiag-toyota-techstream-v15-00-026-8

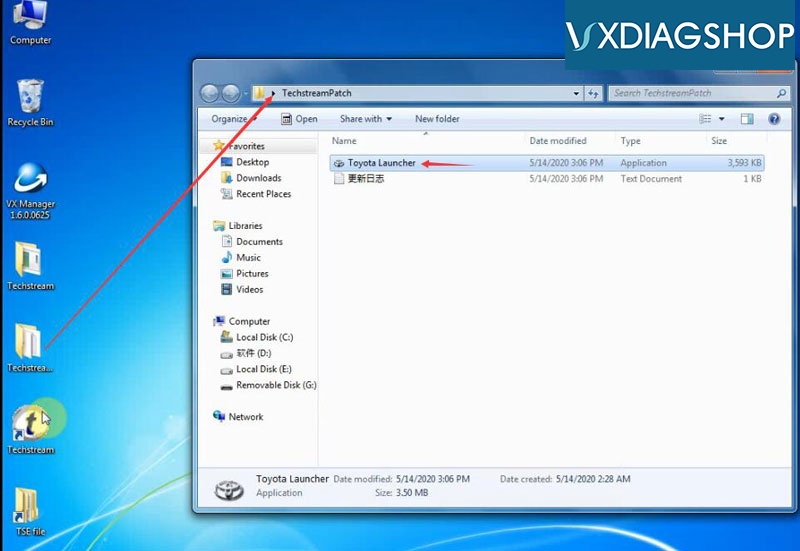
Open TechstreamPatch folder, copy and paste Toyota Launcher to  C://Program Files/Toyota Diagnostics/Techstream/bin folder

Step 2: Install VX Manager
Connect vxdiag vcx nano interface with laptop
install-vxdiag-toyota-techstream-v15-00-026-9

Windows doesn’t see detect driver, you have to install VX Manager driver first
Run VX Manager on desktop
install-vxdiag-toyota-techstream-v15-00-026-10

Select Toyota Techstream software to install
Install VX Manager driver success
install-vxdiag-toyota-techstream-v15-00-026-11

Windows will detect device driver and USB Port (COM4)
install-vxdiag-toyota-techstream-v15-00-026-12

Run VX Manager to check device information

Step 3: Crack Techstream V15
install-vxdiag-toyota-techstream-v15-00-026-13
Install Vxdiag Toyota Techstream V15 13
Go to C://Program Files/Toyota Diagnostics/Techstream/bin, open Toyota Launcher
install-vxdiag-toyota-techstream-v15-00-026-14

Select area: Other, press Next
install-vxdiag-toyota-techstream-v15-00-026-15

Select software language, press Next
install-vxdiag-toyota-techstream-v15-00-026-16

Complete Techstream configuration dealer information
Press OK

Step 4: Run Software
Run Techstream V15.00.026 software
install-vxdiag-toyota-techstream-v15-00-026-17

Connect to vehicle
install-vxdiag-toyota-techstream-v15-00-026-18

select vehicle information
Now you can diagnose, do Health Check, Customize setting, ECU reprogramming, CAN Bus check etc with the tis techstream v15
install-vxdiag-toyota-techstream-v15-00-026-19

install-vxdiag-toyota-techstream-v15-00-026-20

How to Solve VXDIAG License Expire on Dec. 31st 2020

Recently some people reported that their vxdiag software license (i.e vcx nano odis 5.2.6, gds2) will expire on December 31st, 2020.
vxdiag-license-expire-dec-31st-2020


Vxdiagshop.com Solution:
License won't expire.  
License can be renewed for free by providing us your vxdiag Serial Number.