How to Find VXDIAG C6 DTS Monaco CBF Files?
Question:
I am using Allscanner VXDIAG Benz C6 doip device with Mercedes W211.
I need to flash programming but can’t find W177 file.
First i use LAN cable but DTS Monaco don’t show workspace then i use USB cable it shows workspace but can’t find w177.
How to set up an interface in DTS monaco 8.13.029 ?
Should I use USB or LAN?

Solution:
1.How to set up DTS Monaco for VXDIAG C6?
http://blog.vxdiagshop.com/2019/02/27/set-up-dts-monaco-for-vxdiag-benz-c6/
2. VXDIAG uses USB connection when run DTS Monaco.
3.
vxdiag needs to configure CBF to work.
If you have W177 file, do following to find the CBF file:
1). How to find CBF/SMR-d file:
CBF and SMR-D both access Licenses files.
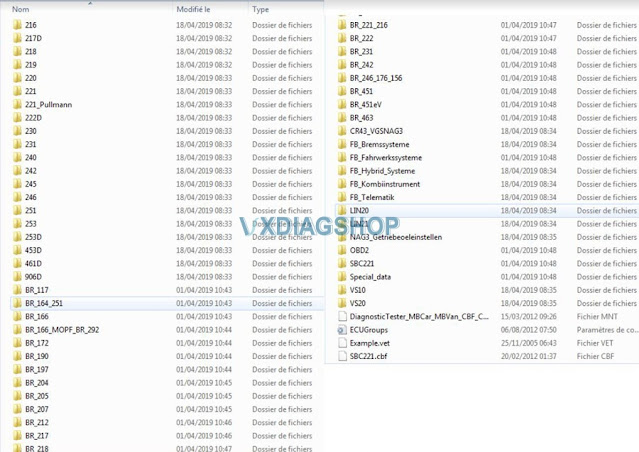
CBF is available for old cars, includes 117, 156, 163, 164, 166, 168, 169, 170, 171, 172, 176, 203, 204, 207, 209, 211, 212, 217, 218, 219, 220, 221, 245, 246, 230, 231, 251, 292, 240, 450, 451, etc.
SMR-D is suitable for new cars, includes 205, 253, 222, 453, etc.
CFF and SMR-F are programming files. CFF file is corresponding to CBF programming file, and SMR-F is corresponding to SMR-D programming file.
SMR-D file path: C:\Program Files (x86)\Mercedes-Benz\Xentry\ Kontexte\ODXProjekte\PKW_COMMON\dbr
CFF and SMR-F file path: C:\Program Files (x86)\ Mercedes-Benz\SDFlash\Release\PKW
The best solution is to create for each cariine one folder and put the corresponding CBFs inside.
WIN7system:
DAS CBF : C:\Program Files (x86)\Mercedes-Benz\DAS\comdat\pkw\cbf
Xentry SMR: C:\Program Files (x86)\Mercedes-Benz\Xentry\Kontexte\ODXProjekte
Xentry CBF: C:\Program Files (x86)\Mercedes-Benz\Xentry\MB_PKW\Caesar\cbf
CFF file: C:\Program Files (x86)\Mercedes-Benz\SDRash\Release\PKW
XP system:
DAS CBF: h\Programme\DAS\comdat\pkw\cbf
Xentry SMR: F:\Programme\Xentry\Kontexte\ODXProjekte
Xentry CBF: F:\Programme\Xentry\MB_PKW\Caesar\cbf
CFF file :F:\Programme\SDFIash\Release\PKW
CFF file:E:\Programme\SDFlash\Release\PKW
If you don’t have W177 file, you need to connect w177 vehicle and import 177 CBF file.
2). How to import CBF file:

Select “Daimler database files (*.CxF)”,then click “Next”
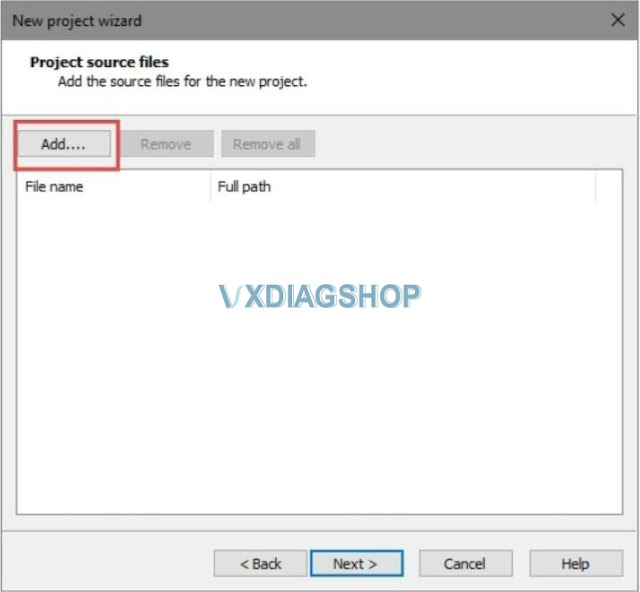
Click “Add” button
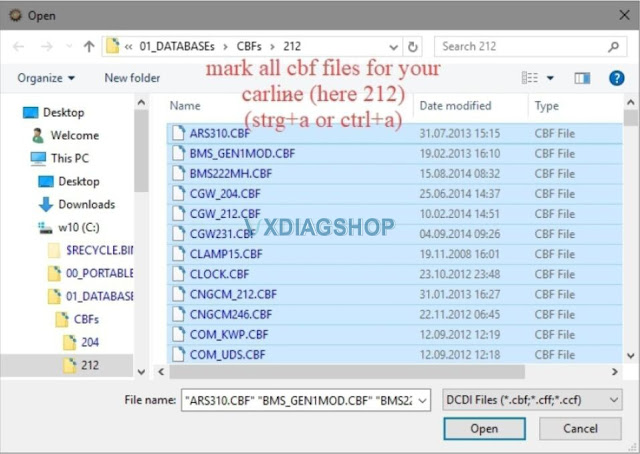
Mark all CBF file for your carline
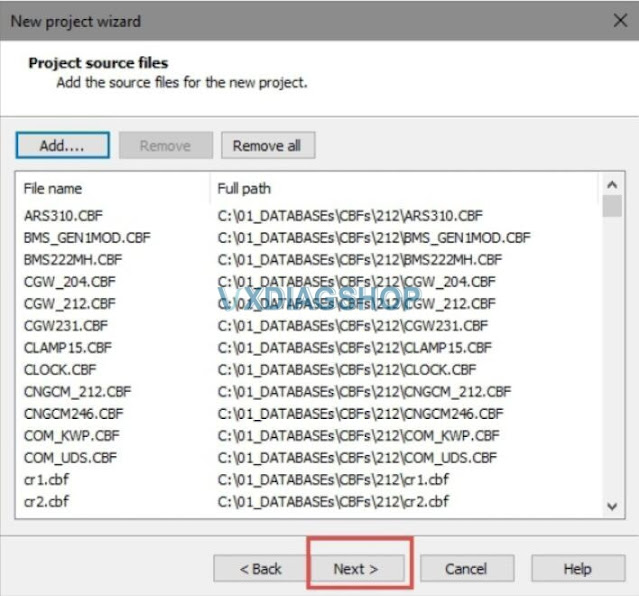
Then click “Next” to continue
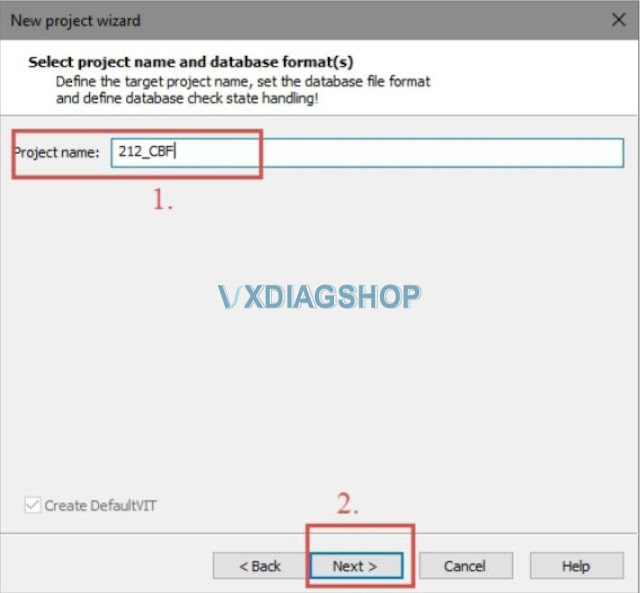
Select project name and database format,then click “Next” to continue
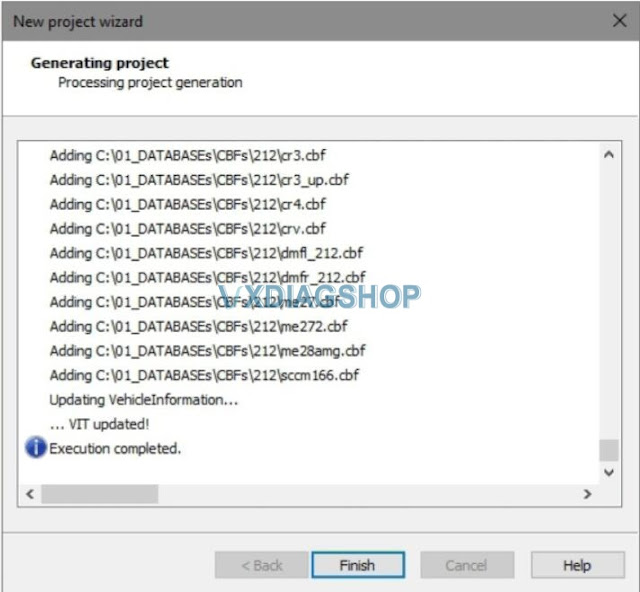
After then click “Finish”
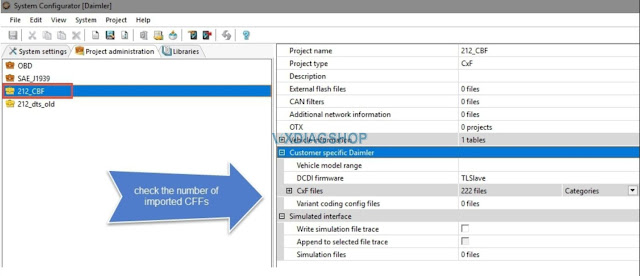
Now check the number of imported CBF files.
http://blog.vxdiagshop.com/2021/08/20/vxdiag-benz-c6-cannot-find-cbf-file-in-dts-monaco/
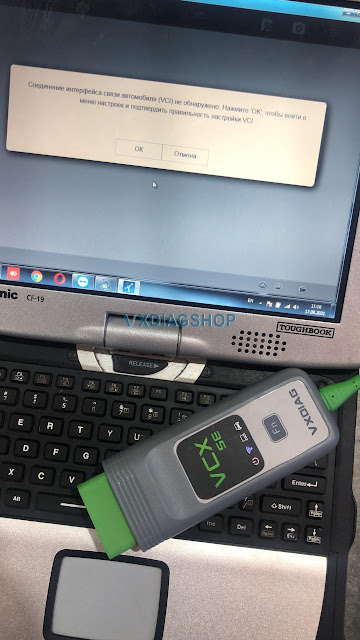
Cannot Connect VXDIAG VCX SE JLR Pathfinder Solution
Offer the solution to VXDIAG VCX SE JLR not connect for Pathfinder.
Look at the error message of cannot connect vcx se to JLR to Pathfinder
I understand that files are still needed for Pathfinder to work
vxdiagshop.com engineer offers the working solution:
For this problem, please install this jlr doip driver, please download below:
https://mega.nz/file/oZFxTITI#hhOvdJM03hsN_q2VLMdbfdYEawLRxPjqf85jpJAlW14
VCI Software (JLR)-2.4.22.59 .exe
Size: 81.6MB
no need to use vci manager, for vxdiag jlr doip only need to use vx manager, need to uninstall the vci manager, otherwise you may get this error.

Alright, credits to the tech support of www.vxdiagshop.com.
VXDIAG VCX NANO or Tech2 for a Hummer H2
“I use them both, depending on what I’m doing determines which one I use.
If programming a module on 07 Hummer H2 and older vehicles I will use the Tech2 with TIS2000, if on newer vehicles I use the VCX Nano and TIS2WEB.
The Tech2 with the correct software can diagnose vehicles up to 2013 but only program up to 2007 using TIS2000.
I personally feel the Tech2 is a better option, I’ve had installation issues with the Nano but it has been working fine for a little while now.
I am using a small laptop with windows 7 with the Nano and the Tech2 for programming using Pass-thru mode and all is working fine.
If all you are wanting to do is diagnostics on vehicles then the Nano will do it and it will do everything the Tech2 will do. The Nano is an MDI 1 clone which is the tool that replaced the Tech2 originally. The Nano uses a windows based program that is a Tech2 emulator called TECH2WIN and has all the same menus and functions as the Tech2.
I purchased my nano gm along with a laptop with needed software from VXDiagshop, they use email support and Teamviewer if needed for a tech to login to your computer and look things over. they’ve been very fast to answer my questions and give support.
The catch with the newer GDS2 type is you still have to have a laptop and Tech2Win software and/or pay for a subscription from ACDelco Tech Connect to actually be able to use the GDS2 type of device while the traditional old style full Tech2 is fully independent for all diagnostics and testing functions. For flashing and software updates you can either pay for a short term subscription or get a copy of TIS2000 running on a computer to connect the Tech2 to (what I did).”
Honda CVT DCT gear Calibration with HDS
Here is the step-by-step guide of Honda CVT DCT gear Start Clutch calibration procedure using the Honda diagnostic system HDS and VXDIAG VCX Plus device. VXDIAG HDS works well Honda, recalibrate and update modules software without any problems.

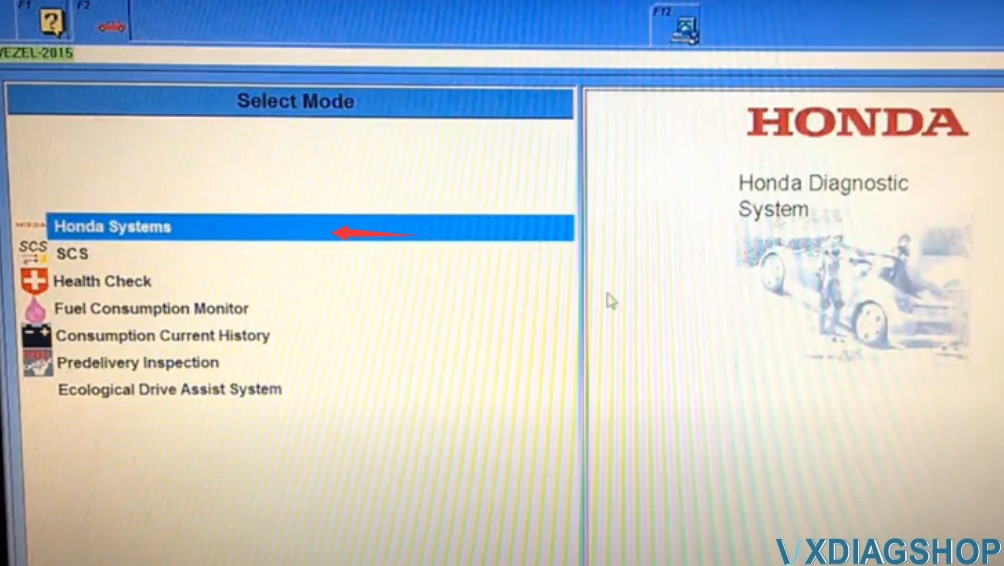
Run HDS software, complete vheicle informaton
i,e a 2015 VEZEL
Select Honda Systems – AT – Adjustment Menu – Clutch Assembly by Pressure


Stop the engine and stop the vehicle
Select parts you have already replaced: Clutch Assembly by Pressure
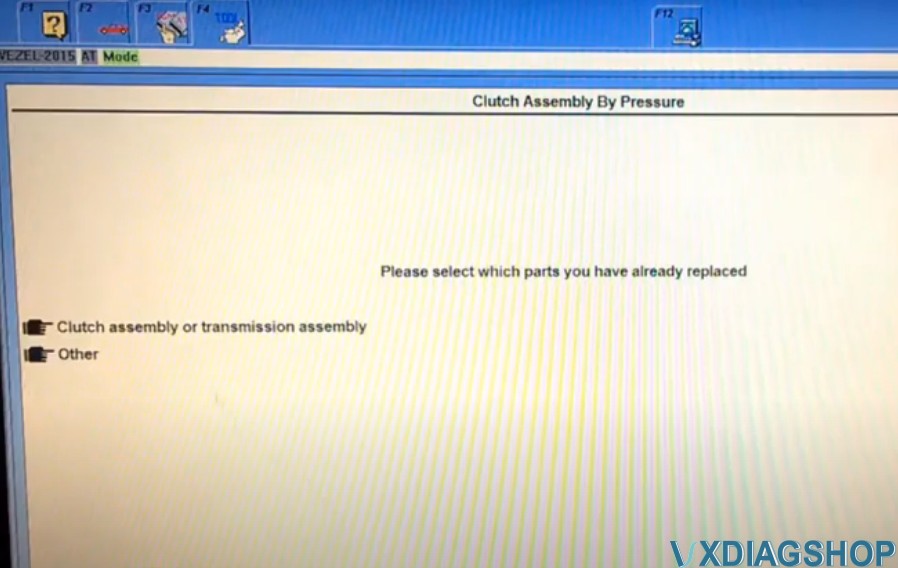
Confirm the parts has been replaced.
Turn the ignition switch off
Turn the ignition switch on
Turn the ignition switch off
Turn the ignition switch on
Turn the ignition switch off in 30sec
Turn the ignition switch on

Operation success. Detect an DTC P2788, clear the DTC.
Go to back to Adjustment Menu, select Clutch Filling Check

The test takes up to 20 minutes, connect the vehicle to a battery booster. Stop the engine and vehicle, parking brake is ON.
Turn the ignition switch off in 30sec
Turn the ignition switch on
Clutch Filling Check operation has been completed
Go to back to Adjustment Menu, select EOL Reference Search
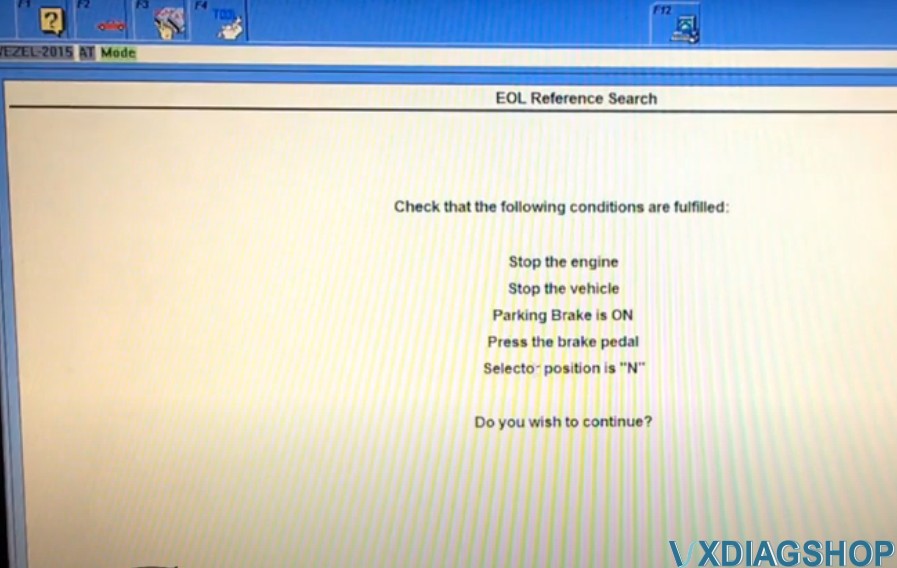
Stop the engine, stop the vehicle, the parking brake is ON, press the Brake pedal
Turn the ignition switch off in 30sec
Turn the ignition switch on
Operation success
Select EOL Learn Gear
Stop the engine, stop the vehicle, the parking brake is ON, press the Brake pedal
Turn the ignition switch off in 30sec
Turn the ignition switch on
Operation success
Select Clutch Clamp Force Characteristic

Stop the engine, stop the vehicle
Turn the ignition switch off in 30sec
Turn the ignition switch on
Operation success
Select EOL Learn Synchronizing in Sequence
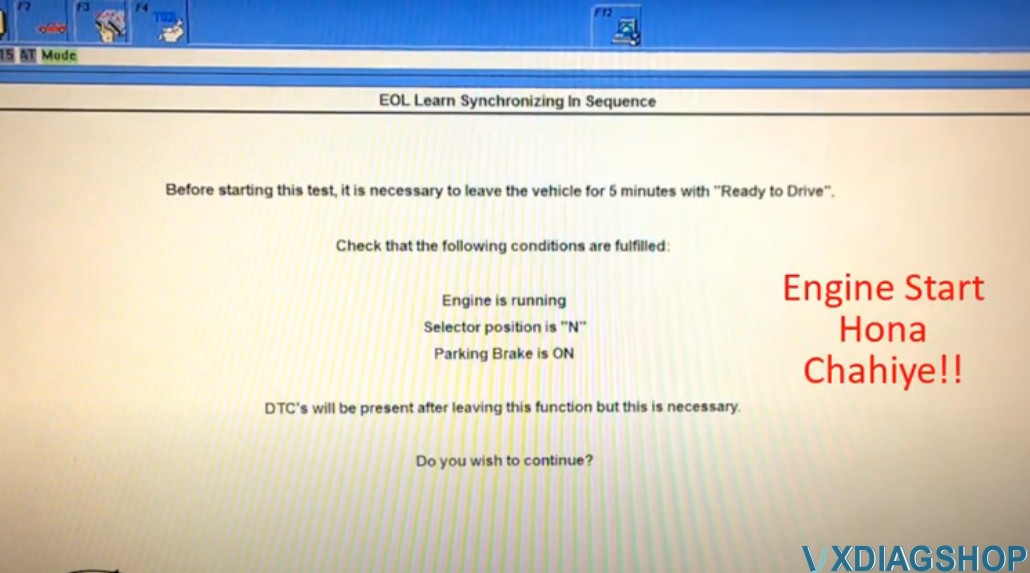
Make sure engine is running, selector position is N, parking brake is ON
Leave the vehicle for 5 minutes with engine running
The vehicle is now ready to run the test

Make sure engine is running, selector position is N, paring brake is ON, press the Brake pedal
Turn the ignition switch off in 30sec
Turn the ignition switch on
Operation success, delect DTC P287C


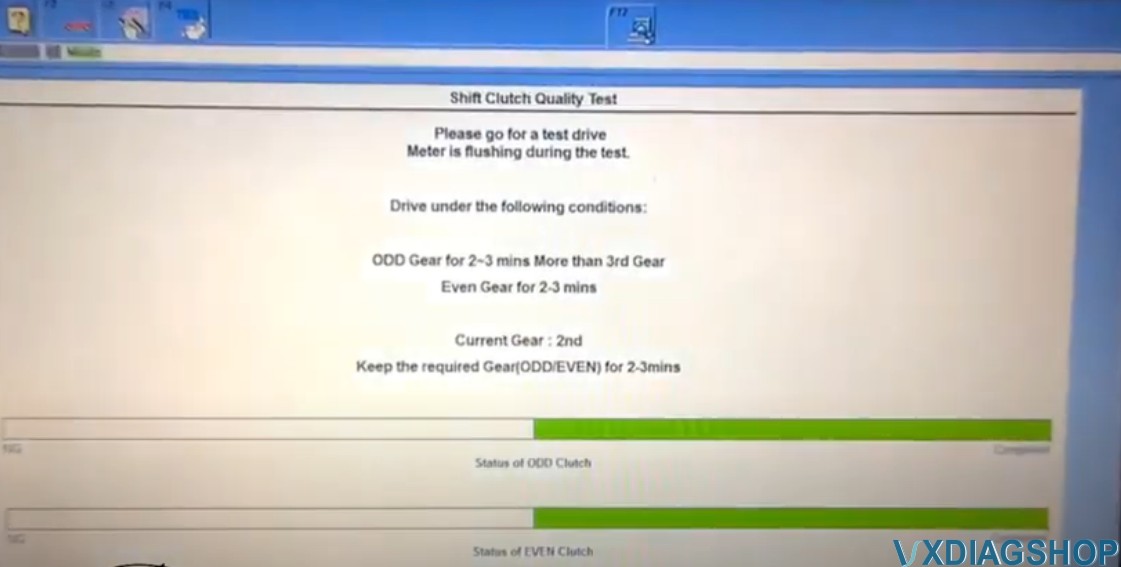
Select Shift Clutch Quality Test
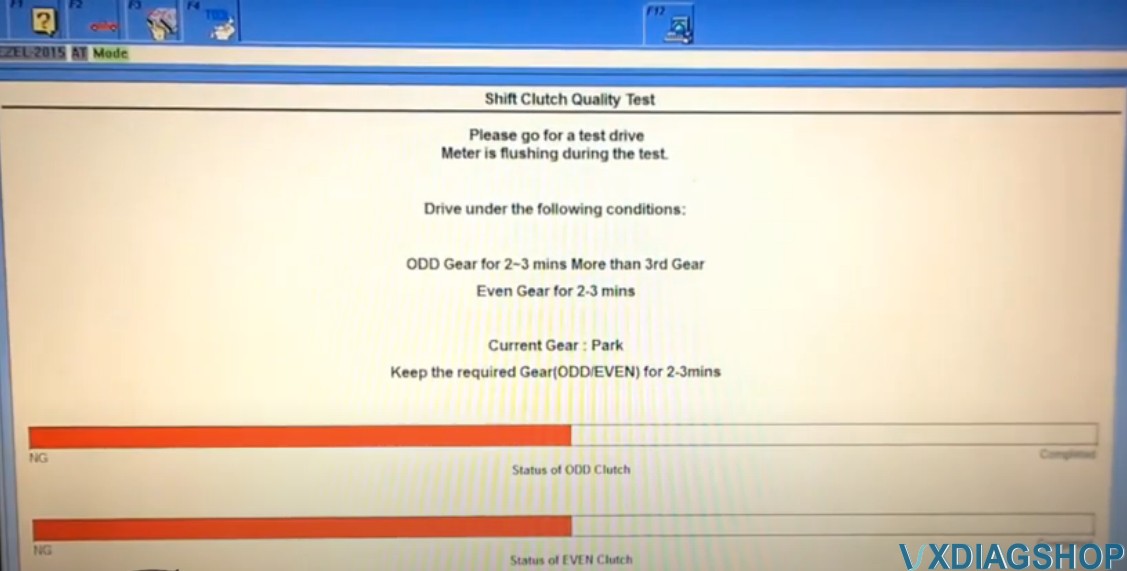
A test drive of about 10 mins is required during this process.
HDS will beep and judder will be smooth when the process is completed
Make sure engine is running.
Turn the ignition switch off in 30sec
Turn the ignition switch on
Operation success
Select Open The Refill Orifice
Stop the engine, stop the vehicle, there are no DTCs on this system, parking switch is ON.
Turn the ignition switch off in 30sec
Turn the ignition switch on
Operation success
Honda CVT DCT gear Calibration with HDS
Here is the step-by-step guide of Honda CVT DCT gear Start Clutch calibration procedure using the Honda diagnostic system HDS and VXDIAG VCX Plus device. VXDIAG HDS works well Honda, recalibrate and update modules software without any problems.
Run HDS software, complete vheicle informaton
i,e a 2015 VEZEL
Select Honda Systems – AT – Adjustment Menu – Clutch Assembly by Pressure
Stop the engine and stop the vehicle
Select parts you have already replaced: Clutch Assembly by Pressure
Confirm the parts has been replaced.
Turn the ignition switch off
Turn the ignition switch on
Turn the ignition switch off
Turn the ignition switch on
Turn the ignition switch off in 30sec
Turn the ignition switch on
Operation success. Detect an DTC P2788, clear the DTC.
Go to back to Adjustment Menu, select Clutch Filling Check
The test takes up to 20 minutes, connect the vehicle to a battery booster. Stop the engine and vehicle, parking brake is ON.
Turn the ignition switch off in 30sec
Turn the ignition switch on
Clutch Filling Check operation has been completed
Go to back to Adjustment Menu, select EOL Reference Search
Stop the engine, stop the vehicle, the parking brake is ON, press the Brake pedal
Turn the ignition switch off in 30sec
Turn the ignition switch on
Operation success
Select EOL Learn Gear
Stop the engine, stop the vehicle, the parking brake is ON, press the Brake pedal
Turn the ignition switch off in 30sec
Turn the ignition switch on
Operation success
Select Clutch Clamp Force Characteristic
Stop the engine, stop the vehicle
Turn the ignition switch off in 30sec
Turn the ignition switch on
Operation success
Select EOL Learn Synchronizing in Sequence
Make sure engine is running, selector position is N, parking brake is ON
Leave the vehicle for 5 minutes with engine running
The vehicle is now ready to run the test
Make sure engine is running, selector position is N, paring brake is ON, press the Brake pedal
Turn the ignition switch off in 30sec
Turn the ignition switch on
Operation success, delect DTC P287C
Select Shift Clutch Quality Test
A test drive of about 10 mins is required during this process.
HDS will beep and judder will be smooth when the process is completed
Make sure engine is running.
Turn the ignition switch off in 30sec
Turn the ignition switch on
Operation success
Select Open The Refill Orifice
Stop the engine, stop the vehicle, there are no DTCs on this system, parking switch is ON.
Turn the ignition switch off in 30sec
Turn the ignition switch on
Operation success