VXDIAG VCX NANO Ford IDS V126 Installation Guide
VXDIAG tutorial: how to install vxdiag vcx nano ford ids v126 (vcx se ford,vcx full ford etc) driver and software on Windows 10 operating system.
First of all, Download Ford IDS V126 and patch here
http://blog.vxdiagshop.com/2022/07/05/free-download-vxdiag-ford-mazda-ids-v126-and-patch/
OpenFordIDSfolder
RunIDS-126_01_Fullsetup
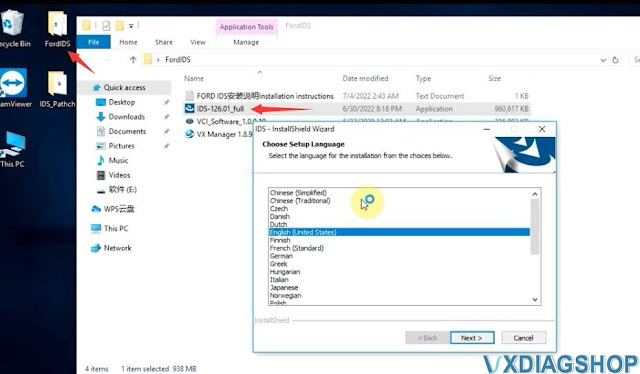
Install setup language
Press Next
Accept license agreement
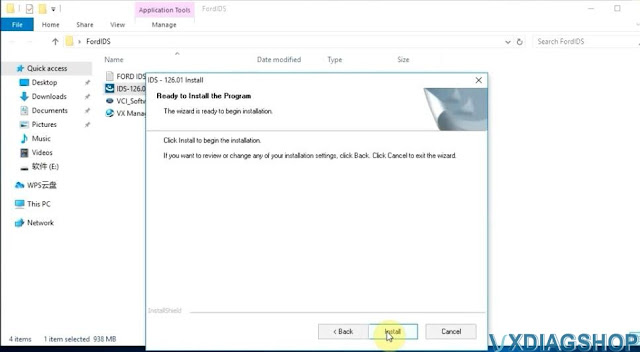
Press Install
Finish installing setup

Press Reboot
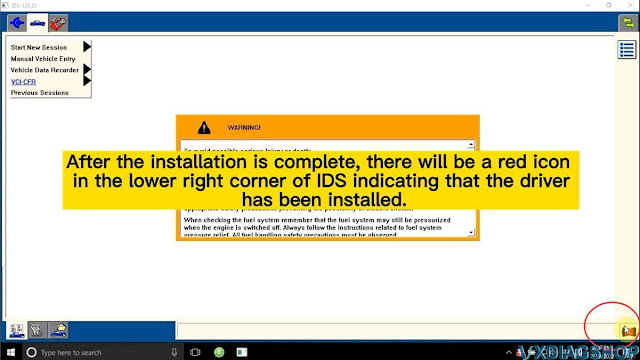
InstallVCI_Software_1.0.0.10 Ford VCI driver until finished


Open IDS Patch folder,
Copy and pasteIDS_Patchto
desktop

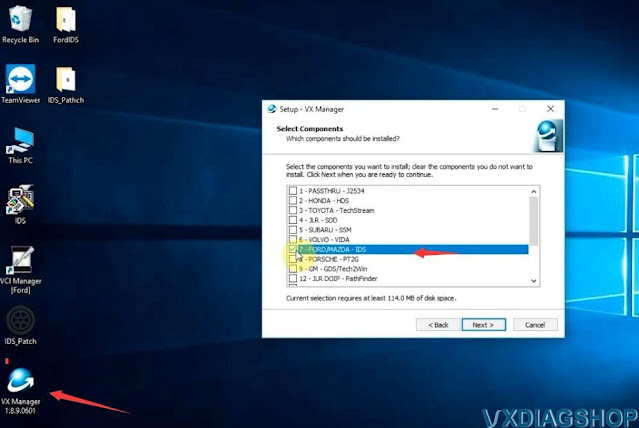
Always download and install latest version vx manager here
http://www.vxdiagshop.com/info/vxdiag-diagnostic-software-download-4048.html
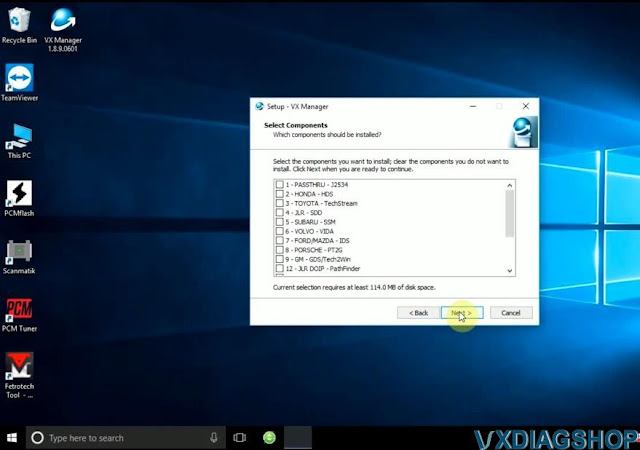
Select Ford/Mazda driver to install
connect vcx nano or vcx se with laptop
vx manager detects device
information

Update firmware and license to the latest version

Before running IDS, make sure the Ford IDS device driver has been installed
Run IDS from IDS_Patch on desktop
Select dealer type: Non-dealer, dealer
code: 00000 and your country

IDS software is ready to use
NOTE: Don't install Ford and Mazda IDS on the same PC. Mazda IDS does not require VCI driver.
http://blog.vxdiagshop.com/2022/07/20/install-vxdiag-ford-v126-driver-software/
VXDIAG Techstream addresses 2004 Land Cruiser VSC issues
2004 Land Cruiser. Recently had a lift done. Brake Malfunction, VSC off, and VSC track lights are illuminated.
Finnaly got the problem solved after reading this
Got mine vxdiag vcx nano toyota usb cable and Techstream software Ver. 16 installed on a Win7 32bit laptop.
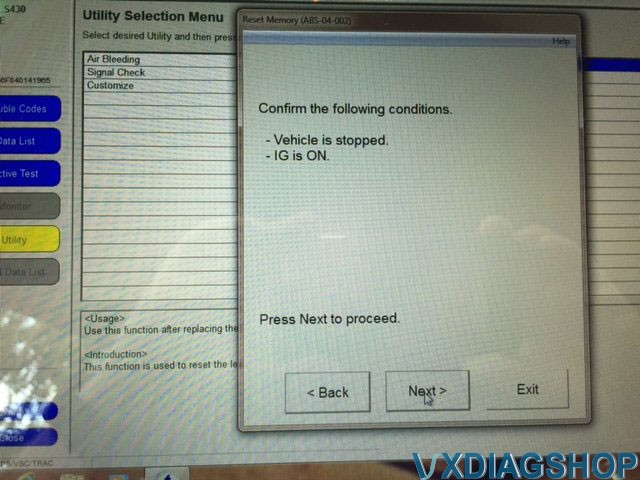
Resolution with Techstream

Click Utility

Click reset memory

Click next

Click next
VXDIAG Vauxhall Tech2Win 182 Bin File
The Tech2win is for older cars from about 1992 on the North American side up to 2008, for the Vauxhall we use a little bit later so it will be about 1996 or 1998 up until 2012 up to the Insignia platform then they started moving over GDS2.
Vxdiag vcx nano gm tech2win does not work on Saab nor Opel. VCX nano does not with Saab properly even with bin files, it does not work well with the mdi very well either. It requires a lot of BUS protocol that MDI cannot emulate. It does work on Opel/Vauxhall with proper bin files.
Vauxhall 182 is the latest and most stable version as it is known to all. 137 is good sometimes.
VCX NANO does not have Opel Tech2win bin files. You need to find yourself.
For example:
Opel Tech2Win PCMCIA V182 Spanish:
https://drive.google.com/file/d/0B_C4k-_wPmotM3lFYXRSV09WODQ/view
Password:mhhauto.com
Tech2win 32MB PCMCIA Card V182.000 English:
Part 1: https://mega.nz/#!QPYU2B5J!JvOBKyrB1bqpXuUXC8gJU8_HCAAtc3PTLwHMRGWkPz4
Part 2: https://mega.nz/#!MKIREarI!qjW5E_DD0n1UjwAYGkZyythcWj5U3qqYTDWKYmz5c7k
Password: mhhauto
*You are at your risk. We don’t take the responsibility for the damage.
Test Vauxhall 182 with vxdiag tech2win:
Connect vcx nano gm interface with laptop
Run vx manager, you can see it is connected and it is showing its serial number

Do a quick device test, update the license and firmware to the latest
version
Now we go configuration of the Tech2win
and you have numbers of
different rom files which give you different access to different
vehicles
even though this is the Vauxhall platform can be used

We click Vauxhall 182 you will get a TECH2WIN Screen pop-up
you select the
top one MDI-USB
if it is black means vcx nano is not connected
Connect vcx
nano via USB
and it comes to the screen here TECH2


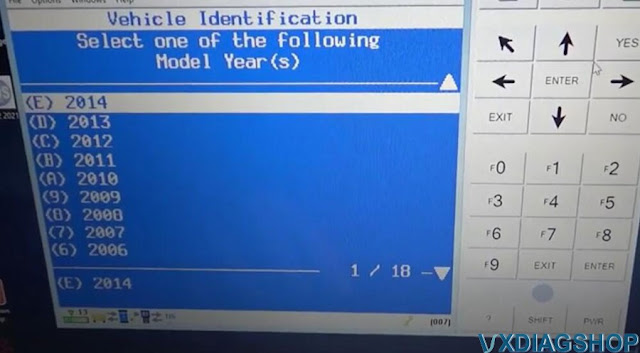

Now select vehicle, model and function you need to perform.
http://blog.vxdiagshop.com/2022/07/19/free-download-opel-vauxhall-tech2win-182-bin-file-for-vxdiag/
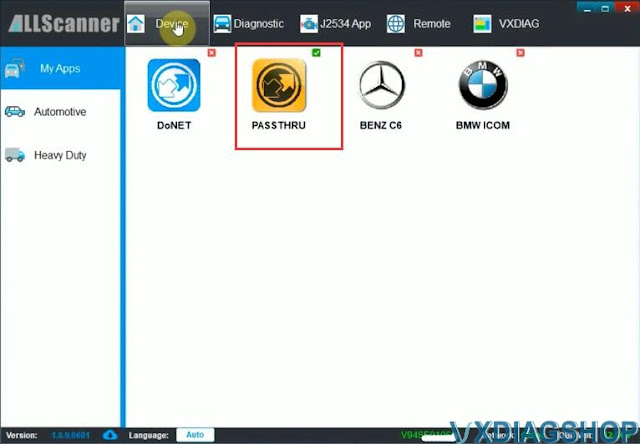
How to use VXDIAG VCX SE with PCMFlash?
PCMflash software has been tested working fine with vxdiag vcx se j2534 passthru. One of our customers has tested it with the ktm bench dongle.
Vxdiagshop.com engineer has tested it working with the new pcmtuner dongle containing pcmflash with 67 modules. You can use any vcx se interfaces. If don’t need software license, go for the vxdiag vcx se hardware unit only.
How to set up vxdiag vcx se with pcmflash?
Download VX Manager 1.8.9 on vxdiagshop.com Download area or vxdiag.net
Install vx manager setup
Press Next

Finish installing setup.
Connect vcx se with PC with USB
Run VX Manager from the desktop
Go to Diagnostic tab, install Passthru driver


Check device status
Update firmware and license if it is not the latest version

We have read Mitsubishi Outlander 2006-2012 EVOX ECU 1860A867 E6T70484 ecu successfully with vcx se pcmflash
Connect vxdiag vcx se j2534 with ecu thru godiag full protocol jumper cable follow the wiring diagram
.jpg)
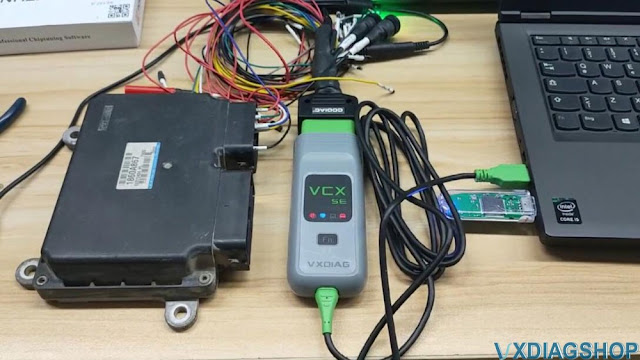

Insert pcmtuner usb dongle with pc
Run pcmflash software
Select interface as VXDIAG J2534
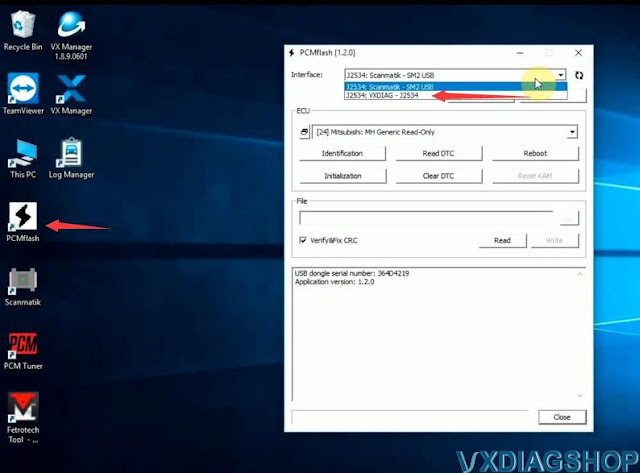
Identify and read ECU
Save ECU data


Done.
If interested in pcmtuner usb dongle and the full jumper, contact www.vxdiagshop.com customer service.
https://www.vxdiagshop.com/service/set-up-vxdiag-vcx-se-with-pcm-flash.html
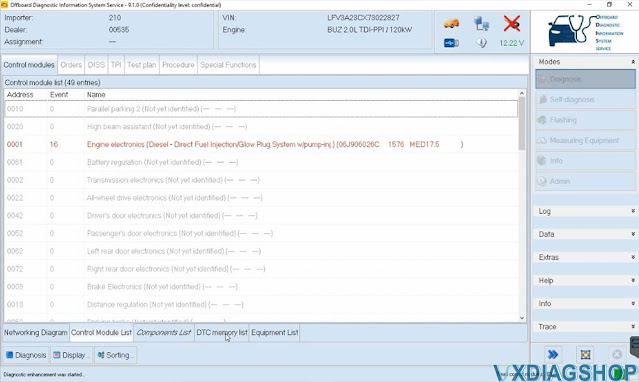
How to Install VXDIAG VCX SE 6154 ODIS 9.1.0?
VXDIAG tutorial: how to install vxdiag vcx se 6154 odis 9.1.0 + Postsetup 90100.207.230 + vx manager + 6154 driver on windows 10 operating system.
9.1.0 software can be downloaded free here
http://blog.vxdiagshop.com/2022/04/22/free-download-odis-service-9-1-0-postsetup-for-vxdiag/
Operating system: Windows 10 32bit
Multi-language: English Japanese Portuguese Romanian Korean Dutch Polish Turkish Spanish French Italian Croatian Danish German Swedish Finnish Slovenian Czech Russian Greek Chinese
Procedure:
Step 1: Install ODIS Setup
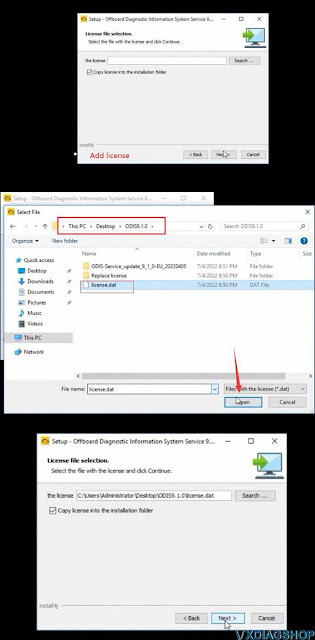
Open ODIS 9.1.0 folder
Run OffboardDiagSetup_VWMCD_9_1_0
setup
Select setup language
Install ODIS setup assisant


Target paltofrm to Standard PC/notebook
Select dagnostoc interace as
VAS 6154

Add license.dat license from C:/Users/Administrator/Desktop/ODIS9.1.0/license.dat folder
Tick Create a folder in the start menu and create shortcuts for all
users
Installing setup until finished

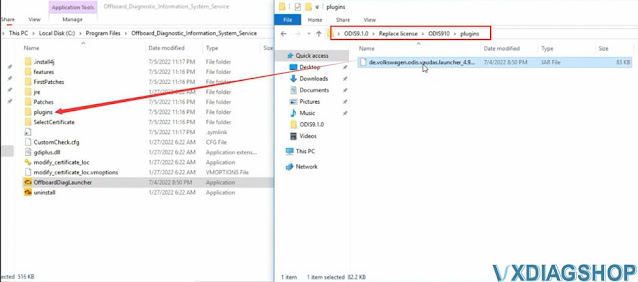
Copy and paste OffboardDiagLauncher file from
ODIS91.0/Replace license/ODIS910 folder
and replace the file
in C:/Program Files/Offboard_Diagnostic_Information_System_Service
folder

Copy and paste plugins file in ODIS91.0/Replace
license/ODIS910/plugins
and replace the file
in
C:/Program
Files/Offboard_Diagnostic_Information_System_Service/pluginsfolder

Step 2: Install PostSetup
Run Offboard Diagnostic
program on desktop
Select local directory
Upload ODIS-Service_update_9_1_0
EU folder
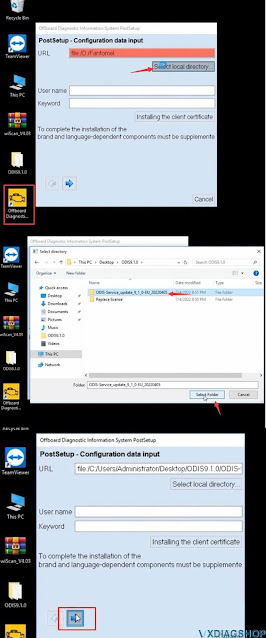
Press Next
Select PostSetup language
Download files and restart computer now


Step 3: Install VX Manager and 6154 Driver
Download VX Manager driver 1.8.9 on vxdiagshop.com download area or
vxdiag.net
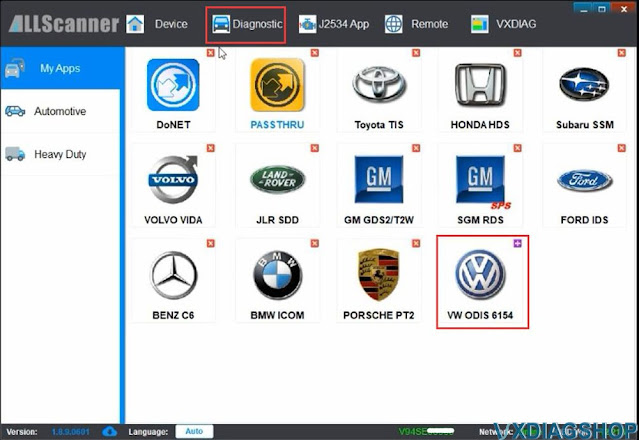
Install vx manager and select VAG ODIS 6154 program to install

connect vxdiag
vcx se 6154 interface with laptop via USB or WiFi (first installation
recommend connecting via USB)
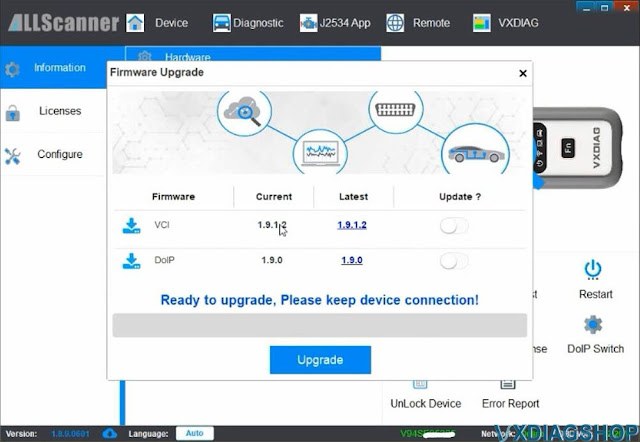
check device status, if the firmware is not the
lateast version, click “Upgrade” to update to the latest version
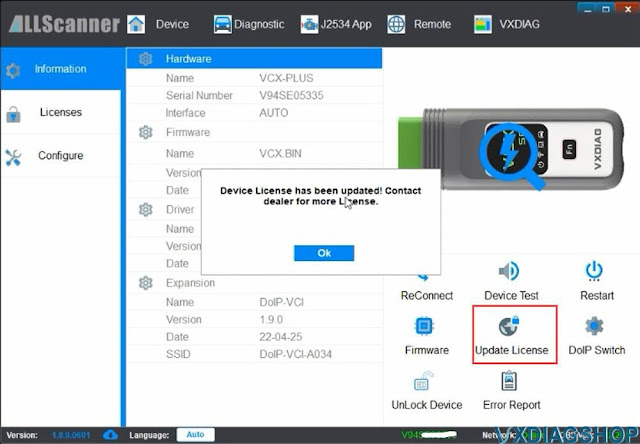
Update
license.
Make sure ODIS 6154 driver is installed
Step 4: Run ODIS 9.1.0 Software
Open Offboard Diagnostic program on desktop
software is ready to use