VXDIAG Techstream Lexus LS460 2008 Brake Bleeding Guide
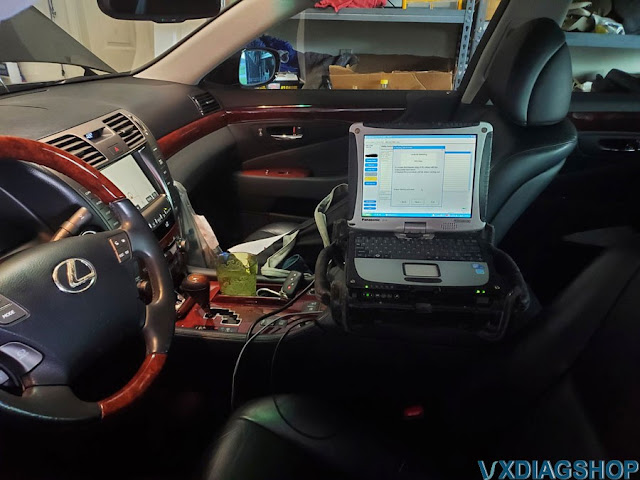
I tried several cheap Mini VCI J2534 simulated USB cables (about $25 each) on Lexus LS460. I found that they could perform some basic Techstream functions but were often unreliable (lost communication, etc.) when performing more advanced functions such as programming TPMS sensors. Eventually, I settled with a VXDiag VCX NANO Toyota Techstream connector (about $89), which performed all the advanced Techstream functions that I needed to do. So, check your VCI/OBD2 interface and make sure that it can communicate with your car reliably and consistently.
I want to share my experience with the brake bleeding on my 2008 LS460 with 82K miles. I was doing this as maintenance and to get rid of the slight "squak" noise when applying the brake. I replaced all the fluids when I bought the car and this was the latest fluid to replace.
So prior to doing this job I did a LOT of research and reviewed the manual. The manual was unusually confusing so I decided to mostly follow the DIY instructions from forums.
The basics of the DIY were as follows:
1. Zero down accumulator
2. Disable EBD
3. Bleed front right
4.
Bleed front left
4. Bleed right rear
5. Bleed left rear
6. Reset
Memory
7. Relearn Linear Offset Memory
The manual listed the following for replacing only the fluid (no parts replaced)
1. Bleed front right
2. Bleed front left
3. Bleed rear
3. Disconnect
accumulator connectors
4. Zero down
5. Disable EBD
Then while not listed you would presumably:
1. Reset memory
2. Relearn Linear Offset
BOTH of those procedures are wrong, especially IF you are just replacing the fluid. Here's my ordeal.
I used the Techstream to select ABS/VSC/TRAC -> Utility-> Brake Bleeding -> Adjust Fluid Only -> All Lines
I followed the prompts and everything worked fine. The fronts were bled using my pneumatic bleeder and the rears were bled using my wife and the accumulator to push the fluid. Everything was good and I just needed to reset the memory and linear offset.
This is where I screwed up.
I noticed both the DIYs and manual both mentioning doing a zero down of the accumulator. So I decided I would reset the memory, zero down the accumulator, disable the EBD, and relearn the linear offset in that order.
This was mistake. The result was the accumulator pressure went to 0 (.45 V) and it was unable to build pressure as the accumulator wouldn't turn on to pressurize the system. This resulted in a low pressure code (Code C1256) which caused linear offset learning to fail (Code C1345). Also as i tried to fix the issue, my battery voltage went low causing the tests to fail. I tried bleeding everything again using the "Adjust Fluid Only" and the EBD 2.0/2.5 Utilities and no fluid would come out of the rear brakes (either side). Jumping the battery and running the car for 30 minutes would see the accumulator pressure rise to 2.19 V (minimum threshold is around 2.4) and immediately go to 0 when the brake pedal was pressed. Nothing worked and I thought I damaged the accumulator or it failed during the bleed. I googled the code and tried numerous attempts to fix, which didn't help.
I tried one last attempt at repair which worked perfect. I simply used the procedure for brake bleeding from "Actuator Replaced." I followed the prompts which leads you to this procedure:
1. Bleed front right
2. Bleed front left
3. Bleed accumulator via right
rear caliper
4. Bleed rear left
5. Bleed rear right
6. Disconnect
accumulator connectors
7. Zero down accumulator, shut off ignition, turn on
ignition, let accumulator run until it stops (builds pressure).
8. Repeat #7
four more times (total of five)
9. Reconnect accumulator connectors.
10.
Reset memory
11. Relearn Linear Offset.
During step 3 it took nearly 3 full seconds for fluid to come out which means there was a TON of air. After this, all my codes cleared and everything worked PERFECT! Keep in mind that steps 3, 4, and 5 dump a LOT of fluid very fast. Because of my screw-up I ended up replacing over 75 ounces of fluid and totally flushed the entire system. Total cost was approximately $23, a few trips to the parts store (because I ran out of fluid twice while trying to solve the problem), and the cost of my time and sanity while I thought a $1500+ part had failed.
If I had just never done a zero down after my initial bleed, everything would have been fine.
Hopefully my experience can help someone who screws up like I did.
Toyota Techstream is required for brake bleeding on an LS460. Use the brake bleed utility under ABS/VSC/TRAC -> Utility-> Brake Bleeding and follow the prompts for your type of bleed exactly.
If replacing fluid only go to ABS/VSC/TRAC -> Utility-> Brake Bleeding -> Adjust Fluid Only -> All Lines
If bleeding after replacing a hard part or if you screwed up, go to ABS/VSC/TRAC -> Utility-> Brake Bleeding -> Actuator Replaced
If bleeding after replacing a sensor, go to ABS/VSC/TRAC -> Utility-> Brake Bleeding -> Stroke Sensor Replaced.
VXDIAG VCX NANO, Mini VCI or Openport for Lexus
I just finished up doing a transmission swap on my Lexus and got interested in the various OBD programmers that exist in the process.
I will be covering & researching primarily devices that cover cars I own or may work on, so this will not be comprehensive, nor is it meant to be. This post will be updated over time with new information.
Devices I have:
* Mini VCI: These are knockoffs of an Xhorse tool. Unfortunately, the original company no longer exists, as it was driven to bankruptcy by Chinese clones.
Supports: Toyota/Techstream
Tech: FT232RL or FT232RQ – same chip, different packaging. Very likely to be a clone chip.
There are several versions of the cable floating around, but there are two major distinctions:
V1.4: Most common. Does not support active tests. Can't program TPMS on newer cars. Cannot be updated. Cost: $20-50
V2.0: Supports active tests. Difficult to find. Many devices that claim to be V2.0 are actually just scams. Cost: $50-$100
Personal experience: Works OK. Sometimes drops connection for no reason. Getting the drivers to work on x64 or windows 10+ can be difficult, but there are plenty of VM images floating around that already have everything set up to go. Good enough for reading/clearing codes and diagnostics. Don't have to deal with credits or unlocks or any of that.
* VXDIAG VCX NANO Toyota Techstream: Works with both WIFI and USB so you aren't tethered to the car while working.
Supports: Different flavors for different brands, version I have is Toyota/techstream only.
Tech: STM32F4
Cost: $100 for the wifi version
Personal experience: Allscanner requires you to connect to the internet every 60 days to update your license, and always takes 3-4 tries to update before it will settle down. Once you get past that though it's smooth sailing. Wifi works well, signal is so strong I can pick it up two rooms away. USB works well too. Works with techstream perfectly. Live data, active tests, etc all work. Much faster and more reliable than my VCI cable.
Devices I am researching but have not tried:
* Mongoose: Officially supported cable for Toyota, but is $495. Clone cables do exist but I haven't looked into them. They may actually be a better solution than mini VCI cables.
* Tactrix Openport 2.0: $169. Clones exist for $20ish but will get fried if they get a firmware update. Requires replacement of some resistors on the board if you get the clone, but supposedly can be updated to the latest firmware then. Reports on compatibility are varied as they seem to be used primarily in the Subaru world, but most techstream functions should work.
VXDIAG Tech2Win GDS2 Review on Win11
VXDIAG VCX NANO GM recent reviews.
"I'm writing to you from 2022. I just set this up on a Windows 11 (!!) laptop. Be prepared to spend some time with it.
I followed the video. I had one issue. The files in the USB drive for the 2nd setup didn't quite match the video. I googled "VXDIAG Download", which took me to their website. I downloaded the latest installer, and that was it. You have to do all kinds of playing with the drivers and such to get it to work and not for the novice user.
I took off 1 star mostly because the USB cable it came with was wound so tight that it now connects/disconnects if I bump it (not that it falls out, it but my laptop loses connectivity).
I tested this on two vehicles. A 2006 Pontiac Montana SV6 and a 2000 Chevy Silverado 2500. Keep in mind that the internal menu's of a Tech II won't always have the names you are used to. For example my van was a "Pontiac APV U Body".
The commands available for newer vehicles (2006 vs 2000) are pretty cool. I specifically bought this to do ABS speed sensor testing, but it's fun to play around with. Much cheaper than a Tech 2.
Can I Use VXDIAG VCX SE 6154 with PIWIS III?
Question: Possible to set up VAS 6154 clone (VXDiag VCX Nano) or the vcx se 6154 with Porsche PIWIS3 PT3G software?
Answer:
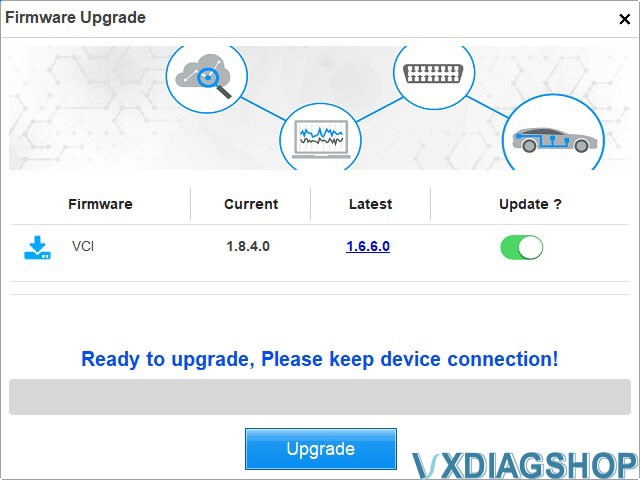
VAS6154 (VXDiag VCX Nano) OK, need downgrade
You can downgrade firmware for free with an older version vx manager (i.e from version 1.8x to 1.6). But after downgrade all licenses disappeared and you cannot work with device.
Some experts provide license installation for firmware 1.6x (downgrade vxdiag vcx nano also known as vas6154 clone to version 1.6) and software for license restore at any time (install license for work with PIWIS3 reworked for 6154 clone). You can use 6154 with any PIWIS3 installation, installing original drivers from VXmanager and can restore licenses at any time.
Before setting up. Check clone VAS 6154 firmware can be updated or not. Some clone VAS6154 firmware canot be updated.
VCX.bin firmware file for vas6154 clone if someone needed
How to downgrade the VXDIAG firmware to an old version:
1. Make a backup of your ManagerCenterC.ini file (where your prog is
installed).
2. Change one line in your original ini file
to
FirmwareURL="http://www.vxdiag.ugu.pl/xml.xml"
3. Open VX Manager and
"update" your firmware.
After positive update, make your backuped ini file as valid and try regular update.
NOTE: We are not holding the responsibility for the damage.

VXDIAG VCX SE 6154 with PIWIS3, need luck.
Some managed to do it. But not for free.
If need a vcx se with Porsche license, check
https://www.vxdiagshop.com/wholesale/vxdiag-vcx-se-pw3.html

VXDIAG and Forscan 2.4.6 Update Ford Escape 2012 PCM
Just a quick note to advise that I was able to update the PCM calibration on MY2012 Ford Escape under Forscan 2.4.6 Beta using a recently purchased VXDIAG VCX Nano Ford configured as a J2534 pass thru device. While the ECU calibration update process was relatively smooth within Forscan, the more challenging process was to configure the VCX Nano to act as a J2534 pass-thru device.
The key, as noted elsewhere on the net, is to ONLY use the VXManager package to configure the VCX Nano as a J2534 pass-through device; and not use the AllScanner version of IDS at all. VX Manager can also be used to update the firmware on the VCX Nano in case a newer version is available. Once I had configured the VCX Nano as a J2534 pass-thru device within VXManager, it was straight-forward within Forscan to select the VCX Nano as the adapter/device to be used while updating the PCM calibration. Of note is that I connected my 2amp battery maintainer to the MY12 Ford Escape to ensure consistent voltage throughout my use of Forscan 2.4.6 Beta to perform the PCM update.
You can also use the vcx nano without having to run VX Manager (i.e. Use VCX Nano straight out of the box with Forscan). Can even leave adaptor choice on auto and it finds it.
I further updated the PCM from BRG to BRJ today using Ford FJDS with VCX Nano connected to MY12 Escape. I am assuming that the absence of similar option within Forscan to update the PCM from BRG to BRJ is simply the result of the development cycle for Forscan Beta. Below is configuration of the PCM on my MY12 Escape as things stand today:
PCM – Powertrain Control Module
Part number: AL8A-12A650-BRE
Calibration level: AL8A-12A650-BRE
Strategy : AL8A-14C204-BRJ
Hardware type: BL8A-12B684-BB