VXDIAG Scanner 5 Connection Methods
Allscanner VXDIAG VCX scanners connection methods are listed below:
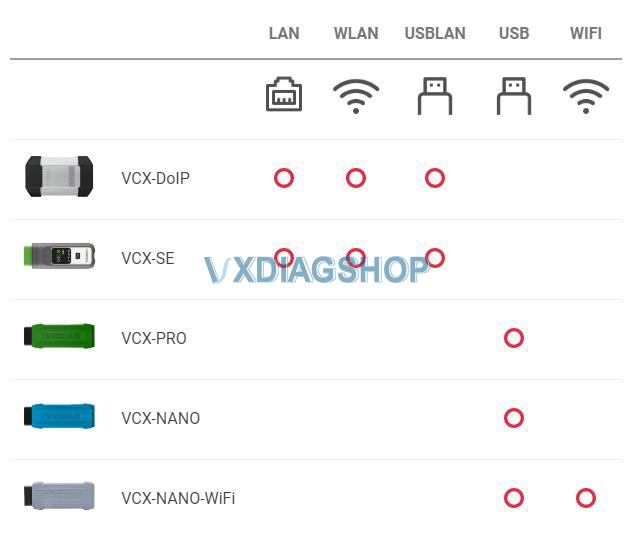
Both VCX DoIP and VCX SE supports LAN, WLAN and USB LAN Connection.
VCX Pro and VCX NANO (USB) supports USB connection.
VCX NANO WiFi supports both USB and WiFi connection.
Check guide below to connect your vxdiag diagnostic tools.
Connection:
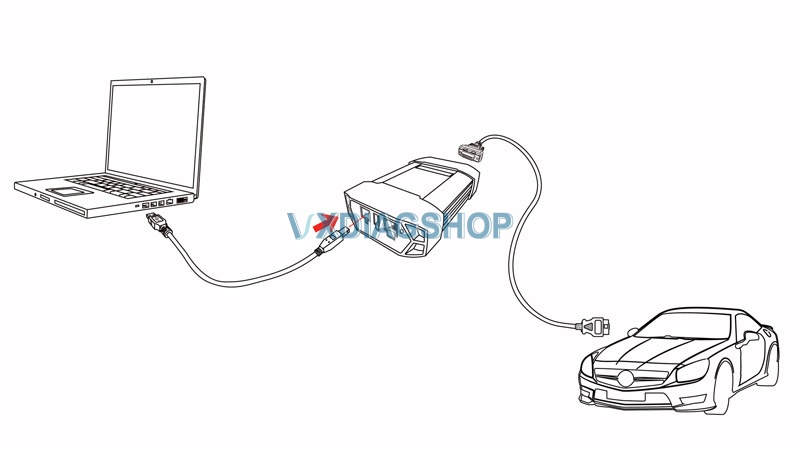
LAN Connection
Applied to: VCX-DOIP / VCX-SE
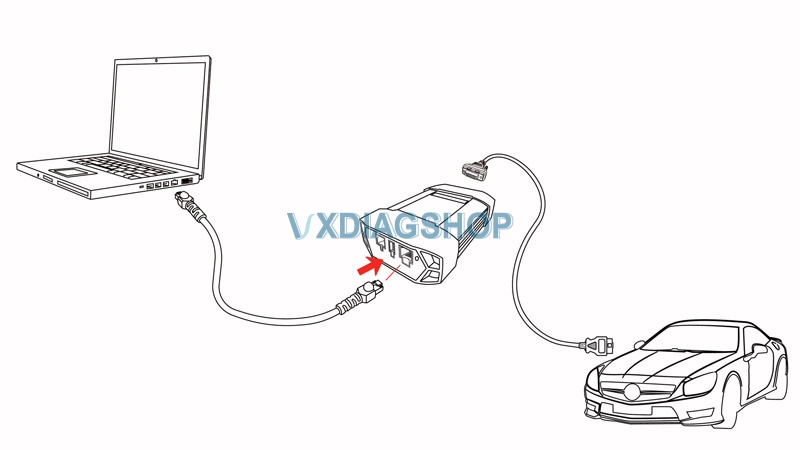
VCX-DoIP LAN Connection Diagram
VCX-SE LAN Connection Diagram
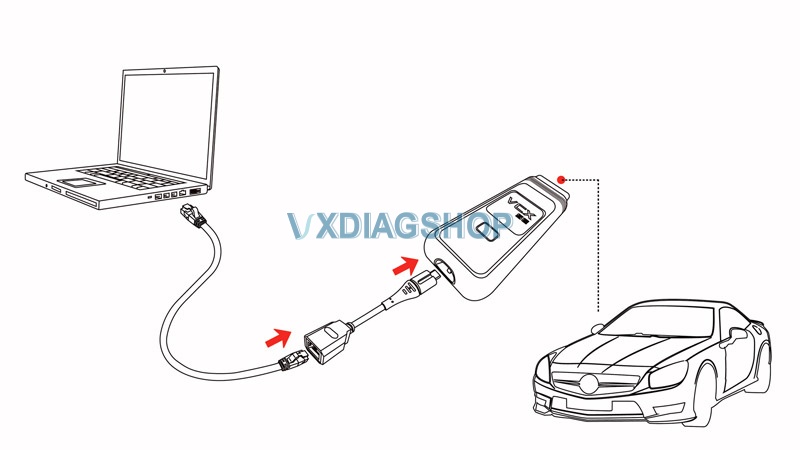
via USB Type-C to RJ45 LAN converter
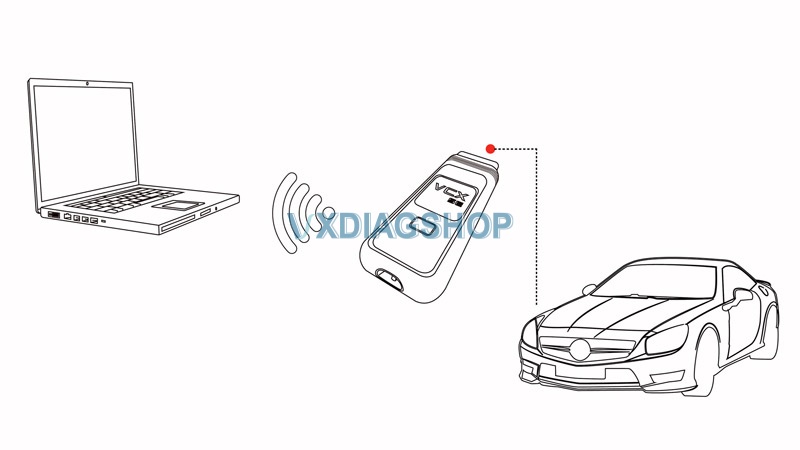
WLAN – Wireless Connection
Applied to: VCX-DOIP / VCX-SE

VCX-DOIP WLAN Connection Diagram
VCX SE WLAN Connection Diagram
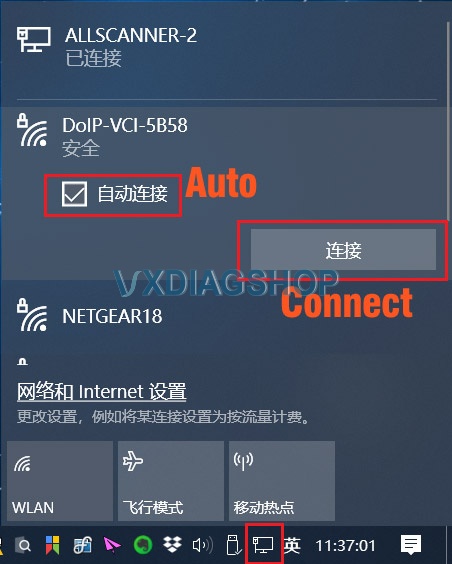
WLAN Connection Procedure:
Connect VCX with vehicle, make sure enough power supply is feed to vehicle to start engine
Search WLAN on your laptop: DoIP-VCI-XXXX,Select Auto Connection and press Connect
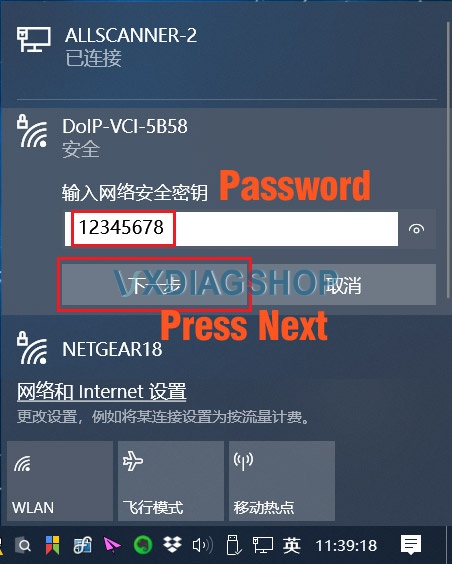
Enter WLAN password: 12345678, Press Next.
Check WLAN information after well connected.

USB LAN Connection
Applied to VCX-DOIP / VCX-SE
VCX-DoIP USBLAN Connection Diagram

VCX-SE USBLAN Connection Diagram
First Time Connection:
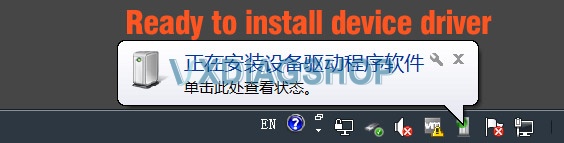
Windows will auto install device driver during the first time USBLAN installation

You will see Realtek USB FE Family Controller in Device Manager if the device driver install successfully
USB (VCX-NANO)
Applied to VCX NANO series only
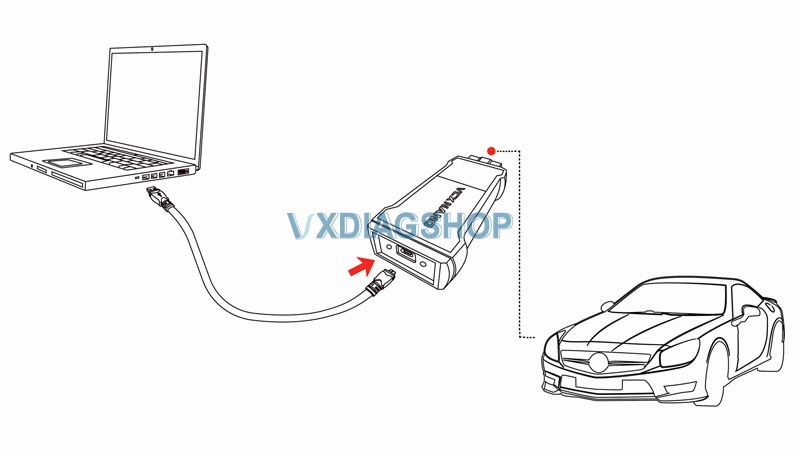
USB VCX-NANO Connection Diagram
First time installation:
Windows will auto install device driver when connecting via USB for the first time
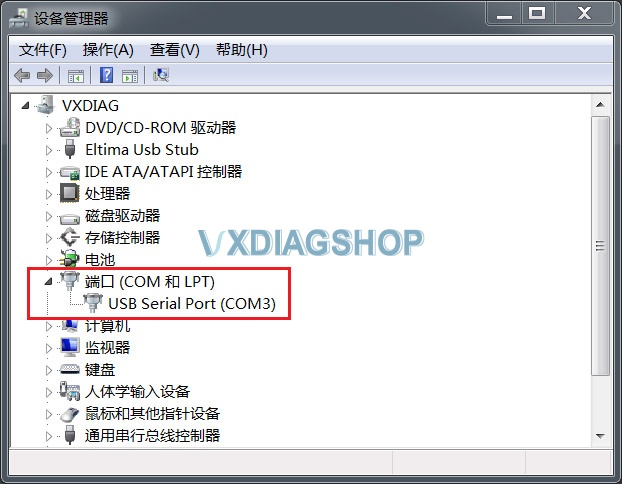
You will see USB Serial Port (COMx) in Device Manager if the device driver install successfully
WiFi (VCX-NANO)
Applied to VCX NANO series only
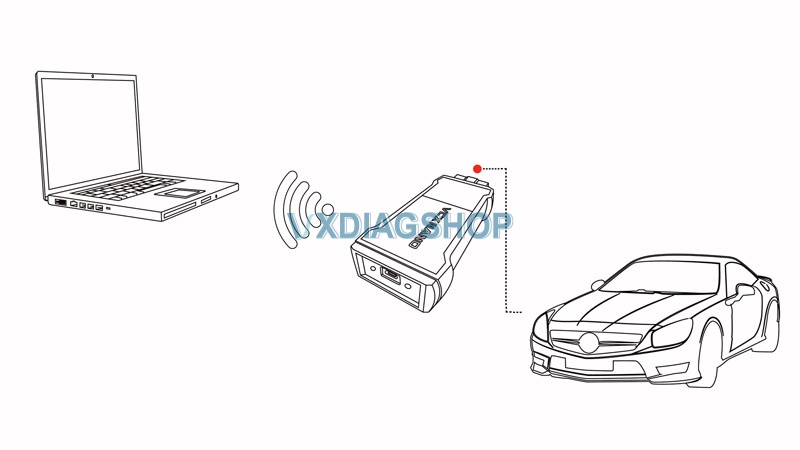
WiFi VCX-NANO Connection Diagram
WiFi Connection:
Start device normally
Search wifi: VCX-WiFi,press Connect
Connect success (Don’t need password)
Detect Device Connection
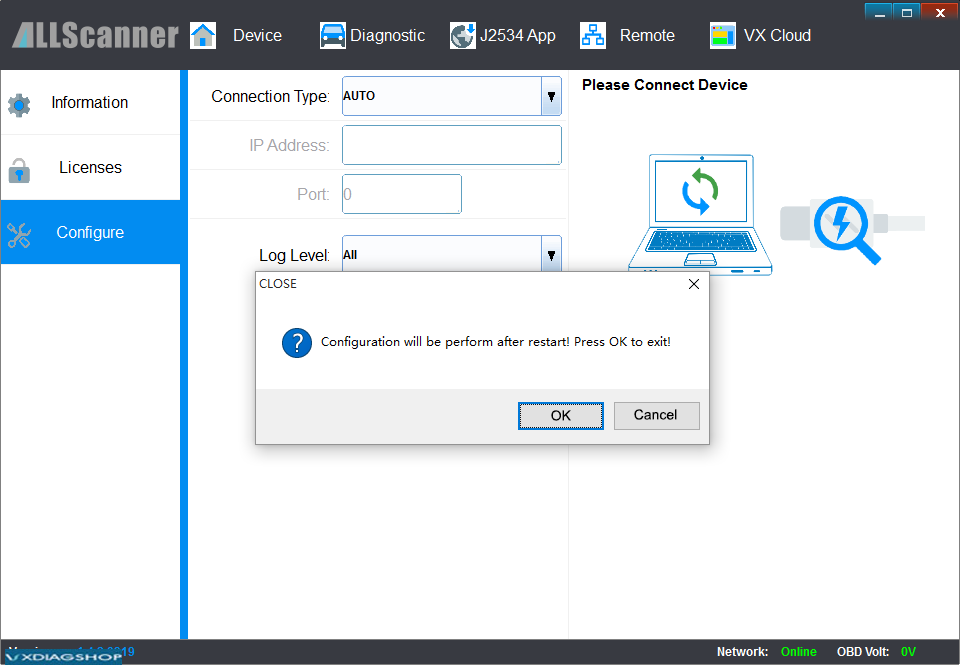
Run VX Manager, The information of device will be displayed in “Device Manager”.
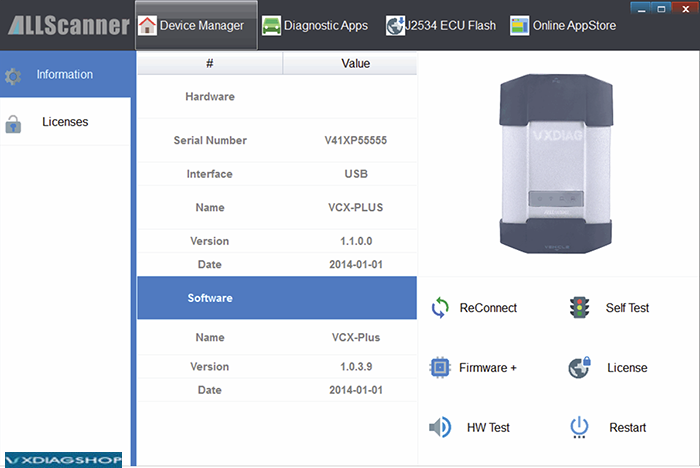
Select [Device], then click [Configure], Connection Type select [Auto], click [Save], Restart VX Manager program
https://www.vxdiagshop.com/service/vxdiag-vcx-lan-wlan-usb-lan-connection.html
How to Set up VXDIAG DoNET Remote via Wechat?
The DoNet remote diagnosis mode only requires a single client VCX device to realize multi-brand original software direct connection to remote vehicle diagnosis. This article introduces the steps of using DoNet remote diagnosis with VXdiag VCX device i.e VXDIAG VCX SE (vcx se pro, vcx se bmw, vcx se jlr, vcx se benz). Same procedure goes to vcx doip series.

If don’t have Wechat, follow DoNET setting via phone explorer directly here.
Requirements
Server
- Prepare the computer with original software.
- Confirm that the latest VXManager client software and the original diagnostic driver have been installed.
- Confirm that the computer has a stable and fast network connection (wired network connection is recommended).
Client
- Connect the VCX device to the vehicle.
- Confirm that the vehicle is powered by a stable power source.
- Confirm that the device has stable and fast network connection (wired network connection is recommended).
Steps:
- Follow the official account
Scan the QR code or open WeChat to search for ” DoNet 远程诊断平台” and follow.

Click [智能诊断] to enter the remote diagnosis platform.

- Configure user information
User information needs to be configured for the first use. Please fill in the mobile phone number to facilitate contact between you and VXDIAG engineer.


- Bind Device
The VCX device serial number needs to be bound for the first use.

- Configure Device Network
For remote diagnosis, the device needs to be connected to the Internet, and click [Configure Device Network].
Select the device network connection method and follow the on-screen guide to complete the network configuration.
There are several methods to connect:
Wired network connection
Wireless network connection
Mobile hotspot network connection

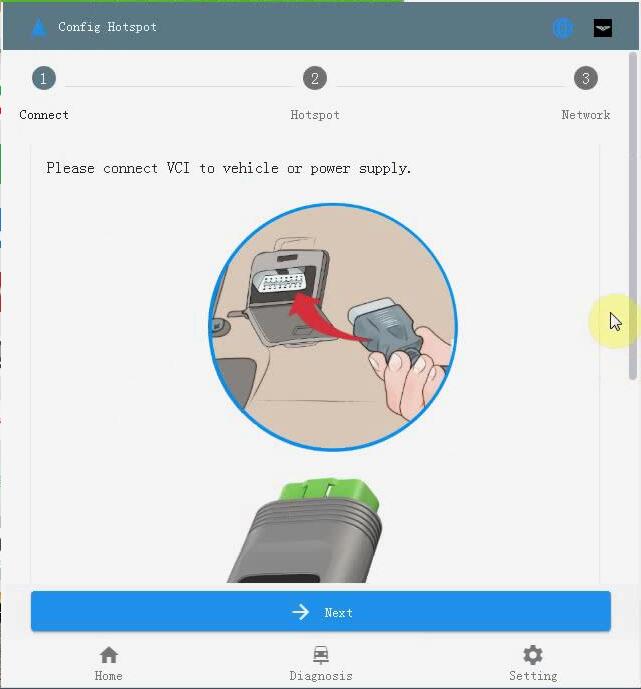
Configure Hotspot
1) Just simple click on “Next” and follow the on-screen guide to complete Hotspot configuration.
Please connect VCI to vehicle or power supply.
2) Open [Settings -Wifi -Hotspot], Turn on Hotspot and set the name and password as: DiagOnNet.

3) Press the button (Fn) for 3 seconds to enter NetConfig mode, wait about 30 seconds to hear the buzzer, then the network is successfully connected.


Configure wired network connection:
1). Make sure that the VXIDAG VCI is connected to the vehicle or the power supply and it works properly.

2). Use a USB TYPE-C to RJ-45 network port cable to connect the device, and then use a CAT-6 network cable to connect the device to the router.

3). Press the Fn button of the device for 2 seconds to enter the network configuration mode, and wait for about 30 seconds until you hear the device buzzer “beep” to complete the network configuration.

*Please ensure that the Internet connection is stable and fast, when the network speed delay is less than 100ms,it is recommended to choose the wired network first.
- Configure network connection successfully
After the device is successfully connected to the Internet, the home page will display information including the device serial number, voltage, network, and speed.
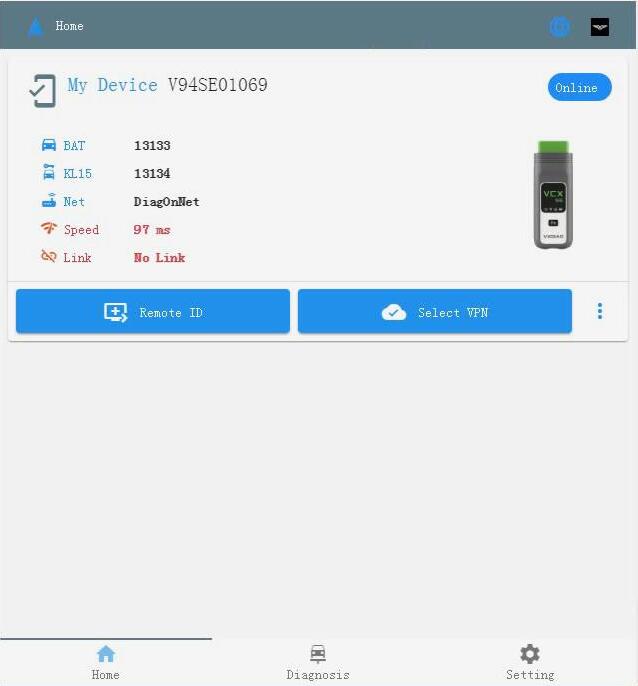
- Share [Remote ID]
Click on [Remote ID] to copy the ID and send it to the server, and wait for the server to start remote.

Next is VX Manager operation
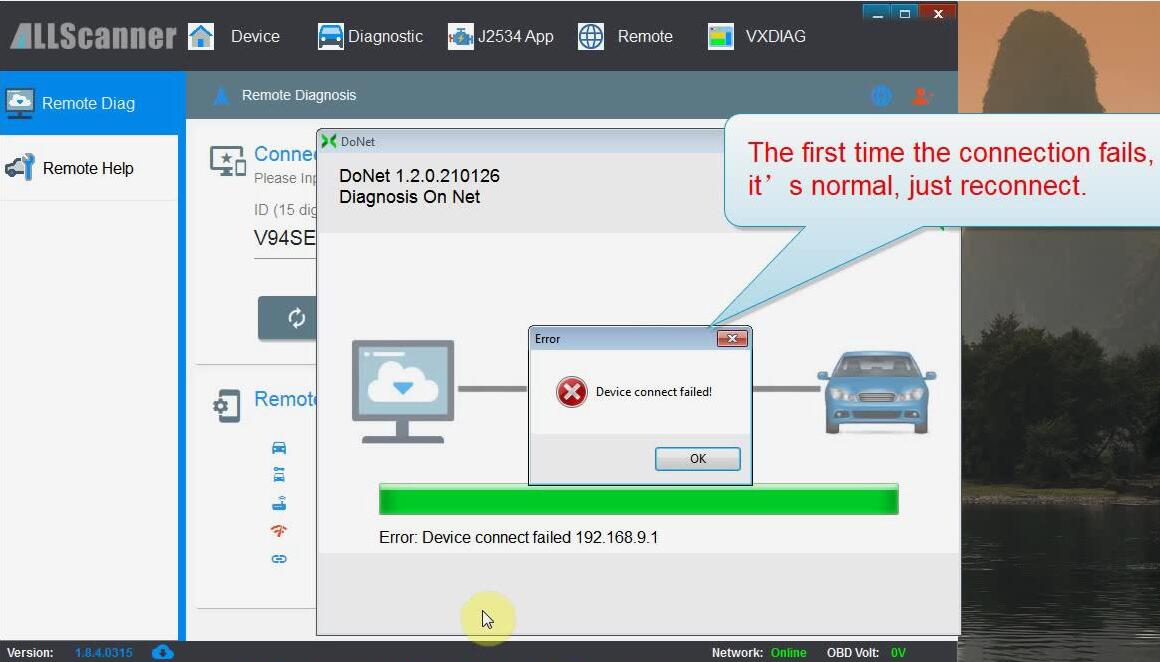
- Open the VX Manager device management software and click on “Remote”.
- View remote device information
Input the correct [Remote ID] and click [Refresh Device], you can see that the client device has been connected normally.


- Connect to the remote device
Click [Connect Device] to start to establish a remote connection.
- The remote connection is successful
After the remote connection is successful, the VX Manager software will automatically restart, and you can see that the device information has been read through the DoNET remote interface.
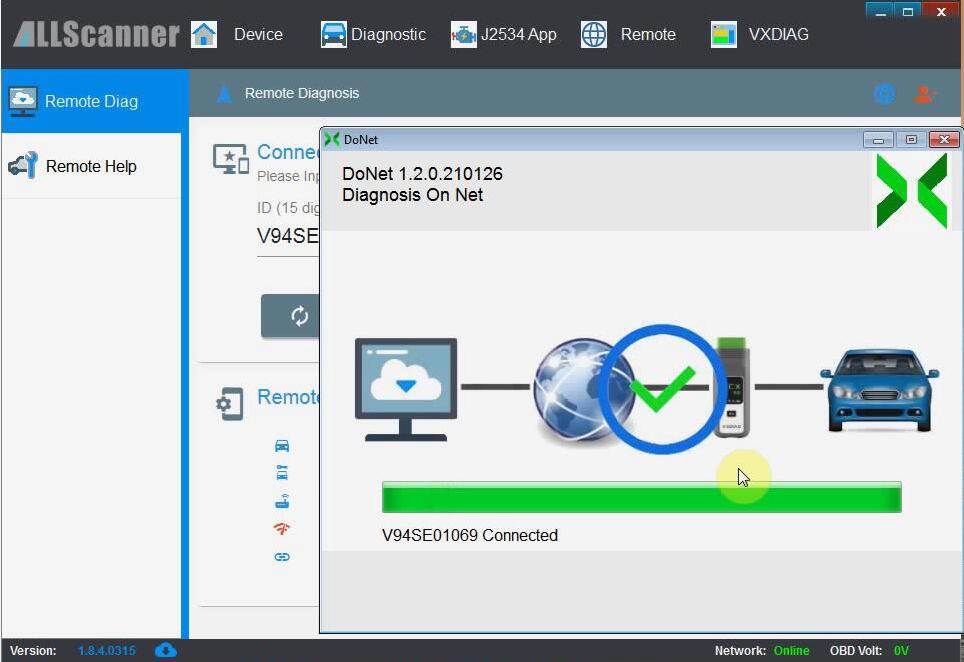

- Start remote diagnosis
After the remote connection is successful, you can use the original software for remote diagnosis, coding, programming and other operations.
After the diagnosis is completed, you need to click [Disconnect] on the [Remote Diagnosis] page to release the remote device.


Enjoy
VXDIAG VCX SE BMW ISTA-P Not Found Solution"

FAQ VXDIAG VCX SE for JLR SDD Pathfinder
Here vxdiagshop.com gathers some frequently asked questions and answers of VXDIAG VCX SE for JLR. Hope it helps.Q: Can i use original SDD and Pathfinder software with the vcx se jlr interface? Does it require patch license?
A: Yes, vcx se is compatible with original software. It does not require patch.
Q: Possible to diagnose Jaguar F.Pace of the year 2016 2.0 AWD with the vcx se jlr?
A: Yes.
Q: What's the computer requirement if i buy the vcx se jlr and hdd?
A: Newer laptop/computer with 4G or more RAM.
Q: Will the jlr vcx se program land rover key 2010 - 2019 when all keys lost?
A: Yes. But require online account.
Q: Does this do online programming?
A: Yes. But we don't provide online account. Online programming require an online account from your car manufacturer which we don't provide.
Q: We have the Panasonic Toughbook with SDD V153 and can you confirm if the vcx se jlr will work with our current SDD V153 version?
A: VCX SE JLR software comes in HDD format. You are required to remove the hard disk from your Panasonic Toughbook and install vxdiag jlr hard drive.
Q: Is it connect via WiFi or Bluetooth?
A: Vcx se JLR supports both USB and WiFi connection.
Q: Can you confirm it will do newer DoIP land rover models?
A: Yes. The vcx se supports DoIP land rover models year 2017 up.
Q: Can I add other software license to the vcx se jlr, i.e Toyota and Ford?
A: Sorry, VXDIAG VCX SE is a single license device. Not possible to add other software license. You can choose vxdiag multi tool series if want multi software license.
Q: What's the latest version of SDD and pathfinder?
A: The latest SDD software version goes to V158.06 and Pathfinder version V264 (May 2020).
Q: Possible to update SDD/pathfinder software?
A: Yes. Software can be updated. 1). Send software HDD back to update. 2) Buy a new version HDD.
Q: Possible to change JLR configuration CCF with this?
A: Yes.
Q: Can i program a new module with vcx se jlr?
A: Yes, but require an online account.
Q: Does the sdd support both online and offline programming?
A: Yes. Online programming requires an online account. Offline programming requires patch installation. Patch can be downloaded free on www.vxdiagshop.com "Download" menu.
VXDIAG VCX SE Setup File Corrupted Solution

1.Try to copy the vx manager from disk to desktop. Don't run vx manager from CD directly.
2.Download latest version vx manager and install.
http://www.vxdiag.net/managecenter/download/vxdiag_beta.zip