Does VXDIAG VCX DoIP Support Truck Software?
Question:
I plan to get the VXDIAG VCX DoIP Multi Diagnostic Tool full scanner because it allows me to scan cars. Does it support heavy-duty truck protocols like J1939?

Answer:
It works fine with regular cars and also has DOIP functionality.
VCX DoIP supports following passenger car protocols.
- ISO-13400 DoIP
- ISO-9141 K-Line
- ISO-14230 K-Line
- ISO-17987 LIN BUS
- ISO-15765 CAN
- SAE-J1850-VPW (GM Class2)
- SAE-J1850-PWM (FORD SCP)
- ISO-11898-2 DWCAN
- ISO-11898-3 DWFTCAN
- SAE-J2411 SWCAN (GMLAN)
- VAG TP16 CAN
- VAG TP20 CAN (SAE-J2819)
- VAG KW81 (SAE J2818)
- SAE-J2610 SCI (Chrysler)
- SAE-J1567 CCD BUS (Chrysler)
- SAE-J2740 GM ALDL
- SAE-J2809 HONDA DIAG-H
- NISSAN DDL UART with CLOCK
- BMW DS2
- FORD UBP
- BENZ KWFB
- BENZ MB-ISO
No possible to use this with heavy duty. They used to have a VCX for trucks. Now it is discontinued.
The VCX DoIP now only works for cars.
VXDIAG Update Benz C6 Driver 2024.06 Xentry
VXDIAG VCX DoIP and VCX SE Benz update Benz C6 driver to support 2024.06 Xentry software.
03/06/2024
Update:
Supports Xentry
Diagnosis 06/2024
How to Update:
1. First update VCI firmware to new
version V1.9.5.0
VCI Firmware V1.9.5.0
Update for Benz Xentry Diagnosis 2024.06

2. Update Benz C6 driver to 3.2.6.240522 in VX Manager

*06/2024 Xentry software will be available on www.vxdiagshop.com soon.
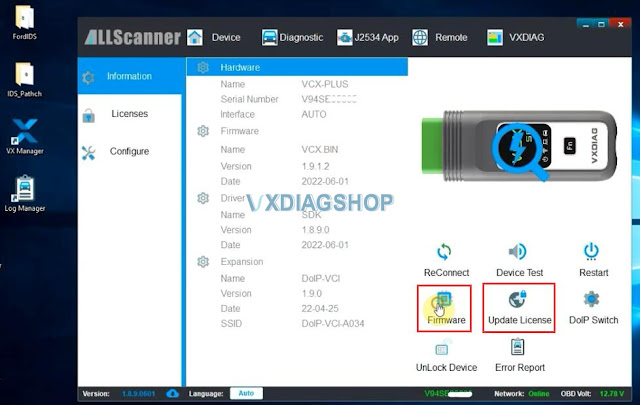
VXDIAG VCX DoIP No Device Detected in VX Manager?
Problem:
The vx manager cannot detect my vxdiag vcx plus doip vci. No device is detected and no network (offline). All indicators on the vci turn on ok.
Any idea?

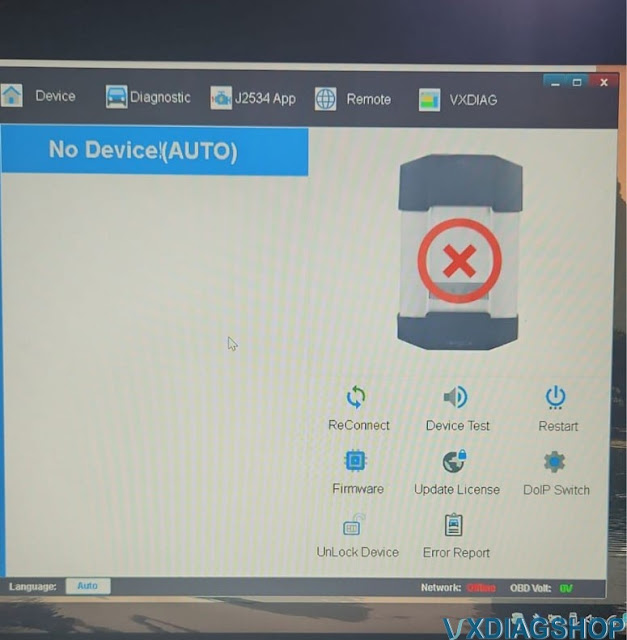
Solution:
Turn off the Windows Defender and try again.
Feedback:
I figured it out. The router had malicious website blocker turned on. Turned it off and now it works.
It ended up being a setting on my eero mesh system that blocks malicious sites. As soon as I turned it off it worked. It would work when on Ethernet because the Ethernet cable was plugged in to the provider modem and not the Ethernet.
If turn off windows defender won't work for you, try solutions below:
VXDIAG VCI Detected but VX Manager No Device (Auto) Solution
How to Set up VXDIAG VCX DoIP with Renault CLIP?
Question: How to set up vxdiag vcx doip to work with CLIP Renault software?
Step 1: Add Renault software license to your vcx doip or vcx se device.
https://www.vxdiagshop.com/wholesale/vxdiag-authorization-license-renault.html
Step 2: Download, install and activate Renault software
Free Download and Install VXDIAG VCX NANO Renault V219
Step 3: Install Renault driver in vx manager
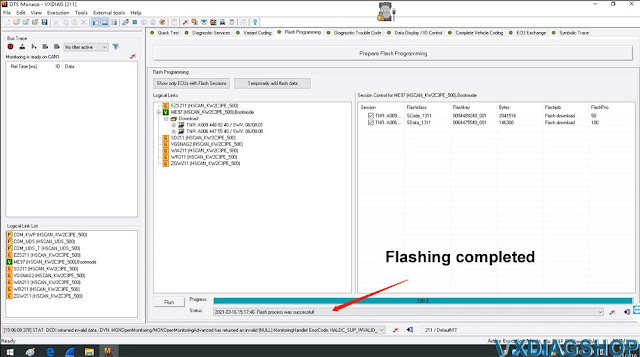
How to Flash Benz ME97 ECU with VXDIAG DTS Monaco?
VXDIAG tutorial: Mercedes Benz W211 ME97 engine ECU flash programming with VXDIAG VCX DoIP (VCX SE Benz or Benz C6 DoIP) and DTS Monaco.
1. Connect VXDIAG Benz VCI with laptop and vehicle (or engine), run VX Manager, check device status.
Update firmware and license to the latest version.
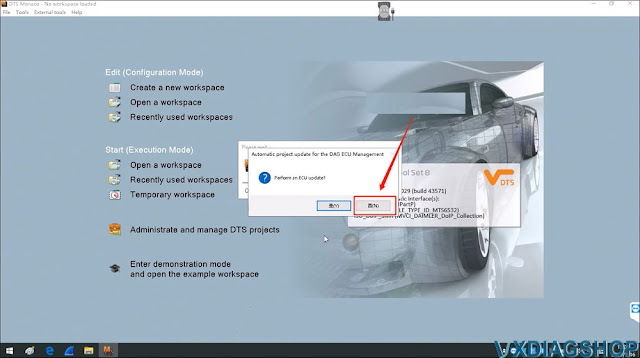
2. Run DTS Monaco software on desktop, Open a workspace
3. Select vehicle chassis and device.
If DTS ask for an upgrade, press No.

4. Click "Start" button to scan all modules
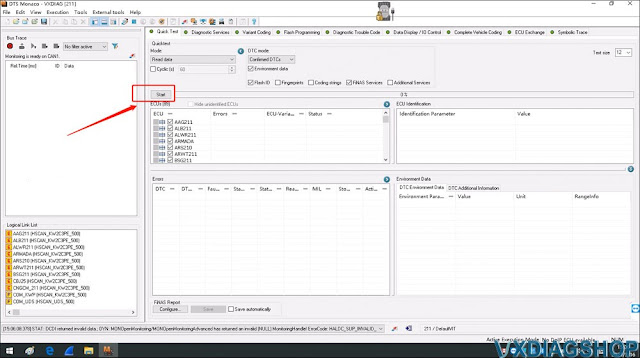
5. Select ME97 module
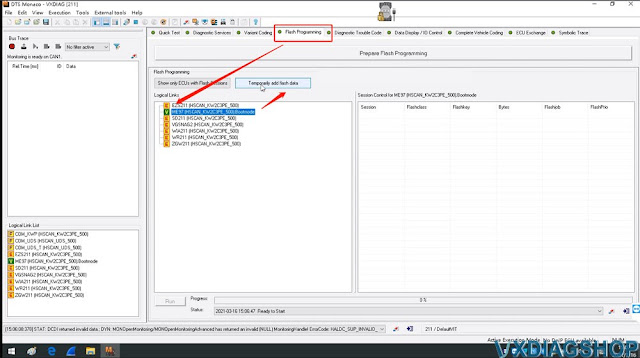
6. Select "Flash Programming"-> "ME97(HSCAN_KW2C3PE_500). Bootmode"
Then press "Temporarily add flash data"

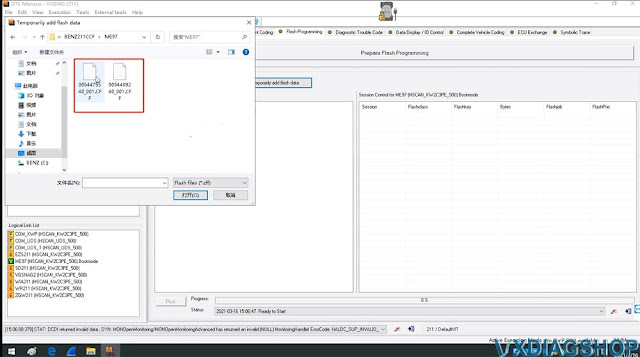
7. Then select the ME97 flash data file
(Some CFF files are included in the C:/DTSProjects folder, you need to find files yourself if not included)
8. Tick All TNR options from Session Control window
Then select "Run"
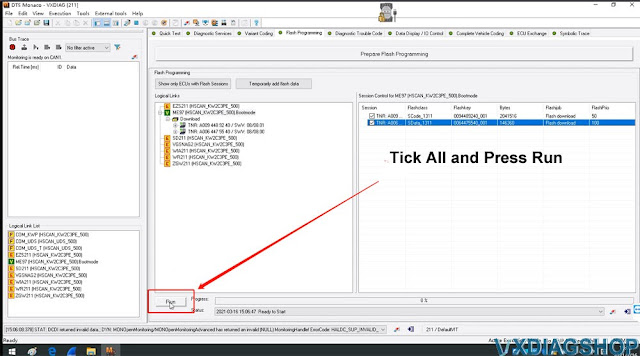
9. Programming in process. Wait until completed.

10. After the programming process completing, back to "Diagnostic Service" tag
Select "ME97(HSCAN_KW2C3PE_500)"(It have updated)
Click "Read ID", then you can get process value:
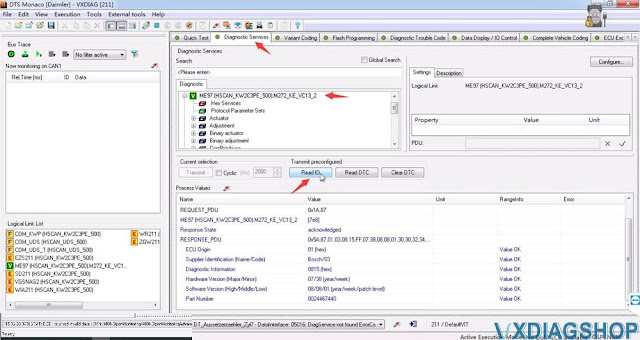
Done!