VXDIAG VCX SE 6154 and SVCI 6154 Which is Better?
VW Audi OBD2 diagnostic scanner VXDIAG VCX SE 6154 and SVCI 6154a which is better?
|
Item |
SVCI 6154a |
|
|
|
|
|
|
Software |
ODIS 8.2.0 and up |
ODIS 7.1.1 and ODIS 8.2.0 Optional ODIS 9.1.0 |
|
Car brands |
VW Audi Skoda Bentley Bugatti Lamborghini |
VW Audi Skoda Bentley Bugatti Lamborghini |
|
CAN FD protocol |
Yes |
No |
|
DoIP protocol |
Yes |
Yes |
|
KWP2000 protocol |
Yes |
Yes |
|
UDS protocol |
Yes |
Yes |
|
CAN BUS and K-line |
Yes |
Yes |
|
Compatible with original software |
Unknown |
Yes |
|
Platform/Driver |
SVCI 6154 Device Manager |
VX Manager |
|
Connection |
WiFi, LAN, USB |
WiFi, USB, WLAN, Type C to USB |
|
Remote diagnosis |
Yes |
Yes, Donet license for free |
|
Compatible with ODIS 8.2.0 and above |
Yes |
Yes |
|
Compatible with ODIS Engineer V14 and above |
Yes |
Yes |
|
Support online functions |
Yes, with online account |
Yes, with online account |
|
Firmware update |
Yes, OTA firmware update |
Yes, update online |
|
Software update |
By link |
By link or HDD |
|
J2534 passthru |
Not tested |
Yes, can be used as j2534 passthru for other OEM programs |
|
License |
No, single brand |
Allow to add multi software license to the device, Benz, BMW, Porsche, GM, Ford, Honda, Toyota, Subaru, Volvo etc |
|
Price: |
$169 |
$166 |
In sum:
The advantage of the VXDIAG VCX SE 6154A is it can be configured for BMW, Mercedes, GM and multi brands and can be used as j2534 passthru for multi OEM software. VXDIAG support is better and it supports latest ODIS 9.1.0.
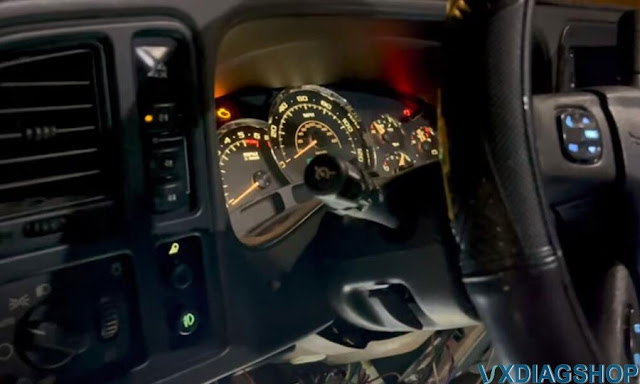
Escalade GMT800 TPMS Programming by VXDIAG VCX SE
Review: 2003-2006 Cadillac Escalade GMT800 /Silverado – TPMS Programming with VXDIAG VCX SE Tech2win software.
Now we have a vxdiag vcx se scan tool that I purchased from vxdiagshop and that allows me to connect
to this truck- a Cadillac Escalade GMT800.
It's a j2534 communication device
that allows me to utilize factory scan tool software to connect to vehicles and
talk to them for pennies on the dollar compared to what dealerships
charge.
It's pretty simple. You buy the device, install the gm drivers and
then download and install the tech2win software. It's a piece of cake and they
outline how to do it step by step when you buy the device. Another part of the
install is a passenger door module with forward slash tpms which you will read
on the sticker on the back of each one that has it out of a gmt 800
escalade.

Now the Escalade has to have an up-level radio. So with that being said you have the pdm out of an escalade gmt 800 and the tire pressure monitoring sensors either sitting in your hand or on a workbench or installed in the tires.
i'd recommend them getting them installed in the tires and how you want to do that is up to you.
What i'm going to show you right now is the programming step to get this taken care of.
Here's the free tech2win software downloaded from vxdiagshop website. Run tech2 software, choose the North American region.
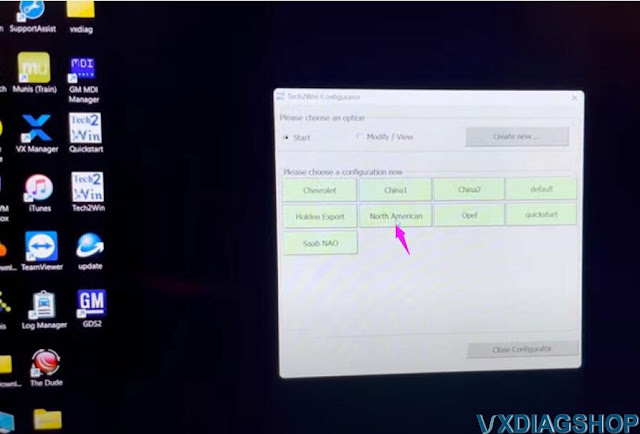
Select correct interface and go ahead.
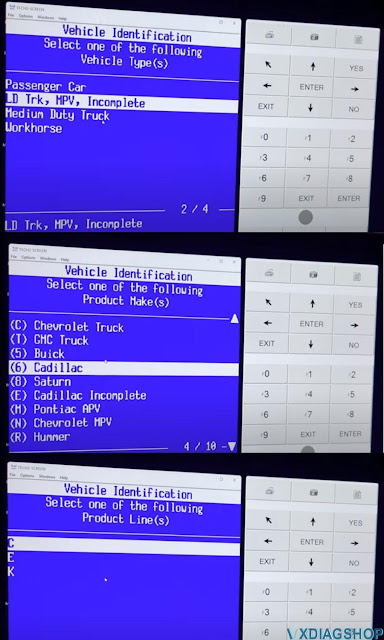
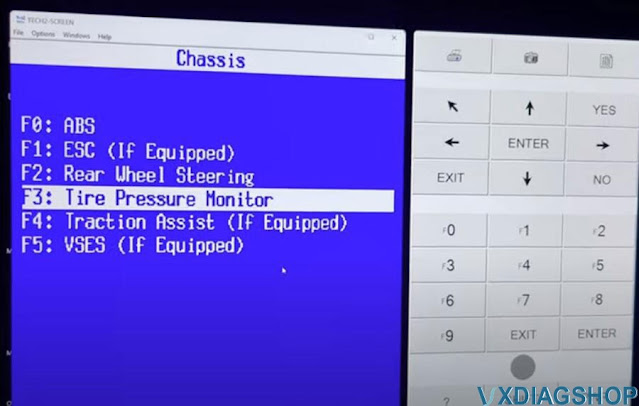
Drill into the diagnostics-> 2005->ID Truck MPV and Incomplete-> Cadillac-> C series-> F2: Chassis ->Equal to or under 8600 GVW-> Rear Disc Brakes

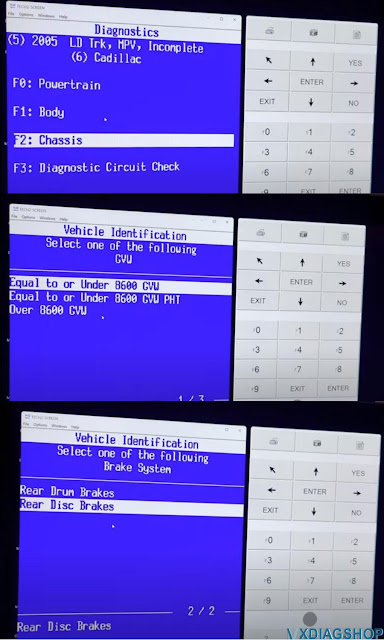

cool ABS is not illuminated
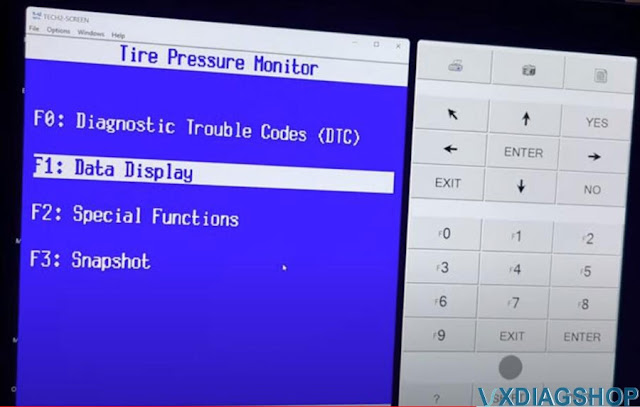
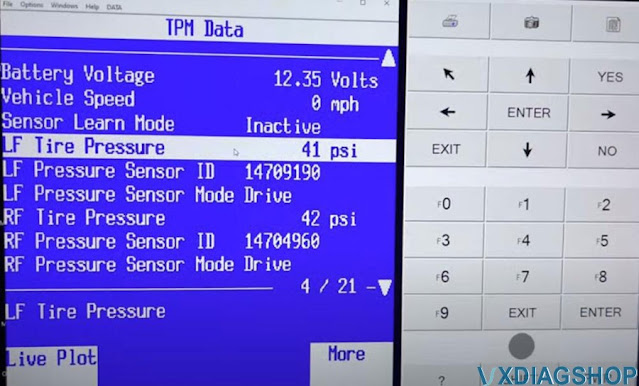
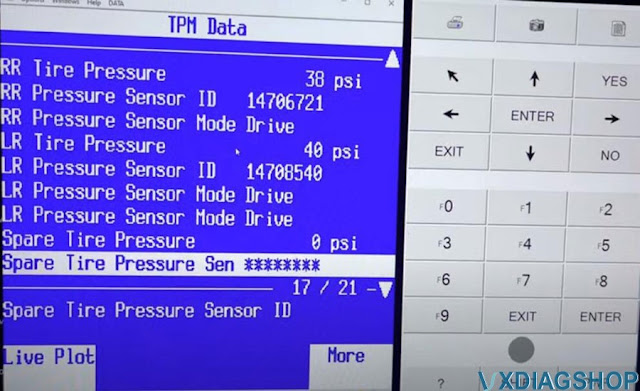
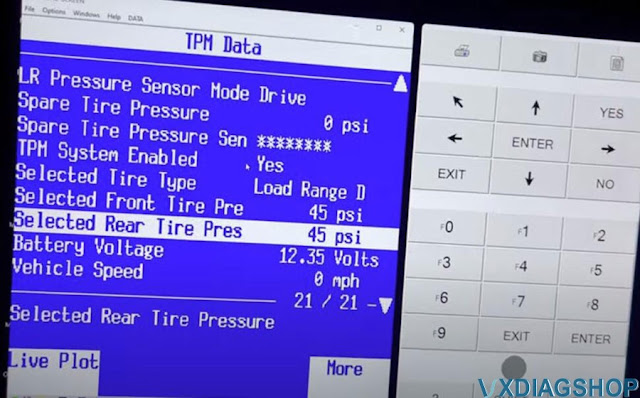
we're going to slide on down to tpms and we'll do just data display to prove it works.
a simple data display that's pulling a live feed through that passenger door module and since i don't live in europe or canada or any other country that's not america i'll switch that to miles
per hour and psi and right now you see all the all the specs 41 42 sensor id, it's currently programmed for 45 psi.
so i believe if it drops down below 10 or if it drops down 10 psi so to 35
it'll set off the tpms warning that flashes on your dtc in your gauge cluster and the light comes on and then you have the load range which you program in here.
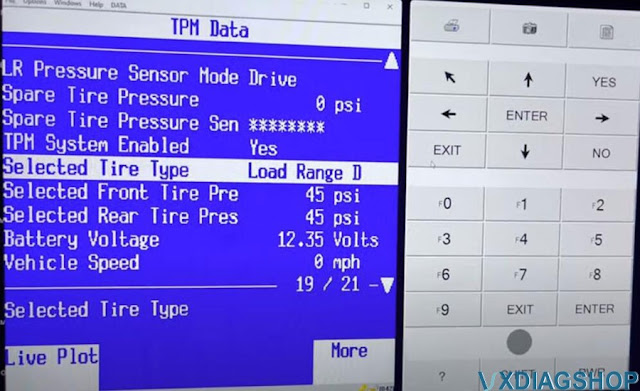
So i'm going to go back and tech2win special functions and here it is so you've got learn sensor location, type tire pressure selection so in here
you would come in here select the load range and specify the tire pressure that you would like

here's the option to enable tpms which it's a piece of cake, just come in here and click enable as long as you have that passenger door module.
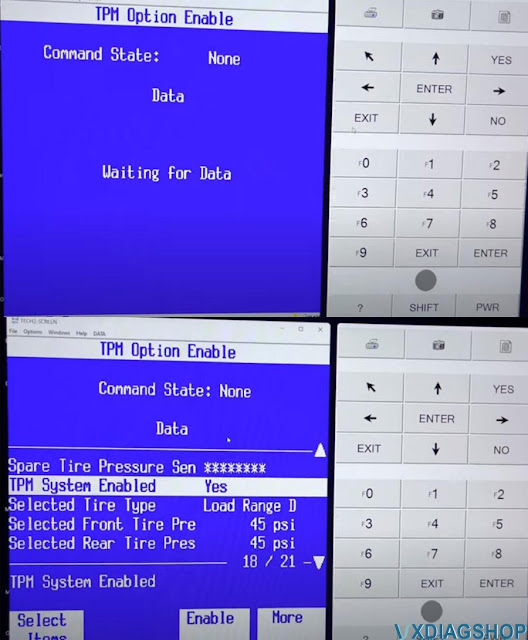
and then spare entire monitoring disable.

Enjoy.
http://blog.vxdiagshop.com/2022/08/02/escalade-gmt800-tpms-programming-by-vxdiag-vcx-se-tech2win/
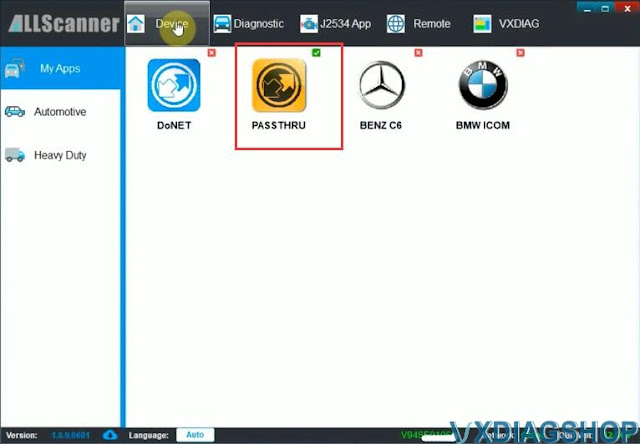
How to use VXDIAG VCX SE with PCMFlash?
PCMflash software has been tested working fine with vxdiag vcx se j2534 passthru. One of our customers has tested it with the ktm bench dongle.
Vxdiagshop.com engineer has tested it working with the new pcmtuner dongle containing pcmflash with 67 modules. You can use any vcx se interfaces. If don’t need software license, go for the vxdiag vcx se hardware unit only.
How to set up vxdiag vcx se with pcmflash?
Download VX Manager 1.8.9 on vxdiagshop.com Download area or vxdiag.net
Install vx manager setup
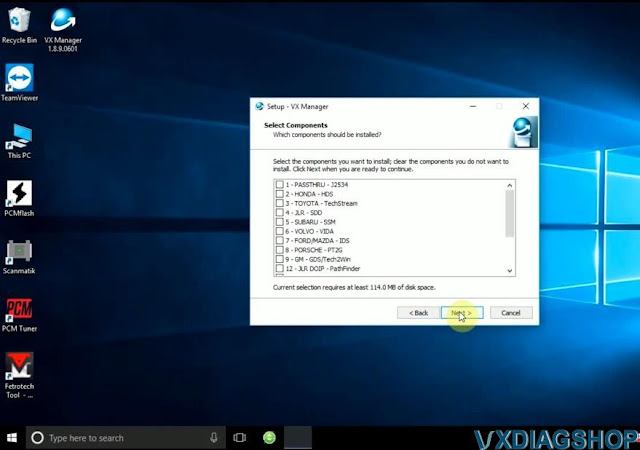
Press Next

Finish installing setup.
Connect vcx se with PC with USB
Run VX Manager from the desktop
Go to Diagnostic tab, install Passthru driver


Check device status
Update firmware and license if it is not the latest version

We have read Mitsubishi Outlander 2006-2012 EVOX ECU 1860A867 E6T70484 ecu successfully with vcx se pcmflash
Connect vxdiag vcx se j2534 with ecu thru godiag full protocol jumper cable follow the wiring diagram
.jpg)
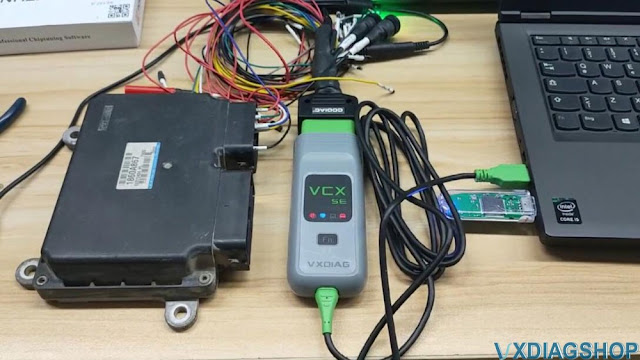

Insert pcmtuner usb dongle with pc
Run pcmflash software
Select interface as VXDIAG J2534
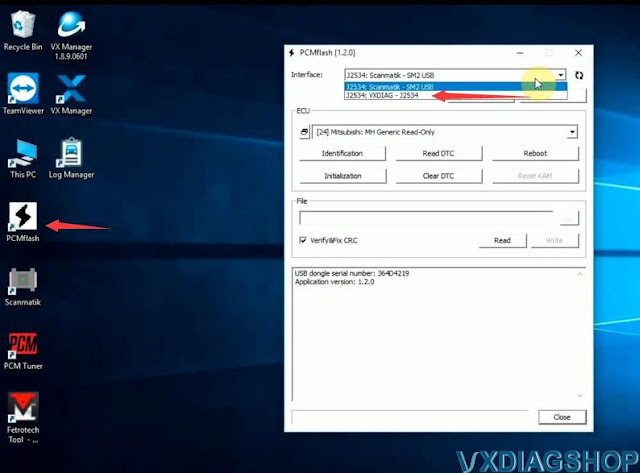
Identify and read ECU
Save ECU data


Done.
If interested in pcmtuner usb dongle and the full jumper, contact www.vxdiagshop.com customer service.
https://www.vxdiagshop.com/service/set-up-vxdiag-vcx-se-with-pcm-flash.html
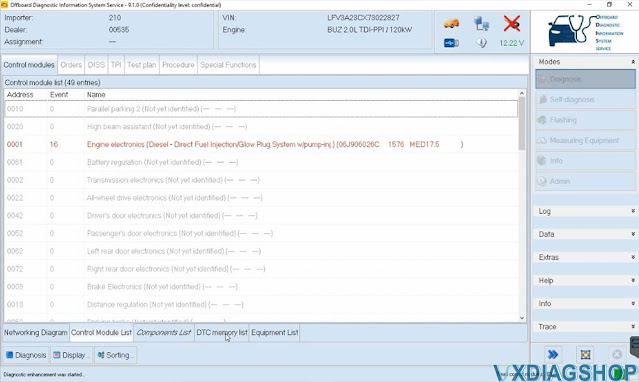
How to Install VXDIAG VCX SE 6154 ODIS 9.1.0?
VXDIAG tutorial: how to install vxdiag vcx se 6154 odis 9.1.0 + Postsetup 90100.207.230 + vx manager + 6154 driver on windows 10 operating system.
9.1.0 software can be downloaded free here
http://blog.vxdiagshop.com/2022/04/22/free-download-odis-service-9-1-0-postsetup-for-vxdiag/
Operating system: Windows 10 32bit
Multi-language: English Japanese Portuguese Romanian Korean Dutch Polish Turkish Spanish French Italian Croatian Danish German Swedish Finnish Slovenian Czech Russian Greek Chinese
Procedure:
Step 1: Install ODIS Setup
Open ODIS 9.1.0 folder
Run OffboardDiagSetup_VWMCD_9_1_0
setup
Select setup language
Install ODIS setup assisant


Target paltofrm to Standard PC/notebook
Select dagnostoc interace as
VAS 6154

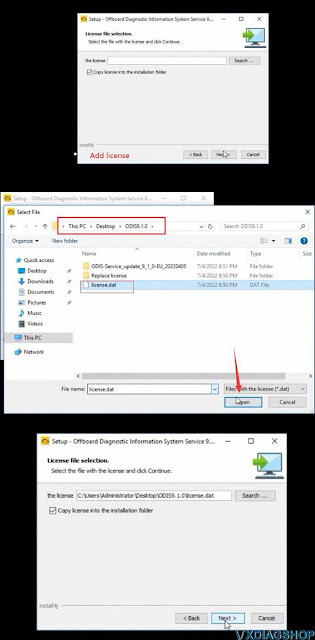
Add license.dat license from C:/Users/Administrator/Desktop/ODIS9.1.0/license.dat folder
Tick Create a folder in the start menu and create shortcuts for all
users
Installing setup until finished

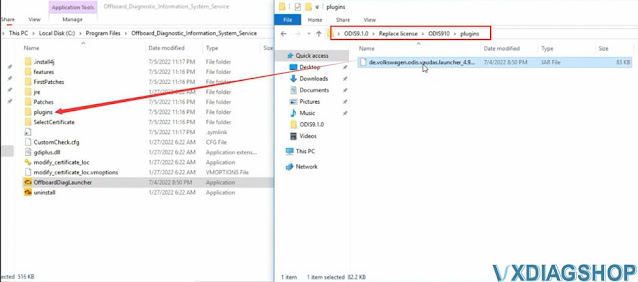
Copy and paste OffboardDiagLauncher file from
ODIS91.0/Replace license/ODIS910 folder
and replace the file
in C:/Program Files/Offboard_Diagnostic_Information_System_Service
folder

Copy and paste plugins file in ODIS91.0/Replace
license/ODIS910/plugins
and replace the file
in
C:/Program
Files/Offboard_Diagnostic_Information_System_Service/pluginsfolder

Step 2: Install PostSetup
Run Offboard Diagnostic
program on desktop
Select local directory
Upload ODIS-Service_update_9_1_0
EU folder
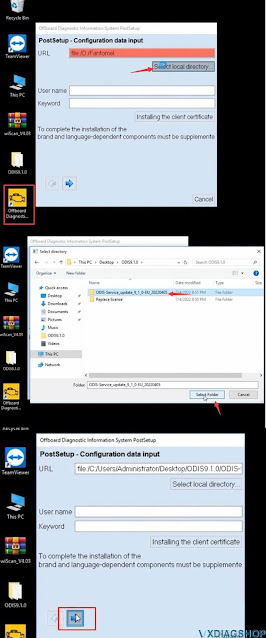
Press Next
Select PostSetup language
Download files and restart computer now


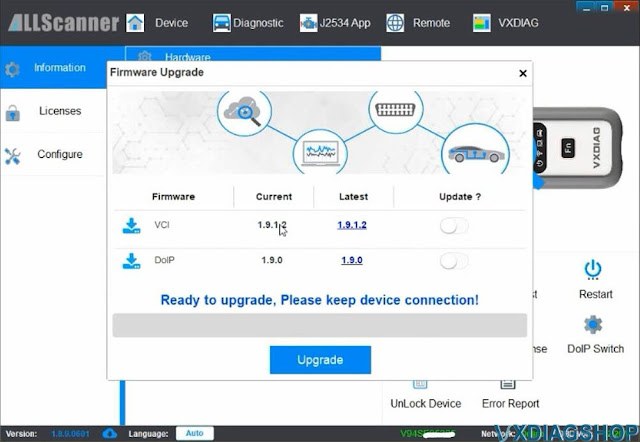
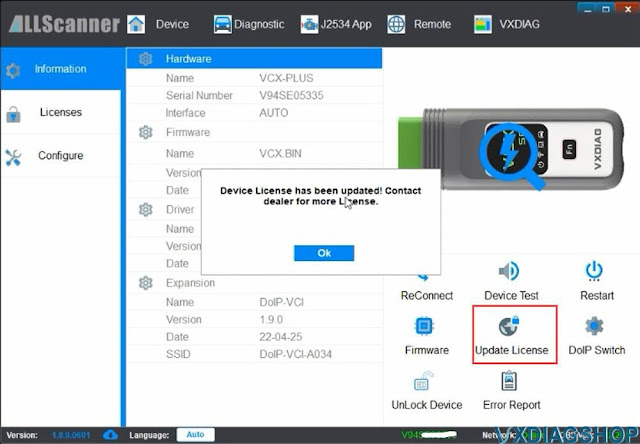
Step 3: Install VX Manager and 6154 Driver
Download VX Manager driver 1.8.9 on vxdiagshop.com download area or
vxdiag.net
Install vx manager and select VAG ODIS 6154 program to install

connect vxdiag
vcx se 6154 interface with laptop via USB or WiFi (first installation
recommend connecting via USB)
check device status, if the firmware is not the
lateast version, click “Upgrade” to update to the latest version
Update
license.
Make sure ODIS 6154 driver is installed
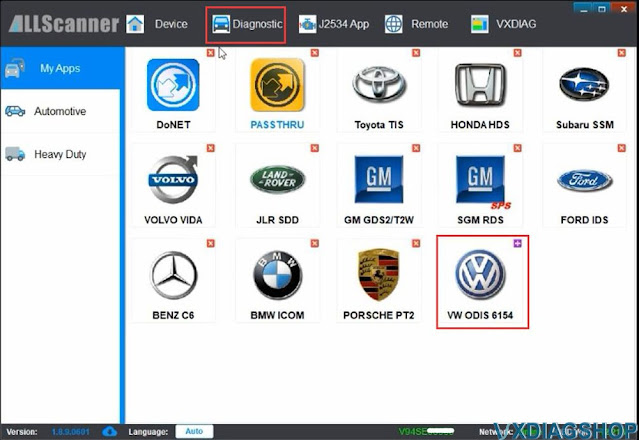
Step 4: Run ODIS 9.1.0 Software
Open Offboard Diagnostic program on desktop
software is ready to use

VXDIAG VCX SE Not Connect to Landrover CAN BUS Solution
Problem:
I was programming a Land rover Discovery 3 with vxdiag vcx se jlr SDD and noticed I was not reading any units that are on high speed can bus. Opened the vcx and found this U20 chip is broken.
No CAN BUS communication with this chip blown.


Solution:
You can search ebay for main board U20 EEPROM, then changed the interface.
It will all be ok.
Disclaimer: We are not responsible for the damage.