Cadillac ECM Programming with VXDIAG VCX NANO GM
Possible to program ECM to the Cadillacs with vxdiag vcx nano gm gds2?
Yes, you can follow the replacement guide here.
This is done thru SPS. It
should be the same as new Techline Connect.
Model example:
2005 Cadillac CTS 3.6L
Replace and Program Cadillac ECM Module:
In total it only took 30 mins.
Step 1: Make sure you disconnect the negative battery cable before starting, the bolt size is 8mm/5/16″
Step 2: Next, remove the plastic cover and you'll see the ECM towards the bottom.(Circled in picture below)

Step 3: There's a tab (Blue arrows) in the center of
the connectors that you'll need to press while lifting the metal clamps. The top
one was broken on mine so I just used a flathead screwdriver to move the tabs
(they're sticking out at the top, circled on red) down while pulling on the
connector.

Step 4: Now all that's left is to remove the bolts, the 4 on the corners (Circled in blue) are 10mm/3/8″, while the black ground wire (Circled in black) is being held by a T20 bit.
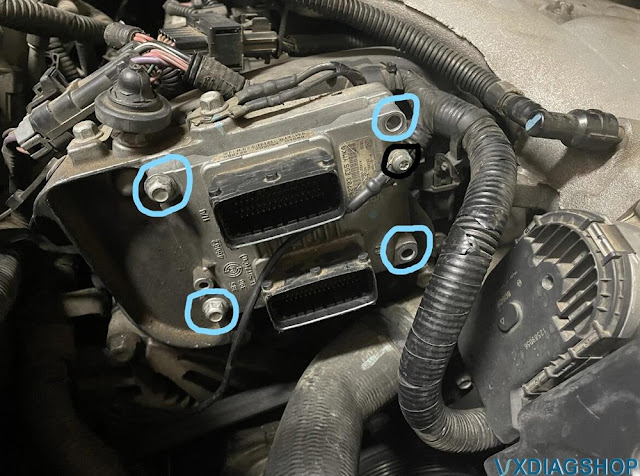
Step 5: Now just reinstall the bolts(do them first) and connectors (push the clamp/the top tab down while holding it in place) to your new ECM, and you're done being under the hood. Protip: Make sure the ground wire is facing up before screwing it in, I made that mistake and had to take it back off and turn it the right way.
New ECM installed:

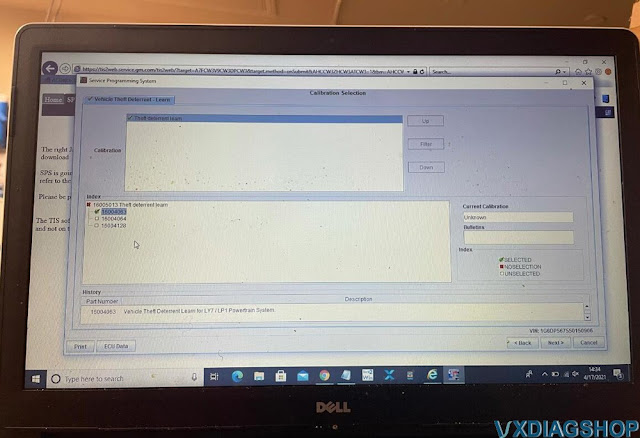
Step 6: Now here's the fun part, if your ECM is used or brand new it will have to be programmed. I bought mine from eBay that programs them to your VIN before shipping, if yours is used it can driven to a shop after performing a 30-minute key relearn. If you got one that's already programmed like me just do the relearn procedure and you're good to go.
You can also program them yourself with a device called the VXDIAG VCX Nano GM (The tool is ~$119 and the fee to access SPS is $40).
Step 7: Now just follow these steps to perform a Idle Relearn:
1. Turn OFF the ignition for 30 seconds.
2. Turn ON the ignition, with the
engine OFF for 60 seconds.
3. Turn OFF the ignition.
4. Turn ON the
ignition, with the engine OFF.
Step 8: Congrats, you're all done!
If you do end up using the Nano, it can do the key relearn in 10 minutes with this option:
How about VXDIAG VCX NANO GM use for 1997 Chevy C1500
Hard to get started but once it works it is awesome.
I was able to use this vxdiag vcx nano gm with tech2win software to read the CMP retard setting on a 1997 chevy C1500 to ensure distributor is set correctly. This eliminated the P1345 I had after replacing timing chain and re-stabbing distributor. Misfires still occurred. Used this to then read individual cylinder misfires. I then used tech2win to test individual fuel injectors of the spider assembly on this same 1997 C1500 which indicated the 2 faulty cylinders. Replaced spider assembly and no more misfires. Unable to diagnose 2 fuel injectors dumping fuel at 100% of the time otherwise. Paid for itself instantly and will be useful for any other GM, chevy, buick vehicles that I have between 1996 and 2013.
So stop reading reviews and buy it now!


Does VXDIAG VCX NANO GM support Windows 11?
Possible to set up vxdiag vcx nano gm gds2 and tech2win software on Windows 11 operating system?
Here is the test report from one of vxdiagshop.com's customers.
‘Just finished installing the VX Manager software on my new Win 11 laptop. The installation went normally and everything works as it should.
Thought you guys would want to know the software works with Win 11 Pro 64 bit.
I am pleased to report that the GDS2 software as supplied by VXDiag installs and runs ok on my laptop using Windows 11 Pro 64 bit. So far I have used the laptop and GM VCX Nano successfully with Tech2Win on my '09 Corvette Z06, and with GDS2 on my '14 Silverado LTZ.
Two observations:
The defender anti-virus supplied with Win 11 and some third party anti-virus programs do not like the VXDiag software suite. They will block the download, installation, and running of the software.Care must be taken to adjust the settings in the anti-virus software to prevent this.
The VXDiag supplied Tech2Win and GDS2 software does not have 100% functionality as the real GM software. They cannot communicate with all the car's modules at one time but can communicate with each module individually. This is the same as under Windows 10.
Thanks for the interest and support.'
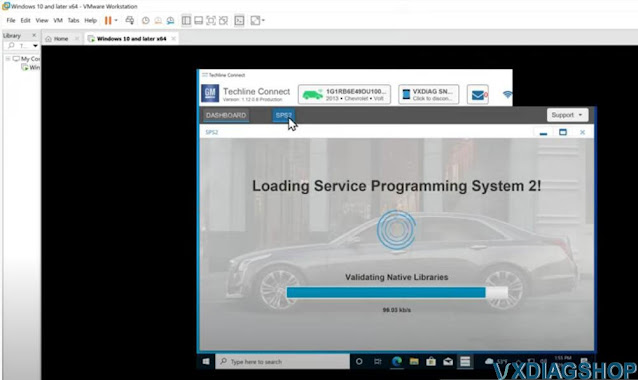
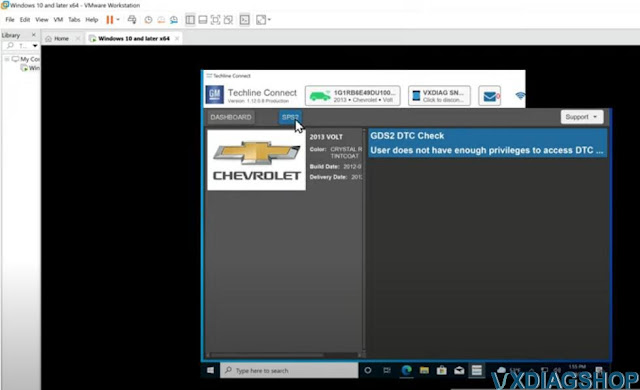
VXDIAG VCX NANO GM techline: Connect VMware setup
Vxdiagshop has revealed the secret to setting upvxdiag vcx nano gmwith Techline Connect GM SPS2 new online programming system. Here we share a virtual machine solution on this.
Related reading:Set up vxdiag vcx nano gm with Techline Connect (native machine)
NOTE:
Our method is much easier than the virtual machine solution. The approach here is not plug-and-play. Just provide another solution.
Share for educational purposes. You are at your risk.
Credit to bit1817 from GM-Volt. The originalvideohere can be used as a visual aid.
During this process, you will:
- Create a virtual machine
- Using a virtual machine will decrease the chance of errors and protect your computer from potential viruses. It also makes it easier to start from scratch with a fresh installation of Windows (if you end up needing to). However, it can be done without using a virtual machine (check our document above).
- Install and set up VX Manager
- Install and set up Techline Connect
- Use SPS2 to reprogram your vehicle using the VCX Nano
What you need before starting:
- A laptop
- An internet connection
- An active “Service Programming System (SPS2)” subscription from ACDelco TDS
- $40 per vin (24 months access)
- VXDIAG VCX Nano GM GDS2 J2534 ($120)
- OBD2 scanner
Important information and tips:
- Read the guide and watch the video to decide if this is feasible for you. You don’t need to be an expert with computers to successfully do everything but it’s definitely not “plug and play.”
- Try to follow the instructions as closely as possible.
- Do not try to follow the video without reading the step-by-step instructions. The video is just meant to be used as a visual aid.
- This might take multiple attempts. If you encounter an error, it might be easier to just restart from scratch instead of trying to troubleshoot it.
- Don’t plug the VCX Nano into your laptop or vehicle until the step says to.
- The video was created on October 29, 2021. Things may change by the time you use this guide, but it should be similar. The user will try to keep the guide updated and fix errors.
- This guide specifically addresses the “Service High Voltage Charging System” error with 1st generation Chevy Volts. However, the process should be similar with other vehicles.
The “Service High Voltage Charging System” message is a common problem on first-generation Volts. Often, the only way to fix the error is to reprogram the BECM and HPCM2 modules (even if nothing is inherently wrong with the vehicle). Before you reprogram the modules, you should see if clearing the codes fixes the issue. Also, make sure the battery coolant is not low. If clearing the codes does not permanently fix the problem, you most likely need to reprogram the modules.
- Before reprogramming, make sure the battery coolant is not low and clear any codes with an OBD2 scanner.
- He recommends buying a Chevy Volt 2011-2015 SHVCS Defeat Plug ($40) to stop the SHVCS message from triggering again. If you choose to buy it, you can install it before programming your vehicle.
- He suggests using VMware to create your virtual machine. Others have reported problems when using other virtual machine software.
- If you don’t live in the United States, you might want to use a VPN and change your location when creating your account with ACDelco TDS. The “Service Programming System (SPS2)” subscription might have better pricing and a longer access time in the USA than where you live.
VXDIAG VCX NANO Techline Connect Setup Procedure:
Step 1:Download Windows 10 Media Creation Tool and VMware Workstation (00:00)
- Search the web to find the download links or click the links below
- Edit: It might be better to use VMware Workstation 16 Player instead of VMware Workstation Pro. If you use the pro version, your access will end after your free 30-day evaluation. However, you can still use the pro version if you would like. The setup process is similar with both versions.
Step 2:Open Windows 10 Media Creation Tool and download Windows 10 ISO (00:30)
- Click on the Windows 10 Media Creation Tool file you downloaded to start the installation
- When the screen says “What do you want to do?”
- Select “Create installation media (USB flash drive, DVD, or ISO file) for another PC” and continue
- When the screen says “Choose which media to use”
- Select “ISO file” and continue
- *remember where you save this file*

Step 3:Set up VMware (01:57)
- Click on the VMware Workstation installation file you downloaded in step 1 to start the installation
Step 4:Set up a virtual machine using VMware (02:58)
- Start the VMware Workstation program
- Select “I want to try VMware Workstation 16 for 30 days” and continue
- Select “Create a New Virtual Machine” and continue
- For the “Installer disc image file,” click browse and then select the Windows 10 ISO you downloaded in step 2 and continue
- Uncheck the box that says “Power this virtual machine after creation” and continue
- Click “Edit virtual machine settings”
- Change the “Number of cores per processor” and “Memory.” This will make the virtual machine run smoother. The values you select depend on the specification of the laptop you’re using.
- I suggest setting the memory to half of what your laptop contains and setting the “number of cores per processor” equal to the number of cores your CPU has.
- My laptop has 16 GB of memory/RAM and a 6 core CPU. Therefore, I selected 8 GB of memory and 6 for the “number of cores per processor.”
Step 5:Power on the virtual machine and set up Windows (04:26)
- Select “Power on this virtual machine”
- As soon as the screen says “Press any key to boot from CD or DVD,” click the center of the screen and press any key. If you don’t do this fast enough, you’ll have to close the window and try again.
- When the screen says “Activate Windows”
- Select “I don’t have a product key” and continue
- When the screen says “Select the operating system you want to install”
- Select “Windows 10 Pro” and continue
- When the screen says “Which type of installation do you want?”
- Select “Custom: Install Windows only (advanced)” and continue
- When the screen says “How would you like to set up?”
- Select “Set up for personal use” and continue
- When the screen says “Let’s add your account”
- Select “Offline account” and continue
- When the screen says “Sign in to enjoy the full range of Microsoft apps and services”
- Select “Limited experience” and continue
- When the screen says “Choose privacy settings for your device”
- Turn off everything and continue
- When the screen says “Let Cortana help you get things done”
- Select “Not now” and continue
Step 6:Configure display settings (optional) (07:31)
- Go to system settings and find the display settings.
- Do this if you need to change the resolution or make text larger

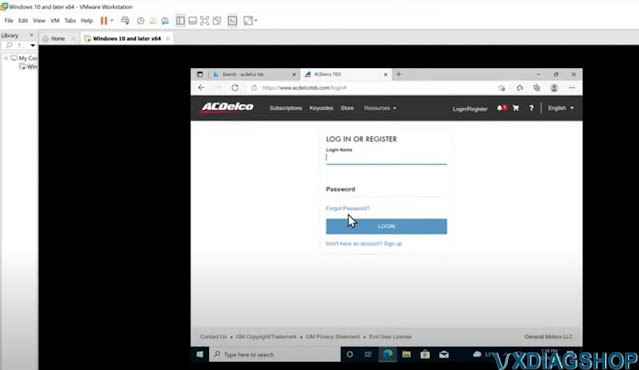
Step 7:Log in to ACDelco TDS and download Techline Connect (08:18)
- You need to have an active “Service Programming System (SPS2)” subscription from ACDelco TDS before attempting this step
- Log in to ACDelco TDS
- Click on your vehicle programming subscription and then click “Add VIN.” It will open a new webpage.
- My subscription already shows the VIN of my car because I’ve done this before. You don’t enter the VIN until step 11 or 12.
- Click “Download Techline Connect”

Step 8:Download and install VX Manager (09:43)
- Go to the VXDiag website and find the download page (or type in the link below)
- Edit: People are reporting problems with the latest version of VX Manager. However, the 1.8.4 version appears to still work. If you have this problem, the link below includes the download for the 1.8.4 version.
- Click the VX Manager Mega Link
- From the Mega webpage, click download
- The download might be flagged as dangerous or a virus. Bypass the warnings (see video) and open the file. Install the program.
- This is safe to do because you are using a virtual machine
- When the screen says “Select Components”
- Select “GM – GDS/Tech2Win” and continue
- Before clicking finish, plug your VCX Nano into your laptop
- When the screen says “New USB Device Detected”
- Select “Connect to a virtual machine,” click the virtual machine from the list, and continue
- Click finish
Step 9:Set up VX Manager (12:52)
- Click “Firmware,” toggle update, and click “Upgrade.” Close the pop-up window when it finishes.
- Click “Update License” and wait for it to finish.
- Click “Diagnostic” and then “PASSTHRU.” Click Install. When it finishes, close the window and close VX Manager.

Step 10:Install Techline Connect (14:28)
- Click on the TLCInstaller file you downloaded in step 7 and install the software
- Once you get to the login screen, close Techline Connect. It might take a few tries for the program to close.
- Go back to the TLC Admin Console web page from step 7 and click “Launch Techline Connect”
- Finish installing the software


Step 11:Prepare for vehicle programming (18:36)
- Clear the codes, if any, from your vehicle using an OBD2 scanner. I think you can do this with the software as well but I didn’t try.
- Unplug the charger from the car
- Your laptop should have a full charge before programming. However, I suggest leaving it connected to the charger, if possible.
- Put the vehicle into accessory mode
- 1st generation Chevy Volt: hold the power button for 10 seconds without pressing the brake
- Turn off the radio, interior lights, etc. You do not want the 12V battery to drain more than necessary.
- Plug the VCX Nano into the vehicle’s OBD2 port
- Click “Connect Vehicle”
- When the screen says “Please select a device type:”
- Select “VXDIAG” and continue
- Click SPS2
- At some point, you’ll get a pop-up that asks if you want to use the car’s VIN with your subscription slot. I think it comes up after you click “next” in Step 12 (around the 20:00 mark in the video). I already did this before I made the guide so the video doesn’t show it.
Step 12:Reprogram the Battery Energy Control Module (19:59)
- I did not fully complete this step in the video because I already reprogrammed my vehicle
- Click “Next”
- Select “Battery Energy Control Module” and click next
- Continue to click next until the software begins to reprogram the vehicle. Don’t do anything until it completely finishes. It might take a while. The vehicle’s instrument cluster will display warning lights during the process (this is normal).
- If your module is already up-to-date, you might get a warning about reinstalling the same calibration. It’s okay to do this. You still need to reprogram it even if it’s up-to-date.
- After it is finished, continue to step 13
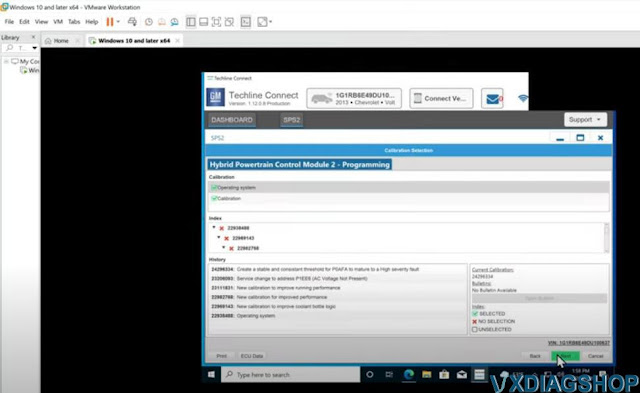
Step 13:Reprogram the Hybrid Powertrain Control Module 2 (21:27)
- I did not fully complete this step in the video because I already reprogrammed my vehicle
- Repeat step 12 but select “Hybrid Powertrain Control Module 2” instead
- After the “Hybrid Powertrain Control Module 2” is finished reprogramming, close the program
- Turn off the car and turn it back on normally. You are finished.

Enjoy.
How to Unlock GM LAN29 Radio by VXDIAG Tech2Win?
Let’s say you bought one of these vxdiag vcx nano gm or mdi clone interfaces and you are trying to program a new radio in your GM LAN29 because you get the ‘lock’ message. You want to have a free range to unlock radios but you are having trouble finding anywhere the menu.

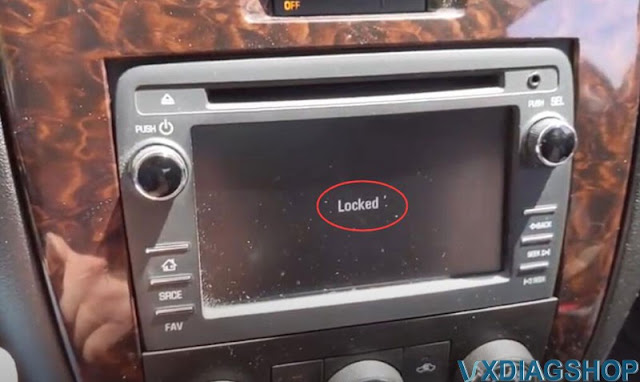
Vxdiagshop.com here gonna show you the secret to unlock GM Radio.
Device required:
Tech2Win 30.004
Free download GM NAO V30.004
https://mega.co.nz/#!fUBQHLYY!1xmrJPOG6-vV2oem_gGwKxaJpf31I01VHZisDHCPRio
Click on the link, then look for the password at the bottom of that group of links.
2). Here the customer has installed a MyLink radio out of 2013 Traverse into a 2015 Impala limited.
3). You have to roll back the Tech2win software version to 30.004. The vcx nano now comes with T2W 33.004 and in that version all the vin unlocking for the radios is completely erased. You can search the youtube guide to roll it back.
The software included with the VCX Nano or cloned MDI has a version of Tech2Win that has eliminated the capability to program the proper VIN to a “new” radio. In fact, reprogram radios after you roll back the firmware version of the Tech2Win software. This is mainly for GM LAN29 vehicles from 2006 to 2017 such as the Impala, Tahoe, Traverse, Silverado, Lucerne, and their corporate cousins.
You can keep original 33.004 in case you want to go back.
4). The original firmware version 33.004 that came with the VCX Nano is not deleted when you follow the procedure to roll back to 30.004. When you initialize the Tech2Win program, click on “North American” to run 33.004 (which you have to do for newer Impalas, as 30.004 only goes to 2011.). To use 30.004, click on “GM NAO.” They both co-exist without any other tweaks. For instance, you want to program a new radio and new key fobs to a 2012 Impala. You will need to run “GM NAO” (30.004) on the Tech2Win to program the radio. After that you will have to exit out of Tech2Win, restart it, and run “North American” (33.004) to program the key fobs.
Procedure:

Get the vcx nano hooked up to the USB.
Turn on ignition switch.
Run the vx manager, go to Tech2Win
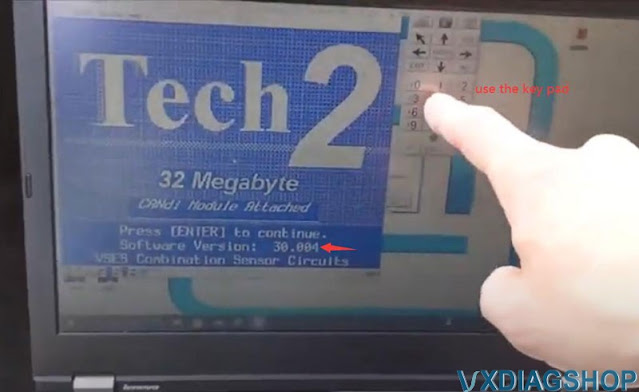
you’ll see that as soon as it boots up here, see that 30.004. you need this version
the other thing is you have to use this keypad, you can’t click on whatever’s on the screen on
this version doesn’t work.
we’re going to set the car up
if tech2win asks to tech2 software may need to be updated, we don’t care, just proceed.
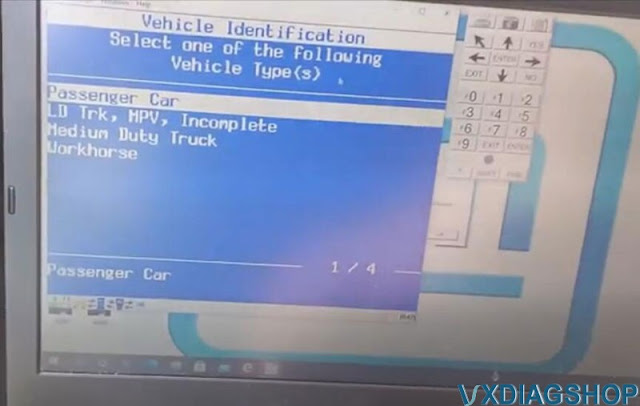
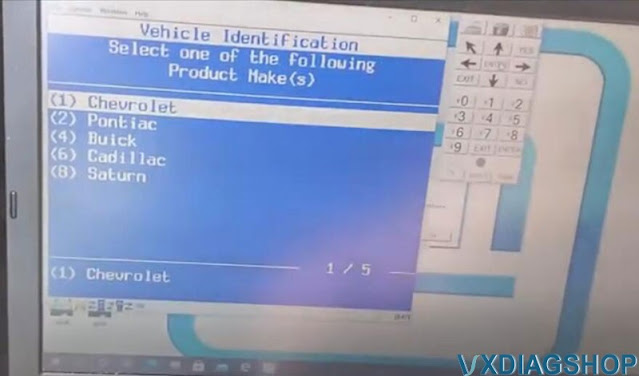
Select Diagnostic- 2006- Passenger Car- Chevrolet, scroll down to select W line
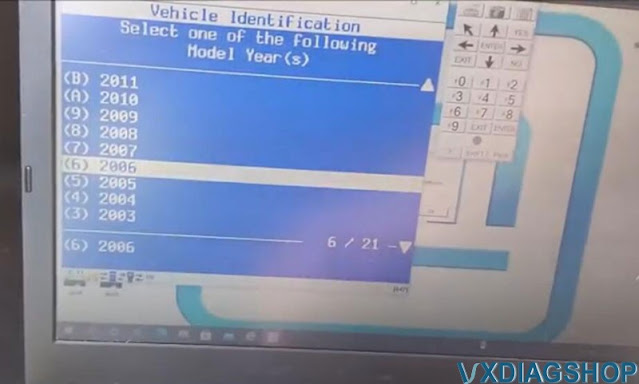
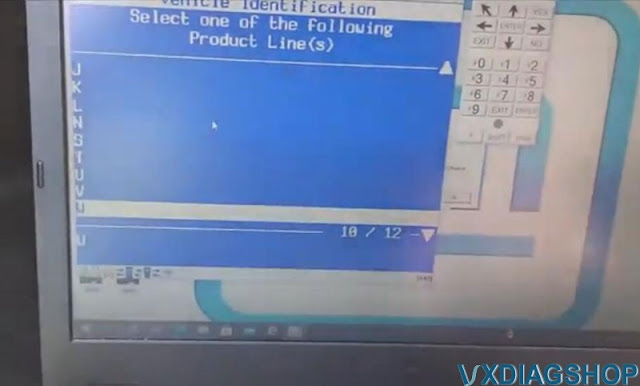
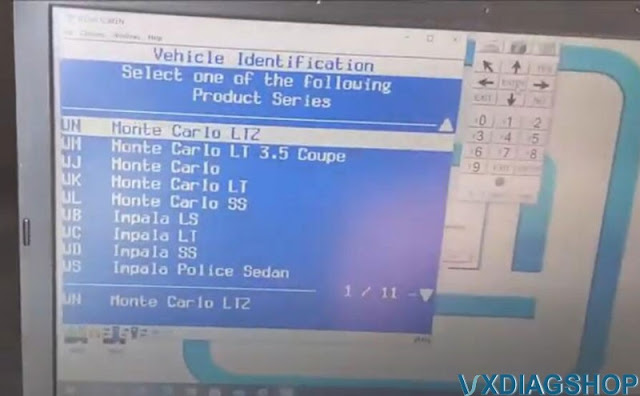
We’re gonna set it as a Monte Carlo ltz
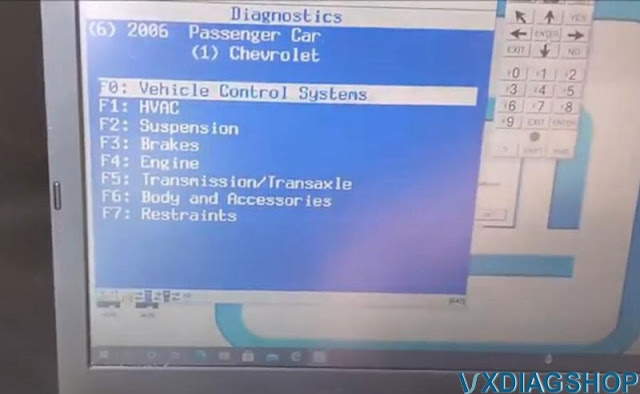
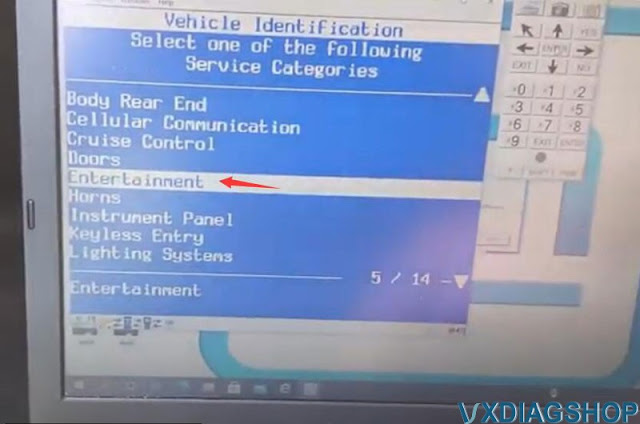
Then select Body and Accessories- – Entertainment- Module setup- F0 Radio- VIN Relearn


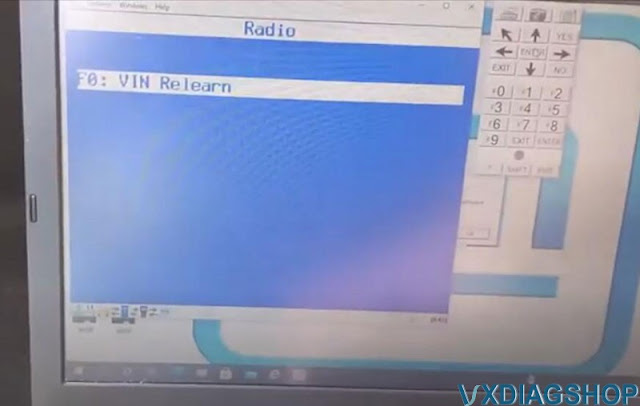
make sure you hooked up right here
We’re getting communicating okay
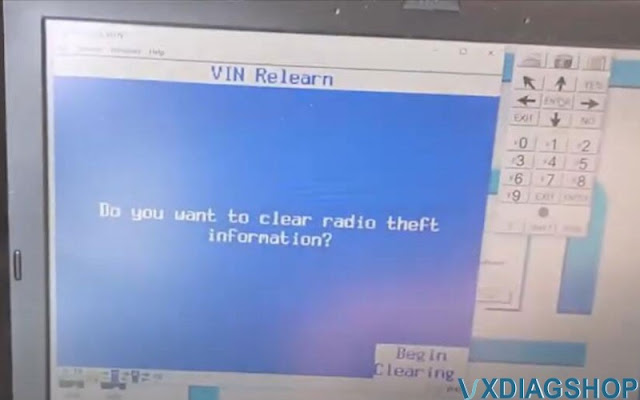
vxdiag vcx nano tech2win ask if you want to clear radio theft information.
Press ENTER to begin clearing.
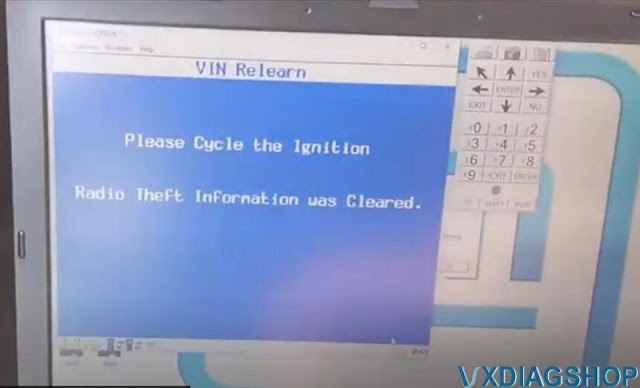
Cycle the ignition. Radio theft info. was erase.
Exit out of that prompt and disconnect vcx nano.
Now it is working
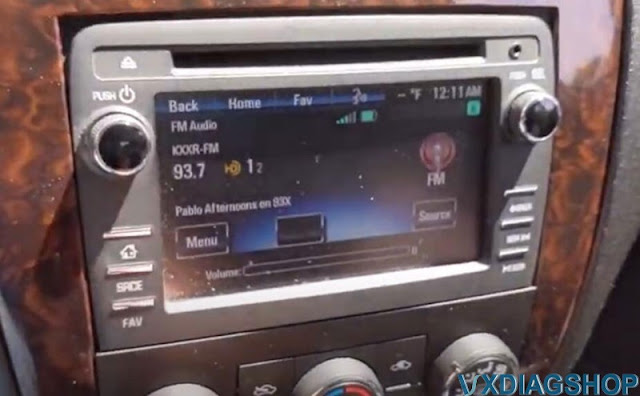
It works. Turn the volume down.