VXDIAG VCX SE DoIP DoNET Not Working Solution
Here comes a similar problem:
I got the VXDIAG
VCX SE BMW, it works fine with ISTA, E-sys.
But the DoIP DoNET is not
working, vx manager sees the dongle, but cannot see Itool radar or e-sys. Any
advice?
DONET Remote Super Diagnosis is available for brands including Mercedes Benz, BMW, JLR Jaguar Land Rover, Toyota, Honda, Subaru, VW/ AUDI/Skoda/Seat, GM, Ford/ Mazda, Volvo.
For BMW, Benz, Porsche3 and JLR with DoIP protocol, DoNET is not working over DoIP.
DoNET Remote Diagnosis is not available for DoIP protocol. DoIP only supports local diagnostics.
How to Connect MBTools App with VXDIAG VCX SE?
Here is the vxdiag vcx nano gm USB install instructions from one of vxdiagshop.com's customer. Hope it helps.
Credit to Monroe King Jr.
THESE ARE WINDOWS 10 & 11 INSTRUCTIONS!
ITEMS:
Laptop running late model windows 10 or any windows 11 update your windows 10
fully.
DO NOT TURN OFF DEFENDER! DO NOT TURN OFF ANY PROTECTION.
STEP 1
Download GDS2 from the vxdiagshop. navagate to the VCX Nano GM USB product page. About half way down you will see links for GDS2 and VX Manager 1.8.4
Do not use the thumb drive that may have come with the Nano. Download these
files from the vxdiagshop only!
Download the GDS2 from the Yandex drive
select "download all" only and the download should begin.
Download the 1.8.4
VX Manager from the mega drive.
These are the only 2 we are installing
because they are important to work on the Volt tech2win is usless for the Volt
and your on your own installing that. I can not help you with that.
Once
downloaded verify they are in your download directory.
If not then defender
caught the missing file and you must get defender to allow the
download.
Extract GDS2 windows will detect the GDS2.exe file click on the
notification flag if your fast! If not then click on settings security windows
security virus protection. "Protection History" click on the threat click on
"actions" click on "allow" or "restore" whichever is available.
Anytime
during the install if you download, extract or install anything expect the flag
and click on it right away or go to settings security windows security virus
protection then "protection history" make sure you click on the threat and
choose action and allow or restore.
What this will do is with defender on it
will automatically make exceptions in the windows system to allow these files to
perform their proper functions without further problems.
Run the Autoinstall
in the extracted GDS2 directory.
During the installation windows will again
flag the GDS2. Exe so you know what to do as stated above and anytime this
happens follow the "Protection History " as you go and clean up as you
go.
Once GDS2 is installed you should see the big blue GM square logo.
If
it is not there do not worry go to the GDS2 extracted directory and then the
install directory and copy the GDS2. Exe file and place it on your root
directory C: on your hard drive.
Make sure there is no protection history and
you should now see the GM logo on your desktop!
You are finished installing
GDS2 DO NOT OPEN GDS2 YET! Just leave it alone there until after you are
finished with VX Manager.
Now run the install program for VX Manager 1.8.5 it
should run without issue but if defender complaints you now know very well what
to do. Thats right Protection History.
Now prepare to hook the Nano to your
laptop for the first time!
When the last screen shows that has the 2 check
boxes uncheck visit website DO NOT CLICK FINISH!
NOW PLUG IN THE NANO FOR THE FIRST TIME!
You may now click finish and yes
on the following screen.
It does not matter if you can detect the nano in VX
Manager at this time. Go to the last tab on the top right and click on the
VXDiag tab scroll down slightly abd hit the blue VX Manager button. This will
give uou the chance to download the latest vx manager 1.8.9 save this is the
choice here.
UNPLUG THE VCX NANO HERE!!!!!!!!
Again anytime you download extract or
install you know what to do yes protection history.
Now extract the new vx
manager.
Protection history
Install the VX Manager
Protection
history
Now in install this time you will get a message about installing do
the install anyway. Or run away option.
YES INSTALL VX MANAGER 1.8.9 RIGHT
OVER 1.8.4
Leave the nano unplugged again until you get to the final screen
again with the 2 check boxes uncheck the view web site box DO NOT CLICK FINISH
YET! PLUG IN THE NANO!!!
Now click finish and yes
In VX manager now you
should see the nano!
In device update firmware. This will update licenses as
well
NOW EXIT VX MANAGER
OPEN GDS2
You will get a red screen! Don't
freak out! Find the run anyway!
Now you should be set. If any problems check
protection history.
How to Connect MBTools App with VXDIAG VCX SE?
MBTools is a third party App for Mercedes Benz retrofit and coding. The diagnostic device has to be J2534 compatible. VXDIAG VCX SE firmware is tested working fine with the app.
When it comes to flashing, though, then it might be a good idea to get a more
serious hardware.
If we are talking about flashing headunits, then the device
must also have DoIP (diagnostic over internet protocol) capability.
VCX SE is a good choice.
How to Set up MBTools App for VXDIAG VCX SE?
*We don't provide technical support of the App. Just showing how to get it work with vcx se passthru.
To start using the MBTools app, please head to the following download location, and get the MBTools-Launcher.exe file.
App can be downloaded free on https://mbtools.me/.
Program is free, token does not.

Depending on which diagnostic device you are using, you will need install the appropriate drivers.
Select VCX SE device VCI and install VX Manager. Then install passthru driver.

To be able to fully enjoy the benefits of MBTools, you will need the following:
– A diagnostic device, such as the recommended SDConnect C4, VCX SE. Other diagnostic devices might work as well.
– A laptop
– Reliable internet connection, throughout the whole time using the MBTools app
– Windows 10 and 11 are recommended, but Windows 7 can work also, with a few tweaks.
– Vediamo/DTS might be helpful to have, but most of the time, it will not be needed.
– For headunit codings, we recommend having a DoIP enabled diagnostic device (VCX -SE). This is not required for Instrument cluster codings, such as AMG menus.
After successfully logging in, the app will prompt you if you are connecting to the control unit on bench, or in the car. If you are not sure, please select "in car".
The main screen will now show up.

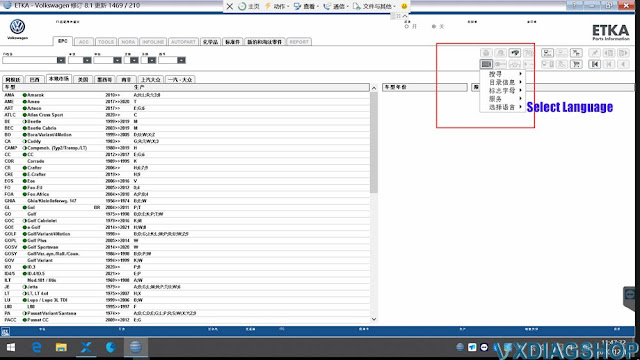
How to Change VXDIAG EKTA Language?
Problem:
I got vxdiag vcx se 6154 and ODIS v11 software installed. When run EKTA software, it shows in English. How to change language.

Solution:
Select the print icon in the top right (the settings menu)
Select Language (5th option down in the menu). If use ETKA standalone it should be 6th option.
Select English
Can I Downgrade VXDIAG VCX SE FW to V1.6?
Question:
Is there a way to downgrade my vxdiag vcx se version to 1.6 and back to new version without loosing my license or hardware?
i found this on the net
1.Make a backup of your mangercenterc.ini file
(where your prog is installed)
2.Change one line in your original ini file to
FirmwareUrl="http://www.vxdiag.ugu.pl/xml.xml"
3.Open Vx Manager and "update"
your firmware.
could it work or i may lose my lisence?
Solution:
FW1.8+ has a different license. You will lose all licenses after
downgrading.
You can downgrade with loosing licenses.
After return back to
the FW1.8+ licenses restored from the VXdiag server.
Newly installed licenses
completely overwrite old.
BUT it is not recommended to do so.
If there is a newer vx manager, you device will not working properly.