How to Solve VXDIAG GM "MDI Driver Not Installed" Error
Problem:
Need help with vxdiag vcx nano gm scanner. I failed to install MDI driver in vx manager, error "MDI Driver Not Installed".

Solution:
If failed to install MDI driver in device manager, download MDI.exe driver.
Paste and install MDI.exe on desktop.
Then install MDI driver in vx manager again.
VXDIAG VCX NANO GM Corvette C5 Brake Bleed Review
VXDIAG VCX NANO GM New User Review:
"I used my Tech2 clone and performed the "Automated Bleed Procedure" a couple
weeks ago. Car is a Cheverolet Corvette C5.
Get this: Drivers Front >
Passenger Front > Passenger Rear > Driver Rear!
The other interesting take away was that I bleed my brakes ~2 times per year due to track time with Dot4 (conventional method RR>PR>PF>DF). The fluid always comes out nice and clean-ish. When I performed the Automated Bleed (which cycles the ABS pump), DF looked clean, PF looked clean, PR was a darker amber color(!?), DR looked clean. So, my takeaway from this was that by cycling the ABS pump, it was able to purge a pocket of older fluid that does not get purged using a conventional bleed procedure.
The downside to the Automated Bleed Procedure is that you will use ~2+ (500mL) containers of fluid. Based on this, I will mainly use the conventional method to save on fluid and periodically will use the Automated Bleed Procedure to ensure a complete purge.
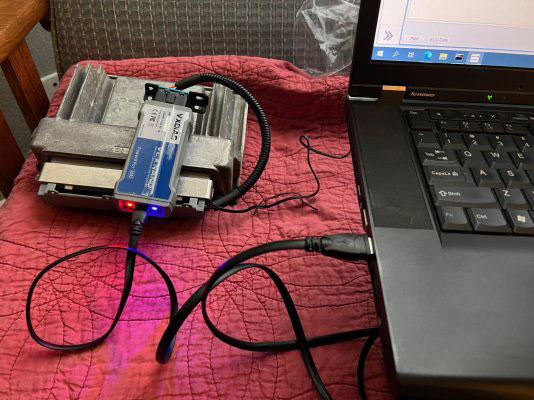
The clone I purchased was the: VXDIAG VCX Nano GDS2 and Tech2Win Diagnostic Tool from vxdiagshop. It is a little quirky to get installed but not too bad. I would also suggest if you purchase this device to also purchase an OBD2 extension cord (length of your choosing). Since our OBD2 port faces down and is directly in front of the brake pedal, I found it almost impossible to pump the pedal without bumping the VXDIAG dongle that is plugged into the port (the dongle is like 6″ long). If you bump the dongle enough, it will unplug and then you will need to restart the sequence from the beginning. The weight of the dongle as well can cause it to disconnect.
FYI.
Once installed, the Automated Bleed Procedure can be found in the
Chassis sub menu. With theTech2 you can also turn the ABS pump off/on for
testing purposes as well if you didn't want to burn through a bunch of
fluid."
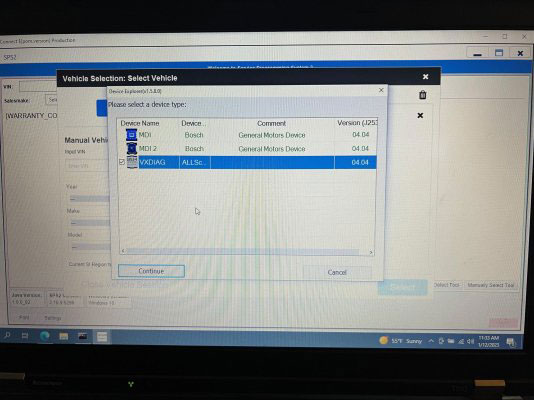
VXDIAG GM & Techline Connect on Lenovo T510 Win10
Here is the user working experience on installing vxdiag vcx nano gm and techline connect on Windows 10 64bit system.
"Took a step back and bought a VXdiag module that worked with a laptop and I was cable to get it working.
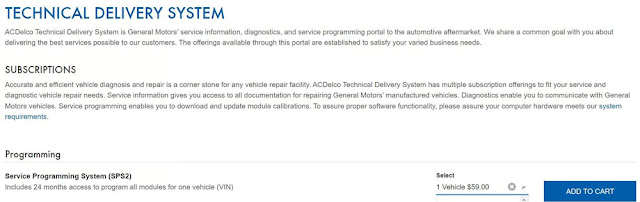
Ii comes with GDS2, Tech2 Win Software. ACDelco has the software as a subscription
I used an old Lenovo T-510.
Installed windows 10 64 bit.
Installed java
8 32 bit.
Installed VCX Manager.
Installed Techline Connect directly from
AC Delco TDS website launcher.
Can program in vehicle or via bench
harness.
Using the VCX Nano as a J2534 pass-thru for Delco TDS/SPS works quite well.
I have used it to "update" the various existing modules in my truck using the
laptop. It finished all the modules without error.
No VMWare."
VXDIAG GM Cadillac ELR 2016 SPS2 Programming
Here comes the customer review of vxdiag vcx nano gm on Cadillac ELR 2016 SPS2 Programming.
"I have a Cadillac ELR 2016. I have vxdiag vcx nano scanner on order.
And
to be honest, getting it to work with ACDELCO TDS will hopefully liberate me as
much as possible (should of got this for the cue android update) from the
dealers (thankfully, I have a mechanic who is certified with EV and Hybrid
Vehicles).
I will read, read and read and then see what or how this can help me with my ELR (one recent issue under investigation). I noticed that the Chevy Volt owners are much more up to date with this kind of programmer and functionalities.
I saw this guide
Set up VXDIAG VCX NANO GM with Techline Connect (VMware Solution)
It's a pretty easy How To guide to follow (because you have a written guide as well as a YouTube how to), and I am at Step 8 as I await my VCX Nano to arrive.
I'm still wondering what the point is by using VMWARE to run it off a virtual station versus simply installing it on a Windows 10 laptop.
I received on the weekend the VXDIAG VCX Nano programmer so that I could then proceed with the rest of the steps required to install and configure correctly.
I did manage to swim through VXDiagshop download page to acquire the
necessary files.
On my first go through, I did not get VXDIAG to appear as an
available programmer through the Techline Connect program. Downloading the files
through VXDiag website and rereading the written and video help has allowed me
to properly configure the VXDIAG programmer with TCS.
I reset up the entire operation (as per the guide, except for one small detail) to double check the guide and my abilities. I got it to work with the VCX Nano. I can communicate using the GDS app, as well as directly with ACDELCO TDS.
Got it to work.
Tip 1…
So, I tried running tech line connect with out plugging in the vcx nano to
the OBD2 port on my ELR. And if course the tech line connect failed to assign my
available vin slot to my vehicle vin.
At that error screen, it says to try
again, I then plugged in my VCX nano to my elr OBD2 port and tech line connect
assigned the available slot for my ELR.
Tip 2…
After setting up a VMware version for windows 10 pro, I debloated windows 10 before proceeding with the installation of various softwares. I wanted a clean and light version of windows 10 pro without any of the background nonsense that windows is known for having.
Successfully reprogrammed the following:
Battery Energy Control Module
Hybrid Powertrain Control Module
2
Amplifier (there was available improvement updates for my ELR)
Found updates for my ELR and updated the following.
Body Control Module
(two updates were found for components within the vehicle hardware – parking
radar and wipers)
Instrument Cluster (the display had an update)
I wanted to see with the Radio, but got spooked with all the hardware ID's and had no clue how to proceed.
I have the NON-Wifi version, and that is the one I wanted. I wanted to be able to one day have a hard wired computer in my garage so that I can run a cable from my computer to the vehicles OBD2. For now, I'm using the VCX Nano on my laptop. I switch my laptop wifi from 5Ghz to 2.4Ghz when I am in or outside of my garage door to make sure I have the strongest wifi connection between my router / mesh network and my laptop.
I can say that ACDelco TDS is very forgiving when connected to your vehicles OBD2 during programming. One module that I was programming took 24 minutes and to my horror my laptop lost wifi connection (picked up by the ACDelco TDS app saying lost connection) in the middle of the reprogramming. BUT, ACDelco TDS did not time out, nor crash, and when the wifi was re-established the programming on my ELR continued and completed.
How to Solve VXDIAG GM SPS2 Error E4399?
VXDIAG VCX NANO GM & Techline Connect SPS2 error E4399 solution from customer.
"I finally received the VCX Nano and followed the guide (I found an i5-6300U@2.4ghz was not enough to run the VM (SPS2 error with tool locking and E4399 codes)) and I decided to follow the latest bulletin PIC5920J.
"Bulletin PIC5920J:
PIC5920J Vehicle Will Not Charge And Hybrid Loss Of Isolation With DTC P0AA6 And/Or P1FFF P1F0E P0DAA
Models Brand: Model: Model Years: VIN: Engine: Transmissions: from to
Chevrolet Volt 2011 –
2014 All All LUU MKA
Cadillac ELR 2014 – 2016 All All
LUU MKA
Opel Ampera 2011 – 2014 All All LUU MKA
Holden Volt 2013 – 2014 All All LUU MKA
Condition /
Concern
Some customers may comment that their vehicle will not charge. Customers
may also comment that a Check Engine Lamp
is illuminated. Technicians may find a current code P0AA6
and / or a P1F0E set on
2011-2013 Volt or a P0DAA on 2014 Chevy Volt, Opel Ampera or Cadillac ELR in the HPCM2. When diagnosing these
DTC'S, potential causes to consider when evaluating the vehicle are:
1. A loss of
Hybrid/EV Battery Pack coolant (external or internal to the Hybrid/EV Battery
Pack)
2. A loss of
high voltage isolation within the battery cells or battery sections
themselves
Recommendations
/ Instructions
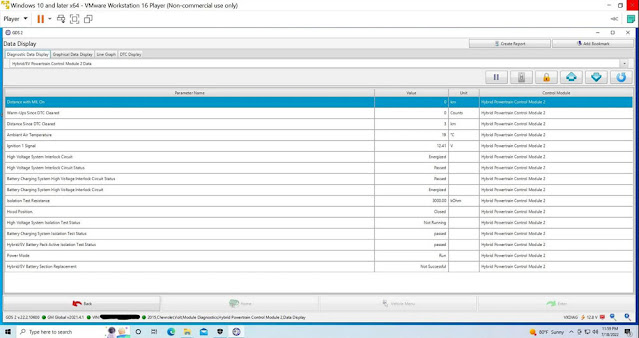
Locate the Isolation Test Resistance that is located in the HPCM 2 data
list under HPCM 2 / Data Display / Data Display / Hybrid/EV Powertrain Control Module 2 Data and note the
current value on the repair order.
Also note the Isolation Resistance from the freeze
frame records in the HPCM2 for the P0AA6, P1F0E, and/or P0DAA DTC.
Inspect Hybrid/EV Battery Pack coolant level by doing both of the following:
- Note if the coolant level is low in the under hood reservoir.
- Remove the drain plug for the battery to see if any water/coolant drains out, indicating a coolant leak in the battery pack.
If necessary, refer to the Hybrid/EV Battery Cooling System Diagnostic in Service Information.
Important: All P0AA6 failures must include an inspection of the Hybrid/EV Battery Pack drain plug, located on the battery tray, regardless of fuid level at the Hybrid/EV Battery Pack coolant reservoir. If any moisture is found during the drain plug inspection, contact the GM Technical Assistance Center (TAC)
If the coolant level in the reservoir is at
the proper level and there is no coolant or water drained from the battery
from the drain plug inspection.
2011 – 2014
Program the HPCM2 (K114B) and
the BECM K16 with the latest calibration. If DTC sets again, review freeze frame
information again and follow SI diagnostics
2015 – 2016
Please follow SI for the DTC
that set after performing the coolant plug inspection.
Important: If you have any moisture that is found in the battery during the drain plug inspection or the Isolation test resistance will not go above 275 kOhms after the HPCM2 and the BECM have been updated, please contact the Technical Assistance Center (TAC) for further direction.
For vehicles repaired under the EV coverage,
use the following labor operation. Reference the
Applicable Warranties section
of Investigate Vehicle History (IVH) for coverage information.
For 2011- 2014 Volt/Ampera And
2014 Cadillac ELR

Please follow this diagnostic or repair
process thoroughly and complete each step. If the condition exhibited is
resolved without completing every step, the remaining steps do
not need to be performed."
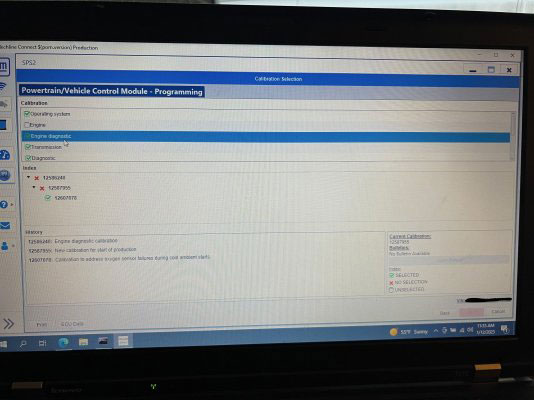
The bulletin request to read the HPCM2 isolation test resistance (ITR) from the DTC P0AA6 and freeze frame and then after the module update. So I decided to sacrifice another VM to run the hacked/virus infected GDS2 diagnostic software. I found the ITR for DTC P0AA6 was 250 kOhms and freeze frame was 225 kOhms which was below the 275 kOhms threshold as stated in the bulletin.
I then reprogrammed the BECM which took about 12 mins as stated in guide without any issues. Next I reprogramming the HPCM2, but it only took about 2mins (guide stated about 7mins) and SPS2 exited with a successful warranty claim code. However when I turned the car back on I immediately received a reduced propulsion message, missing battery gauge, and the ICE extender turned on. So I decided to reprogram HPMC2 once more and again it took only about 2 mins and again SPS2 exited with a successful warranty claim code, but this time battery came back fine. And for everyone's reference the final ITR after update was 3000 kOhms:
Overall I would say the whole process is doable, but not for the faint of heart!