VXDIAG Subaru SSM4 Cannot Install Software Error Solution
Problem:
I have a problem installing vxdiag vcx se Subaru Select Monitor SSM4 software on Win7 64bit system
Error"
You cannot install the software.
Time limit for updating the software has
expired."
Tried changing time back to 2022.1.11, no luck. Any idea?

Solution:
Change computer date/time to 08/2022.
Then run Subaru fix patch here
https://mega.nz/file/J6YQALTL#57ZL6loDpa9FapxI4jzLZhfPJUyL-2sxegGOnJuTcLY
It should be fine.
VXDIAG Techstream Cannot Find Toyota Proace 2020?
Problem:
I have a vxdiag vcx nano Toyota connector with latest techstream V18.00.008 on a Windows 10 64bit pc. I've managed to get the program and the connector to communicate with my van (Toyota Proace City 2020). Techstream does not have proace in vehicle list. Tried mini vci no Proace either.

Solution:
Toyota Proace is based on a PSA platform. Toyota Proace is a Peugeot Expert and Citroen Jumpy. PSA made Proace for Toyota.
For ProAce project TME has decided the adoption of PSA technical documentation and diagnostic tester.
So you will need diagbox to diagnose.
Techstream is for all Toyota and Lexus except Supra and ProAce. Supra needs Toyota ISTA and Proace requires diagbox.
Check and download ISTA & Diagbox license for Supra and Proace here.

2014-2018 Subaru Forester CVT Learning with SSM4
How to initiate Subaru Forester CVT learning mode with SSM4? Check instruction below:
2014-2018 Subaru Forester CVT Learning Control with SSM4
Learning Control
A: GENERAL
DESCRIPTION
• Follow the messages displayed
on the Subaru Select Monitor when working.
• When the
following work is performed, perform learning work for the
transmission.
Replacement of TCM/Replacement or disassembly of transmission assembly/Replacement of control valve body/Clearing AT leaning value is executed.
B: PROCEDURE
1. PREPARATION FOR
LEARNING
1) Warm up
or cool down until the ATF temperature displayed on the Subaru Select Monitor is
40 — 65°C (104 — 149°F).
2) After stopping the vehicle,
shift the select lever to "P" range.
3) Fully apply the parking brake.
4) Lift up the
vehicle.
CAUTION:
While working, be sure to keep the lower edge of the tires 30 cm or more
above the ground as vehicle will
vibrate.
5) Connect
the Subaru Select Monitor scanner (vxdiag
vcx se subaru or openport) to data link connector.
6) Turn the ignition switch to
ON.
7) Turn off all
switches causing an electrical load, such as headlights, A/C, seat heater and
rear defogger, etc.
8) Set SI-DRIVE to I mode.
(Vehicles with SI drive)
2. SIMPLE
LEARNING
NOTE:
Simple
learning is performed with the vehicle lifted, without actually running the
vehicle.
CAUTION:
Do
not turn the power of the Subaru Select Monitor OFF during work, and do not
disconnect the data link
connector.
1) Select
{Work Support} in the «Transmission Diagnosis» display screen of the Subaru
Select Monitor.
2)
Select {Compulsory learning mode} in the «Work Support» display screen of the
Subaru Select Monitor.
3) Follow the messages displayed on the Subaru Select Monitor screen
when working.
NOTE:
During
AT learning in progress, AT OIL TEMP light in the combination meter starts
flashing at 2 Hz and the learning
operation starts. The following message is displayed on the screen when the AT
OIL TEMP light which was flashing at 2 Hz
turns off.
4) When «AT learning normally ended.» is
displayed, simple AT learning is completed.
NOTE:
• If
communication error occurs during learning, retry the "AT learning mode" from
the beginning.
• If the message «Execute AT
learning again after fixing troubles of the vehicle» appears during learning,
select [OK] and display the DTC list.
After repairing the locations indicated by the DTC, start the "AT learning
mode" over from the beginning.
• When communication error occurs during learning,
select lever does not shift occasionally. If select lever does not shift, turn the ignition switch to OFF before
operating the select lever.
• If the message «AT learning
ended abnormally.» is displayed, start the "AT learning mode" over from the
beginning.

For detailed operation procedures, refer to Subaru Select Monitor software.
How to Solve VXDIAG GM SPS2 Error E4399?
VXDIAG VCX NANO GM & Techline Connect SPS2 error E4399 solution from customer.
"I finally received the VCX Nano and followed the guide (I found an i5-6300U@2.4ghz was not enough to run the VM (SPS2 error with tool locking and E4399 codes)) and I decided to follow the latest bulletin PIC5920J.
"Bulletin PIC5920J:
PIC5920J Vehicle Will Not Charge And Hybrid Loss Of Isolation With DTC P0AA6 And/Or P1FFF P1F0E P0DAA
Models Brand: Model: Model Years: VIN: Engine: Transmissions: from to
Chevrolet Volt 2011 –
2014 All All LUU MKA
Cadillac ELR 2014 – 2016 All All
LUU MKA
Opel Ampera 2011 – 2014 All All LUU MKA
Holden Volt 2013 – 2014 All All LUU MKA
Condition /
Concern
Some customers may comment that their vehicle will not charge. Customers
may also comment that a Check Engine Lamp
is illuminated. Technicians may find a current code P0AA6
and / or a P1F0E set on
2011-2013 Volt or a P0DAA on 2014 Chevy Volt, Opel Ampera or Cadillac ELR in the HPCM2. When diagnosing these
DTC'S, potential causes to consider when evaluating the vehicle are:
1. A loss of
Hybrid/EV Battery Pack coolant (external or internal to the Hybrid/EV Battery
Pack)
2. A loss of
high voltage isolation within the battery cells or battery sections
themselves
Recommendations
/ Instructions
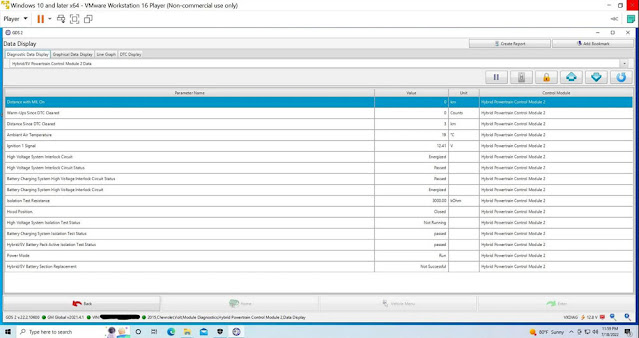
Locate the Isolation Test Resistance that is located in the HPCM 2 data
list under HPCM 2 / Data Display / Data Display / Hybrid/EV Powertrain Control Module 2 Data and note the
current value on the repair order.
Also note the Isolation Resistance from the freeze
frame records in the HPCM2 for the P0AA6, P1F0E, and/or P0DAA DTC.
Inspect Hybrid/EV Battery Pack coolant level by doing both of the following:
- Note if the coolant level is low in the under hood reservoir.
- Remove the drain plug for the battery to see if any water/coolant drains out, indicating a coolant leak in the battery pack.
If necessary, refer to the Hybrid/EV Battery Cooling System Diagnostic in Service Information.
Important: All P0AA6 failures must include an inspection of the Hybrid/EV Battery Pack drain plug, located on the battery tray, regardless of fuid level at the Hybrid/EV Battery Pack coolant reservoir. If any moisture is found during the drain plug inspection, contact the GM Technical Assistance Center (TAC)
If the coolant level in the reservoir is at
the proper level and there is no coolant or water drained from the battery
from the drain plug inspection.
2011 – 2014
Program the HPCM2 (K114B) and
the BECM K16 with the latest calibration. If DTC sets again, review freeze frame
information again and follow SI diagnostics
2015 – 2016
Please follow SI for the DTC
that set after performing the coolant plug inspection.
Important: If you have any moisture that is found in the battery during the drain plug inspection or the Isolation test resistance will not go above 275 kOhms after the HPCM2 and the BECM have been updated, please contact the Technical Assistance Center (TAC) for further direction.
For vehicles repaired under the EV coverage,
use the following labor operation. Reference the
Applicable Warranties section
of Investigate Vehicle History (IVH) for coverage information.
For 2011- 2014 Volt/Ampera And
2014 Cadillac ELR

Please follow this diagnostic or repair
process thoroughly and complete each step. If the condition exhibited is
resolved without completing every step, the remaining steps do
not need to be performed."
The bulletin request to read the HPCM2 isolation test resistance (ITR) from the DTC P0AA6 and freeze frame and then after the module update. So I decided to sacrifice another VM to run the hacked/virus infected GDS2 diagnostic software. I found the ITR for DTC P0AA6 was 250 kOhms and freeze frame was 225 kOhms which was below the 275 kOhms threshold as stated in the bulletin.
I then reprogrammed the BECM which took about 12 mins as stated in guide without any issues. Next I reprogramming the HPCM2, but it only took about 2mins (guide stated about 7mins) and SPS2 exited with a successful warranty claim code. However when I turned the car back on I immediately received a reduced propulsion message, missing battery gauge, and the ICE extender turned on. So I decided to reprogram HPMC2 once more and again it took only about 2 mins and again SPS2 exited with a successful warranty claim code, but this time battery came back fine. And for everyone's reference the final ITR after update was 3000 kOhms:
Overall I would say the whole process is doable, but not for the faint of heart!
VXDIAG GM BCM SPS2 Programming Review March 2023
vxdiag vcx nano gm March 2023 review: This plus 45 bucks Acdelco subscription I fixed the car ('14 GMC Sierra.).

I had some issue with the BCM, ECM, and I need to diagnose the car for the DTCs. Then I decided to work on it by myself…I didn't really know anything about fixing cars…so…2 months, every night reading and learning online, I decided to give it a try. I bought the vxdiag vcx nano gm gds2, thank god the acdelco subscription is for 2 years, so I still had that. Then followed instruction on the VXDIAG website, everything was great! One thing I did was installed two systems on my computer, one I used for like tech2 and GDS, the other one is just for SPS2 programming. Because if you read, there can be problems if you use this and run SPS2 directly, to run SPS2 for programming, you need to do:
1. install the VX manager.
2. Install Passthrough (that is in the VX manager)
3. Run passthrough first, when the program loads, just click "load" on the top right corner, then you can start log in the website for acdelco and then start SPS2.
It may still quit sometimes, but make sure when you choose the
connection you are using the VXDIAG, there are a lot of videos on youtube, the
most helpful one I found was the one "how to program BCM using
VXDIAG".
Once you get car connected, basically it works as any $1000+ thing
to program your car modules. I replaced my BCM, ECM, Radio, Amplifier module,
and all programed fine with this!
If you are also changing the Instrument Cluster, you can't program it with SPS2. You need EEPROM programming, it is much easier, just find the EEPROM programming kit, which I got on ebay for 16 bucks, works amazing and yes I did got my Instrument cluster replaced too, by myself. When using EEPROM you have to make sure the parts number are the same.
So anyways, vcx nano gm works great with SPS2. For Tech2 and GDS,
it works smoothly. VXDIAG website has a GDS patch or it comes in that little
flash drive, patch the GDS program, start from the patched file, no problem. I
got everything fixed now on my car, and yes, 2 months ago, I knew nothing about
fixing cars. The last thing I fixed was getting rid of the service engine light,
it has been there since the day I got the car, then since I changed throttle
position module, I need to get crankshaft position relearned, I ran Tech2 and
there's an option under the ECM part to relearn it, so I did it, in about 3 mins
it's relearned and the check engine light is finally gone!
I'm pretty happy with this, I don't think I would need to use it
for a while since everything important is new and just replaced and DTC cleared
once fixed, but compare to what they showed you to do it professionally and
correctly, this saved me thousands of dollars. I didn't need to go to the dealer
to program modules, I didn't need to buy parts from the dealers, I didn't need
to go to the dealer to get the code read. This is wonderful!