Mercedes Benz W205 Tailight Coding with DTS Monaco
Let's convert the old Mercedes Benz W205 non-Full-LED(aka Halogen) taillight to facelift (2019+) Full-LED taillight. You need to install 4 new wires from the rear SAM to the taillights.
Credit to realeric from mbworld. The tutorial is for educational purpose ONLY.
Materials:
- Full LED Taillights, left & right (Facelift, 2019+) (MB Part#: A205 906 5003, A 205 906 4903)
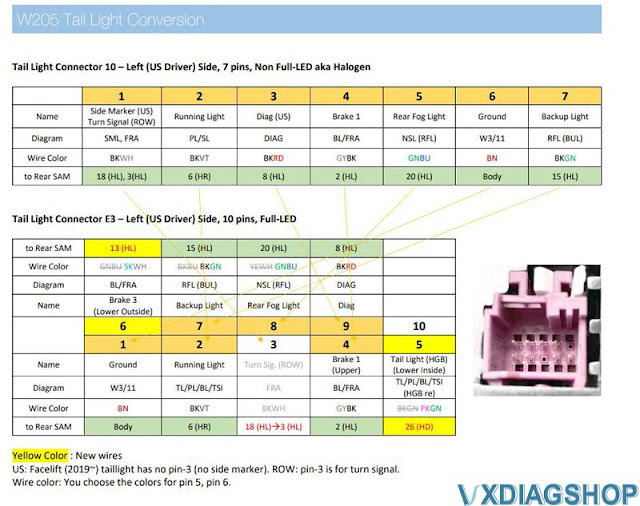
- 10 Pin Taillight Connector (2 EA) (17 EA pins of 1.8mm x 1.8mm x 13.7mm outside, 0.63mm x 0.63mm inside)
- Dupont connector female pins (2 EA) (1.8mm x 1.8mm x 16mm outside, 1.2mm x 0.6mm inside)
- Crimping Molex Tool
- 20 or 22 AWG Stranded TXL Wire (10ft x 4 EA)
- Friction Tape (Harness Tape)
- Tools: 8mm deep socket, T40 star bit, flat head precision screw driver set, utility knife.
- Software: Windows 10 x64 Notebook, J2534 PassThru VXDIAG Benz C6, VCX SE Benz or SD C4, Xentry 2021.x~, DTS Monaco 8.x~
Estimated time to finish: 4~5 hours
Required skill level: mechanical - entry(1/5), electrical & crimping pins - entry(2/5), software variant coding - skilled(3/5).
Where to get the material:
- Taillight: Mercedes dealership. I paid $440 total including two taillights + shipping.
- Connector: Taillight connector is available on ebay/aliexpress but the rear SAM HD connector pins are not (or I couldn't find it). I purchased all from a distributor but they might have wanted to sell 20000+ instead of 2ea. I don't know if Mercedes dealerships have the pins.
- Other tools: If you don't have a crimping tool, it's available on amazon for $15~. I recommend open barrel type. Friction tape is $9 on amazon. Automotive wire is $10~$25 on ebay/amazon (don't use PVC jacket wire).
Installation:
1. Crimp the 4 new wires with two types of female pins.
2. Disconnect the Power, HD, HR, HL connectors from the rear SAM.
3. Disassemble the rear SAM connectors (HR, HL. HD(US vehicles only)).
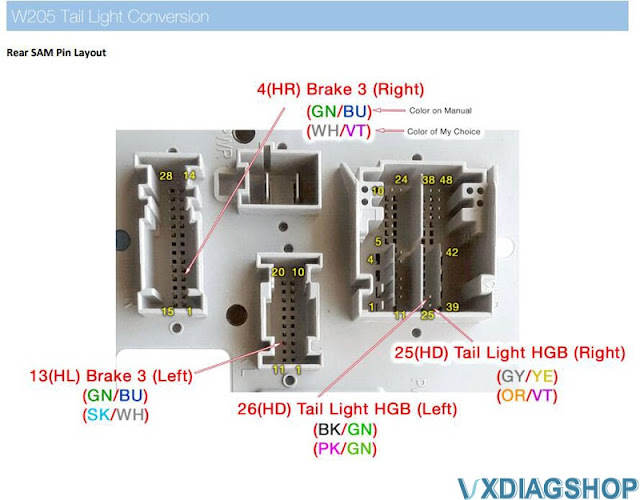
4. Insert the 4 new wires into the rear SAM connectors (Ref: pin assignment table)
5. (US only – optional amber turn signal. You can skip) Move 2 pins, HL-18 à HL-3, and HR-10 à HR-12
6. Assemble the rear SAM connectors.
7. Plug the connectors to the rear SAM module.
8. Route the 4 new wires to the taillight.
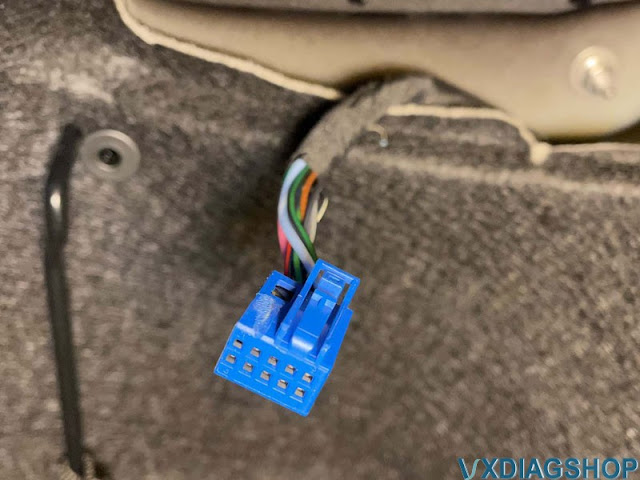
9. Cut the old taillight plug off. (Take a picture to remember the wire colors).
10. Crimp the wires with female pins (1.8mm x 1.8mm x 13.7mm outside, 0.63mm x 0.63mm inside).
11. Assemble the pins + black frame + purple type D housing (or blue type C housing with tab removed).
12. Install the new LED taillights.
13. Do offline variant coding with DTS Monaco (or online SCN coding if you have a genuine Xentry tool & account).
14. Connect the 10-pin taillight plugs to the taillights


Tail Light Connector 10 – Left (US Driver) Side, 7 pins, Non Full-LED aka Halogen


Variant coding: Variant coding means "changing parameters stored in the control module". "Coding" doesn't mean "programming" but means "changing parameter". Have you ever change a setting on the control panel in Windows? It's the same. To change the parameters in the rear control module for the taillight (we call it "rear SAM"), you need a laptop running Windows 10 x64, SD C4 or PassThru device (there are many tools on the market), and DTS Monaco 8.x(software developed by Softing, Inc). Study the software for a while (days).
Online SCN Coding: If you have an online SCN account, add 38O (O is not zero but “O”scar) into online VeDoc system and do online SCN coding to EZS, Instrument Cluster, and Rear SAM. However, only dealerships or a few of independent shops can do it as it requires a genuine diagnostics tool and an online subscription account ($$$$$). Or you can hire someone just to add 38O to the online VeDoc ($$) and do offline variant coding.
Offline Variant Coding: If you don’t have an online SCN account, you can do it with DTS Monaco or Vediamo. The offline variant coding, however, can be erased when the rear SAM is re-flashed at dealerships as MB’s server in German don’t know the change history. Don’t worry about it too much as it hardly ever happen.
1. Add 38O (O as “O”scar) in the EZS (EZS222, 05 Variantenkodeung Schreiben) with DTS Monaco. I, however, couldn’t find a location for it in the EZS as it’s not a standard variant but a specific code only for a retrofit. That’s fine. Let’s skip this step.
2. WIS manual states Instrument Cluster also needs to be coded, but there was no variant related to the rear taillights. That’s fine. Let’s skip this step.
3. Change the rear SAM’s variants. Don’t panic. Follow the step-by-step instruction, then you can do it with easy. Remember, backup the current variant data before going forward.
Offline Variant Coding
Steps:
0. Run DTS Monaco, create a project, add BC_R222.smr-d, create a workspace (do it offline in advance).
1. Connector the notebook PC to the vehicle using either a VXDIAG VCX SE PassThru device or a SD C4.
2. Turn the vehicle on (Don’t run the engine) (Off à Acc à On à Engine Run). (Turn off A/C to save battery)
3. Run DTS Monaco and open the workspace you have created.
4. Click on “Configuration” / “Execution Mode” and choose “Variant Coding” on the tab.
5. Select “BC_R222” for the rear SAM (BC_R222 is the name of the W205’s rear SAM control unit).
6. Press “Connect” if not connected automatically.
7. Click on “Save…” to backup the current data. (For example, save to “BC_R222_before.sgde”).
8. Find the parameters (see below), change it, click on “Do Coding”.
9. After having done all, reset BC_R222 (“BC_R222” / “Ecu Reset” / “hard reset” on the “Diagnostic Services” tab)
10. Check if the taillights work as you want.
11. Turn the vehicle off. Done.
Pros: It runs as factory installed. No shortcut.
Cons: It's only for DIYers for fun. If you hire someone for this, it will cost $$$ at least.
Note: If you buy EU/ROW taillights (amber turn signal), amber turn signal will blink instead of the red brake lights
How to Install 7.1.1 Software for vxdiag vcx nano 6154?
The vxdiag vcx nano 6154 comes with standard packing, the wifi device itself is a blue color.


You can order it from the link below
https://www.vxdiagshop.com/wholesale/vxdiag-vcx-nano-6154.html
quality is a pretty decent plastic solid impact-resistant kit.
A half meters cable quality is very good, connectors are firmly inserted, everything is as usual.
The supply voltage is maintained well or up to 32 volts. VCX nano is a single brand scanner, if you need a multi-brand device, vcx se 6154 is a better choice.
We will install the program Service 7.1.1 for vag group Audi Volkswagen diagnosis.
Software can be downloaded free on vxdiagshop.com 'Download' area.
Step 1: Install Setup
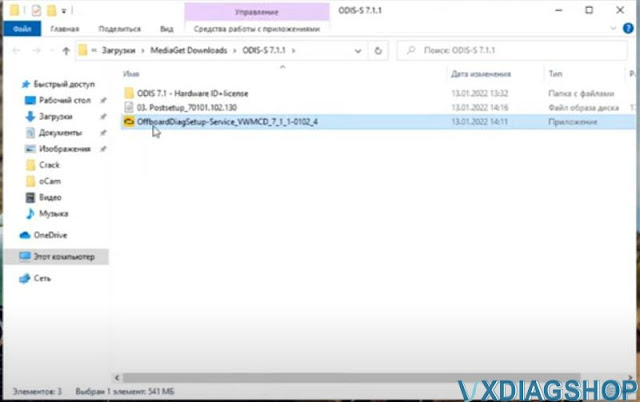
Run OffboardDiagSetup-Service as administrator
select the software language
choose next
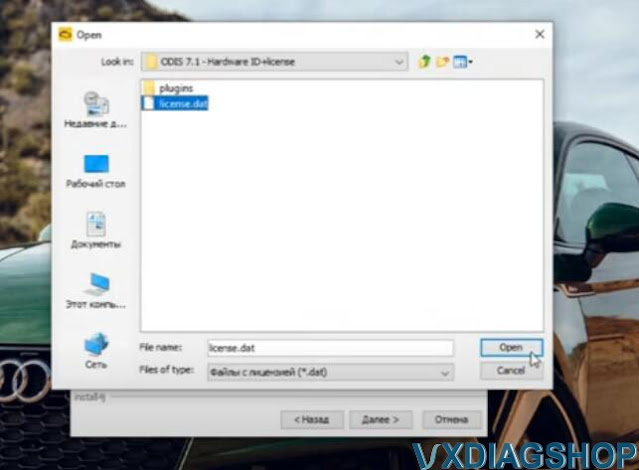

choosing a licensed file
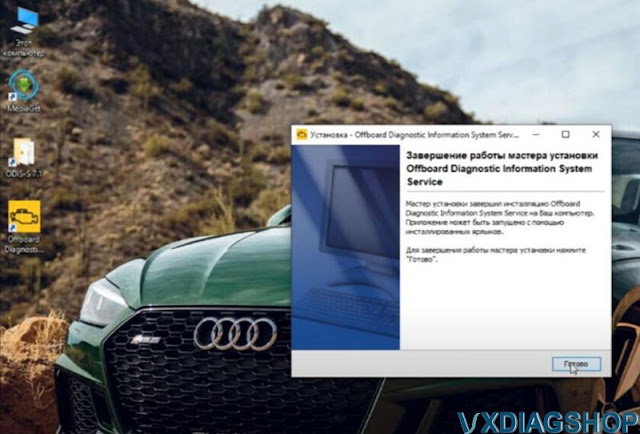
wait for the installation completed
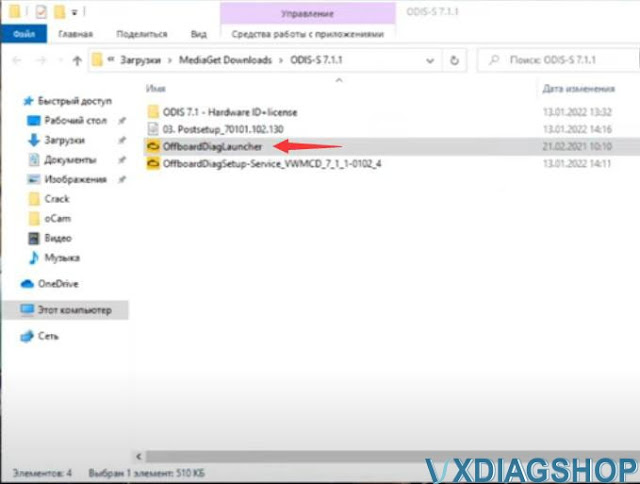
Right-click OffboardDiagLauncher go to Property
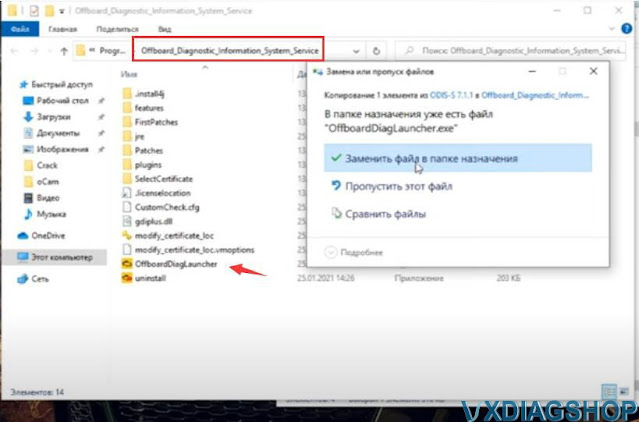
Copy, paste, replace OffboardDiagLauncher in Offboard-Diagnostic_Information_System_Service
Always run as administrator
Turn off your antivirus during installation
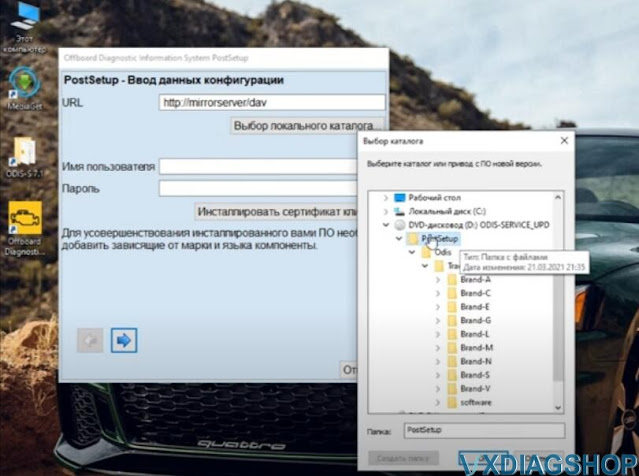
Step 2. Install PostSetup
Right click OffboardDiagLauncher on desktop, go to Property
Run OffboardDiagLauncher as administrator
Install PostSetup
Select local directory
press Next
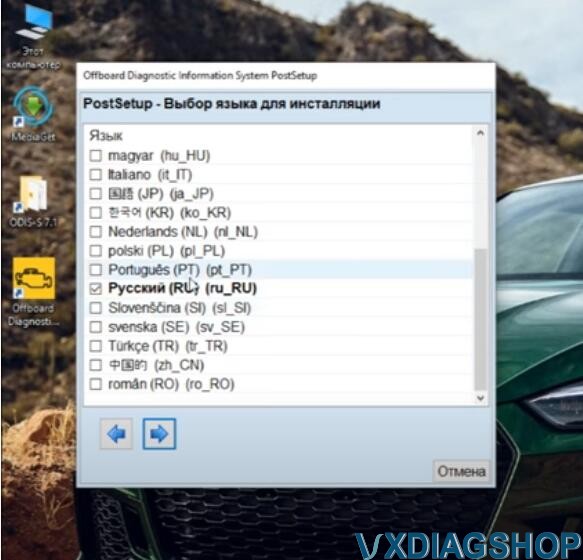
select language
wait until postsetup install completed

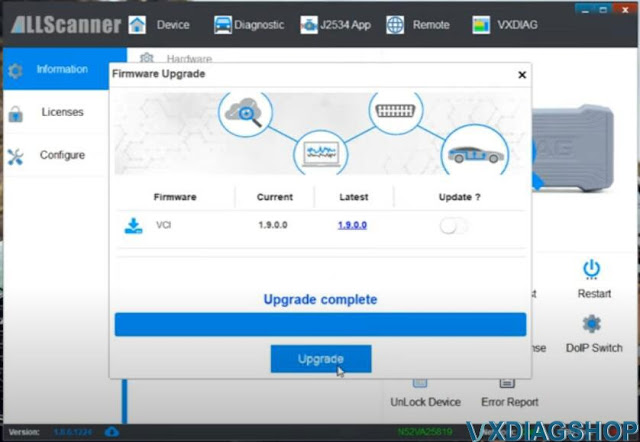
Step 3: Install VX Manager
Download and install latest version VX Manager 1.8.6 on vxdiagshop.com
Select vas 6154 program to install
Connect vxdiag vcx nano 6154 with vehicle
vx manager detects the hardware
update firmware and license
install passthru driver


Now we run O-D-I-S software
Connect VCX WiFi
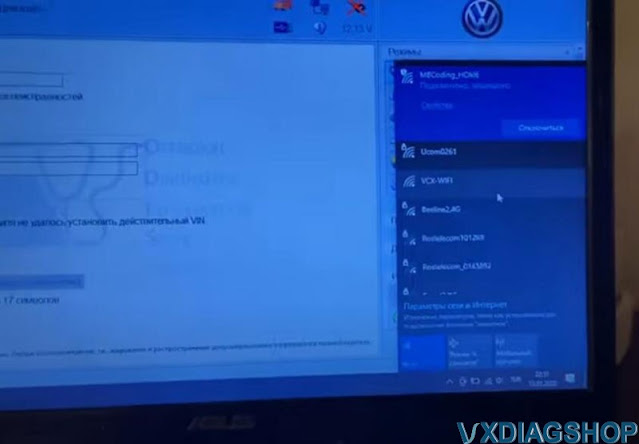
In vx mamager, press Re-connect , device is connected via WiFi
Software is ready to use.

http://blog.vxdiagshop.com/2022/01/25/set-up-vxdiag-vcx-nano-6154-software-7-1-1/
VXDIAG VCX SE Subaru SSM3 Setup Review
Here comes the unbaised review of the vxdiag vcx se subaru diagnostic scanner.
'I purchased this unit to do one thing, register my H001SAL002 remote start installation on a 2018 Outback. It will only register via SSM3 and only under the Denso option when prompted, SSM4 will not present you the option to register the OEM remote start unit. After 2 weeks of messing around, I finally got everything to work correctly and got the remote starter activated. The cost was worth every penny, some mouthbreathing small brain tech wasn't in my wife's car butchering anything and now I have to ability to directly interact with the ECU as I should be.
When everything works correctly, it does exactly what it needs to do, one star lost for having to mess around with the software, VXdiag really needs to figure out a better process to make everything work correctly without tricks.
Here are some steps to get everything working the first time:

1. Use a laptop that you don't care if you have to reset it, in fact I encourage starting with a fresh flash, DO NOT use your daily tuning laptop! You will be disappointed if you do bad things to your computer and have to start over, you've been warned.
2. DISABLE WINDOWS DEFENDER!!! If you can't do this, stop now and return this unit, DO NOT PROCEED. If you have a third party antivirus, turn it off. You only get one shot to do this right, DO NOT reboot the computer unless you have an exception setup for the patch.
3. Set your system clock to 1-1-2018, if you fail to do this, SSM4 will not install. If you change the clock later, SSM4 will lock you out and you have to reflash the system. If you dont do this, SSM4 wont even install and you need SSM4.
4. Only use the 2020.7 ISO, do not try to use the older 2018 build, it will work but will not work right.
5. ONLY install the programs from the Launcher, work from the bottom up
6. The Subaru.exe patch must be placed in and executed from c:\. If your system deletes it, you failed to follow instructions and should stop.
7. Install VXManager last, start it first.
8. Connect to the OBD interface, make sure the license updates before starting SSM3. Update SSM3 if needed before launching
9. Run Subaru SSM3 from the launcher only, it will not recognize the interface if you try to start it externally.
10. Try to scan the vehicle first, if you cant connect you wont be able to do anything else. If you made it this far you will be able to figure it out from here. Have fun.'