VXDIAG VCX FD Ford vs VCX NANO Ford
VXDIAG VCX FD and VCX NANO for Ford which is better?
Here comes the user review.
"I set this up with IDS V130. The data monitor read is very slow, also it will not run power balance it just freezes. I was going to use this on a second machine but it's so slow that I don't like using it. It doesn't have a problem running forscan at all.
.jpg)
Sprinter W907 VS30 Coding using VXDIAG VCX SE Benz DTS Monaco
Topic: Mercedes Sprinter W907 VS30 diagnostics and variant coding using VXDIAG VCX SE Benz Xentry and DTS Monaco software.
Purpose:
Need to set up a proper diagnostic and variant coding scanner for the 2022 Mercedes Sprinter 4×4 with the V6 Diesel engine.
By now, the user has been able to get everything running regularly and can now use Xentry to diagnose the van, clear codes, see underlying data, and more. He is also able to do basic coding in DTS Monaco. Here is a write-up that outlines what he did to get things working.
NOTE: This is not our work. Credit to KrellyKryl from sprinter-source.com. Thank you for your awesome contribution!!!
You are at your own risk.
Hardware and software
The easiest way to get the entire ecosystem
is to purchase the whole Mercedes Star Diagnostic Tool suite with all the
hardware, multiplexer, software, etc. It's expensive, but it's the best option.
Xentry PassThru is also available for an annual fee.
Other options also exist. You can obtain the various software packages as PassThru versions with devices such as the Tactrix OpenPort 2.0. For many (even most), this might be the best option, but I'm not going to go into such systems here, but it's worth researching if you want to learn more about the whole ecosystem.
Here, I will instead focus on the options from VXDIAG (no affiliation). They make various multi-vehicle (including Benz) tools, such as the VCX SE and AllScanner devices and bundle up all the various software on ready-to-go SSDs, HDDs or used laptops – shipping takes about a week. If you are on a newer (2020+) laptop and want to boot from an external harddrive, you will likely need to convert the partition from MBR to GPT, which can be done with e.g., EaseUS. Once done, you can boot from the external hard drive using the loaded SSD and clone it to an internal hard drive, also using EaseUS.
Overview of the VXDIAG VCX SE device
To use any of the supplied
software, you need to connect your PC to your van via the OBD2 port using a
"Vehicle Communication Interface", or hardware VCI. As mentioned above, many
different VCI devices can achieve that, but here I'll focus on the VCX SE
device. It is a pretty powerful little thing, which works across different car
brands and supports all the main protocols, including DoIP, UDS, and DoNET. It
also works with both PassThru and OpenShell (as a multiplexer) versions of
Xentry. The device can be connected to your computer via ethernet, wifi, and a
supplied USB-C to USB-A cable. All options work about the same, however, to
maintain wifi connectivity to a network, I prefer to use the USB-C cable
connection. The device comes with no instructions, but it's pretty intuitive –
plug it in, attach the cable to your computer, and then do the rest via
software.
Overview of VXDIAG software
If you get an SSD or used laptop
pre-loaded with software from VXDIAG it'll contain a boatload of stuff, most of
which you don't need. A lot of it will also be in Chinese, so the first thing
you want to do is get all of that cleaned up by removing programs you likely
don't need (e.g., chat tools, email clients, browsers, and more). While this is
a little daunting, you can ignore most of the software, shortcuts, and icons,
because everything is pretty much set up to go and you mostly only need the
following software packages:
- VCX Manager. This is the main software that will control the connection between your van, the VCI, and all downstream software.
- Xentry (Offline). This is the main software for diagnostics.
- Xentry Diagnosis Stop. Xentry is often not able to shut down properly, so you can run this little script to stop the session.
- DTS Monaco. This is the main software for coding. Version 8 comes pre-installed.
- WIS, EPC, StarFinder, SDmedia, and other STAR tools. These come pre-installed too and might run via virtualization software. I don't really use most of these, although WIS and EPC can be helpful.
As mentioned above, a lot of unneeded stuff was installed and there are installers all over the place. Since everything is set up ready to go, you can get rid of most/all of that – I transferred installers, etc., to an external hard drive, just in case. For easy access, I dropped the programs I use into the Windows taskbar.
How to use VX Manager
This tool is the main software communicating
with your VCX SE device (VCI). Note, you don't need to have the VCI connected to
your van for any of this to work (notice the low OBD voltage in the images
below). When you turn on your laptop without the VCI connected, you'll get an
error like this popping up:
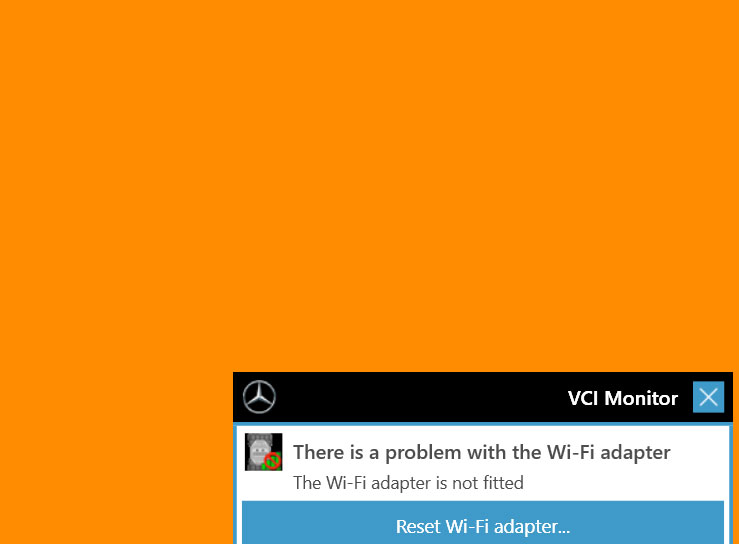
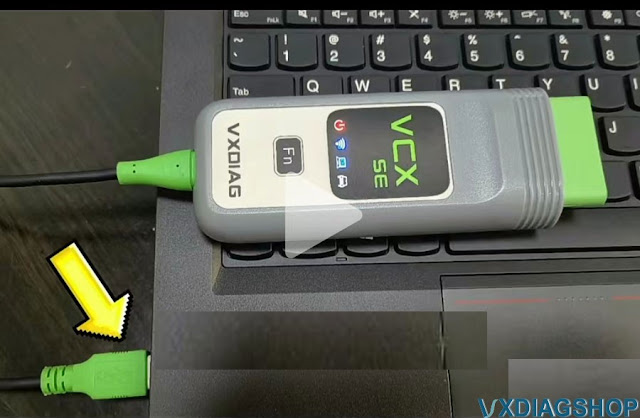
You can ignore that. Once you connect the VCI e.g., via the supplied USB cable, you'll get the following:
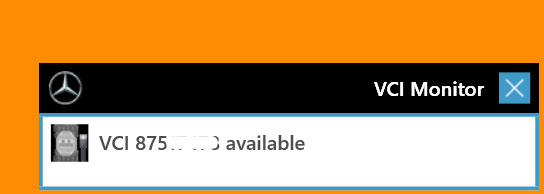
You'll likely also see a "VCI-new" message pop up – minimize that window to the taskbar, but don't close it. That means the VCX SE is now connected to your computer, so it's time to open up the VX Manager. When you do, it's possible you might see the following at first:
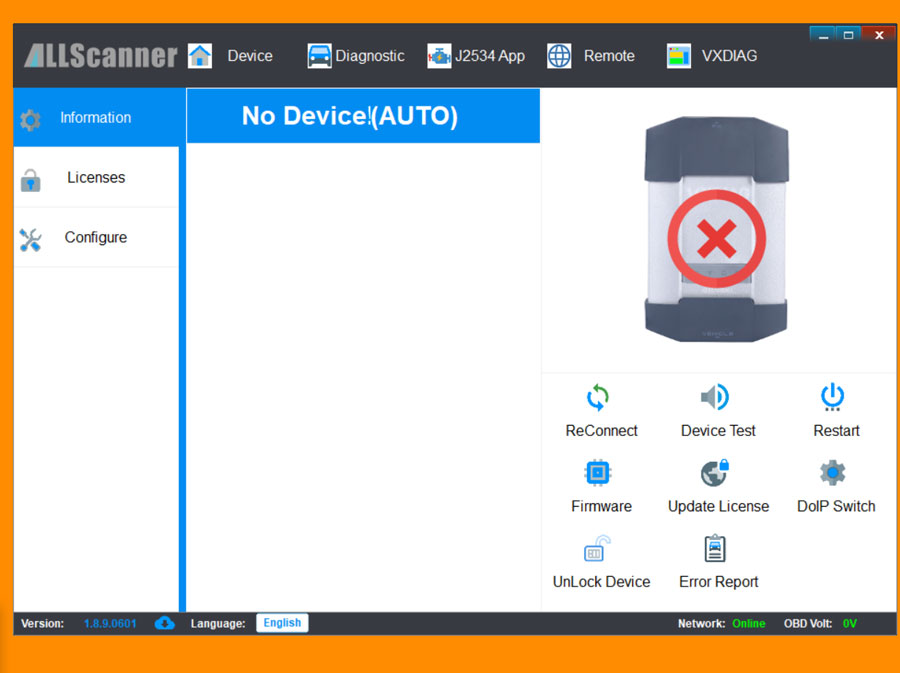
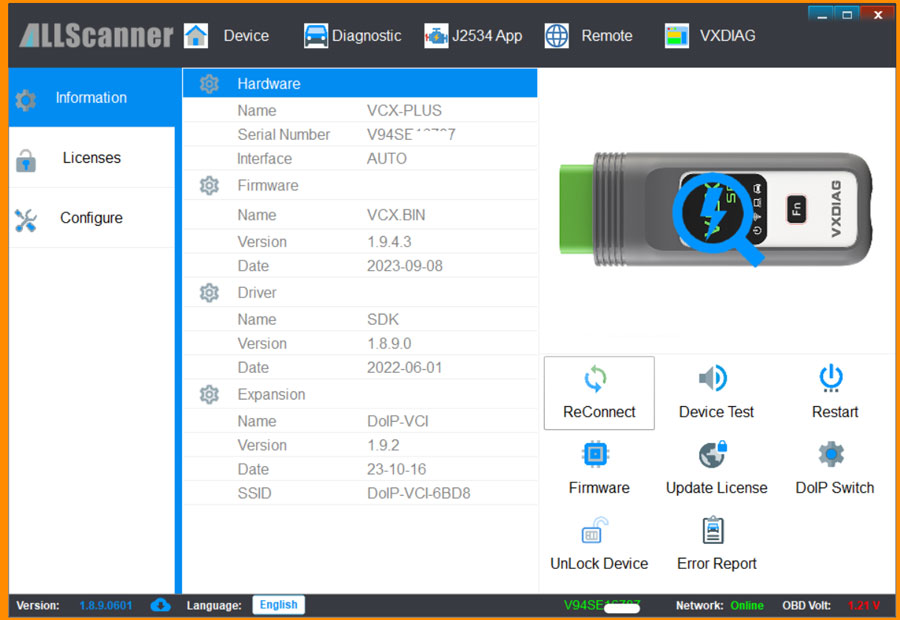
Wait a minute and your device should show up. If not, press the ReConnect button and you should hear a beep from the VCI. Once everything is connected, you should see this:
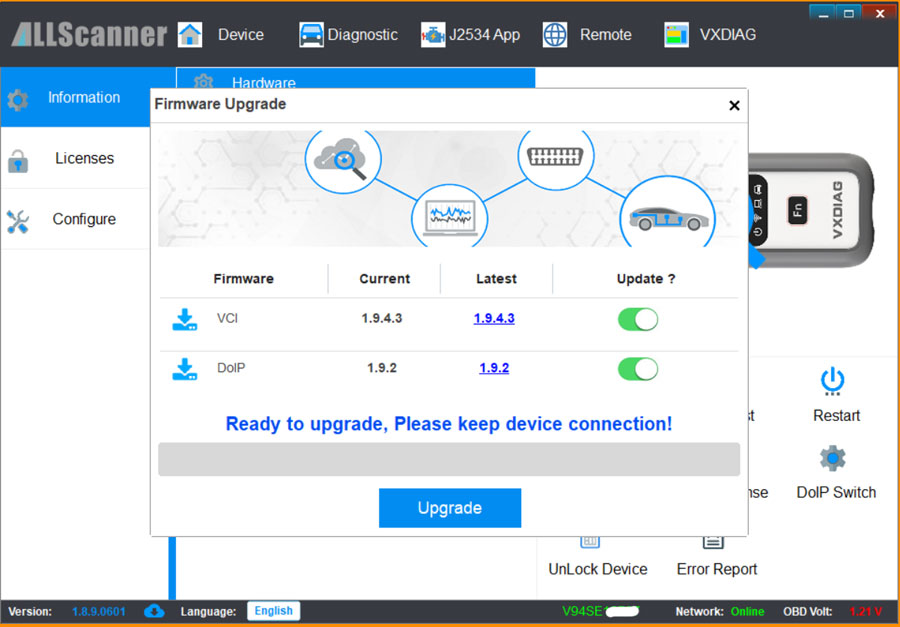
Now, it's time to ensure that all the required VCX software, firmware, licenses, etc. are up-to-date.
Update your firmware in the "Device" tab:
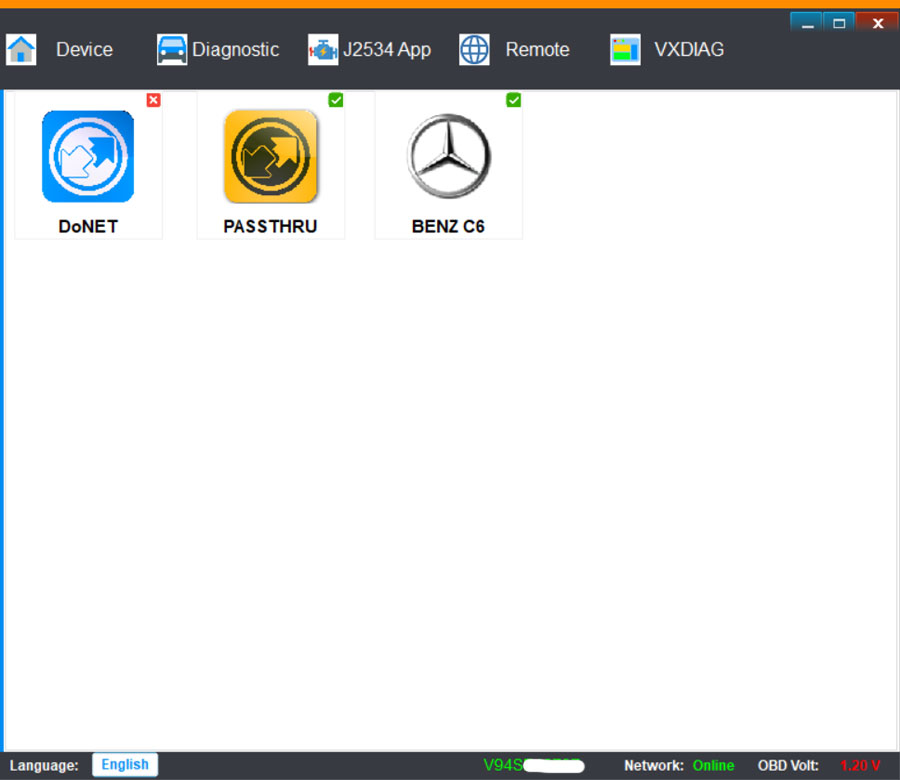
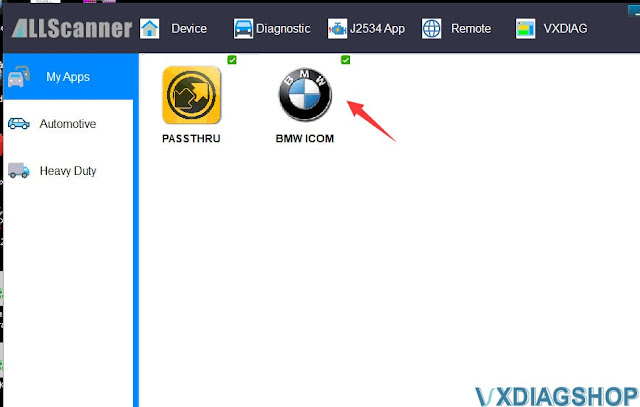
Make sure the correct diagnostic software is installed under the "Diagnostic" tab – you likely want both PassThru (pre-installed) and Benz C6 (likely not pre-installed – click the icon and press install):
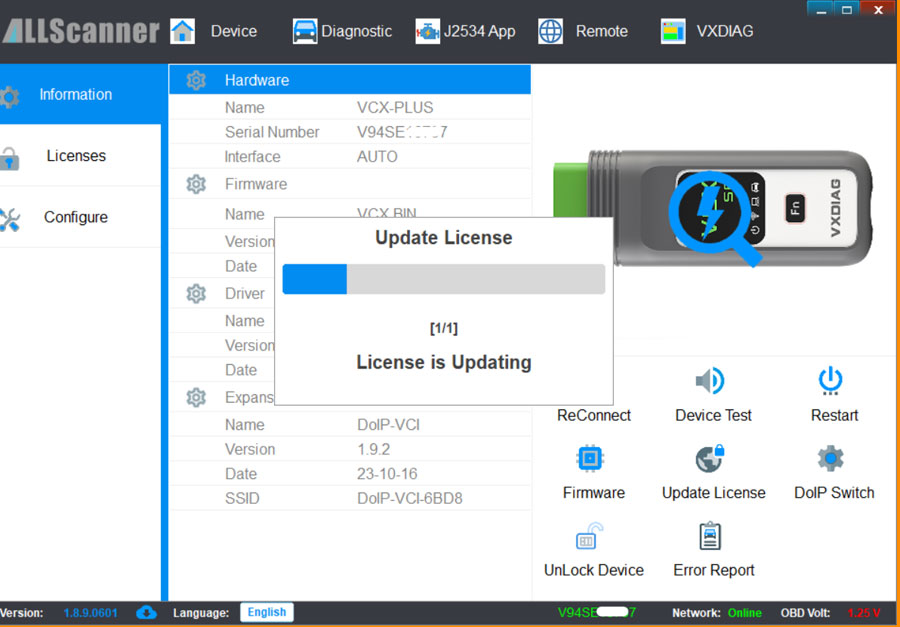
Finally, go back to the "Device" tab and update the licenses. Once done, everything should be ready to go.
Now, it's time to head out to your van and plug the VCI into your OBD2 port. Press the Start button twice, without pressing the brake pedal, so the car is on, but the engine isn't running. To preserve battery, turn off A/C, head unit, etc. With the VCX Manager open and the VCI plugged into your van and the computer, press the "ReConnect" button to make sure everything is connected. If yes, you should be able to see the voltage of your starter battery under the "OBD Volt", which should read ~12.6V. Is it >13.5V? Turn off that engine, dammit, and try again. Lower than expected? Go drive your van for a bit to recharge the battery (or, alternatively, connect to a trickle charger).
To make everything work properly, press the "DoIP Switch" under the "Device" tab. Once the window opens, select "BENZ (ISO-13400)" and press the "DoIP ON" button. A "DoIP UDP Send" window should pop up. Press "OK" and minimize the DoIP Config window. You're now ready to rock and roll!
Getting started with Xentry
Now the fun begins… The good news is
that Xentry is quite easy to use and it's more straight-forward than many of the
OBD2 scanners out there, including those from Foxwell and ThinkDiag – although,
as mentioned above, those are fine devices too (I have both. As well as a
BlueDriver, OBDLink MX+, OBDeleven, and Carista, which only work as simple OBD2
scanners for Mercedes, but I digress..). In addition to being more
user-friendly, it's also faster, provides helpful diagnostic hints and
instructions, and is overall, just much more powerful – as one would expect,
since this is the OEM software.
Before you start, make sure everything is connected, the VCI interface is active (check your taskbar), the DoIP switch is on, and the van is on, engine off. Boot up Xentry and it should automatically read your VIN if you're using an "OpenShell" version. Wait a little and if everything is connected properly, Xentry should read your OBD voltage and status of the ignition:
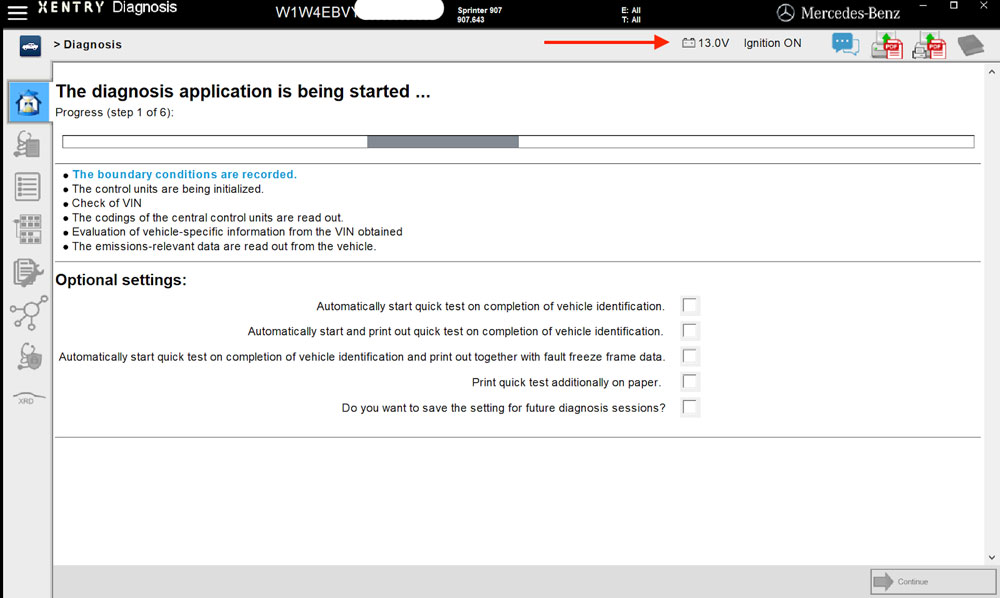
Once initial steps have completed, press the second tab on the left to go to the "diagnostics" portion of Xentry. Run a Quick Test and you will see the program running through all the various components (ECUs) in your van. These will be helpful for DTS Monaco too, so more about that later.
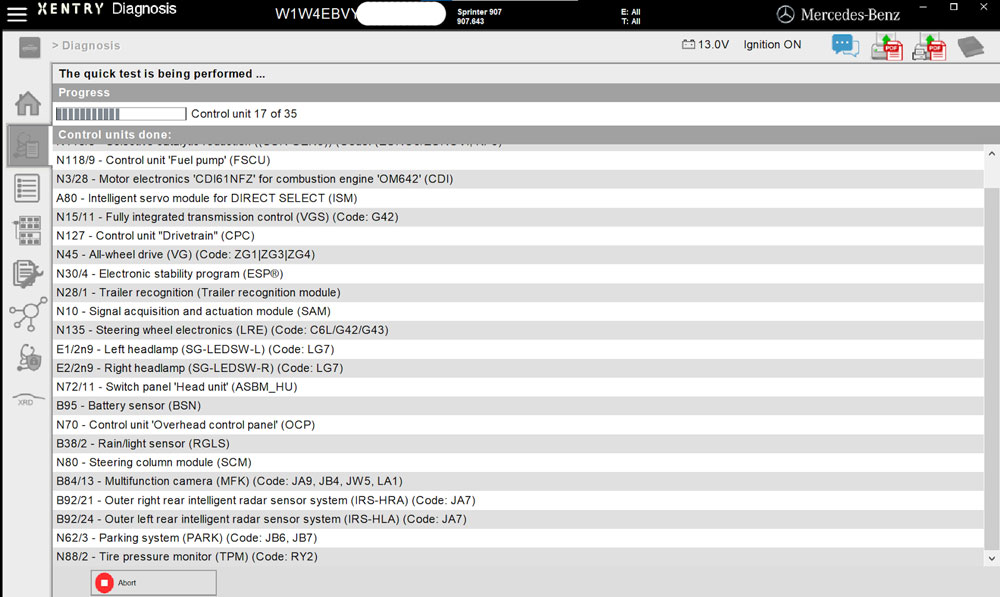
Once the Quick Test has completed, you'll get the results, including whatever error codes Xentry might have found. You can use the "Sequence/Filter" to just show error/event codes – otherwise all tested modules will be shown. On the right, you'll see the following:
F = fault that is stored and current. These can't be cleared because of an underlying problem.
f = older fault that was stored. You can clear these (but note, if the underlying cause is not fixed, they'll come back).
VXDIAG HDS vs Foxwell vs Autel for Honda Clarity
Here comes the review on VXDIAG Honda HDS from one of vxdiagshop.com's customers.
"I got mine a vxdiag vcx se Honda device from vxdiagshop.com because I could get all brands onto one dedicated laptop (started with HONDA HDS).
I drives a Honda Clarity 2018.
I pulled out my i-HDS clone VXDiag unit to see what I could see as I'm coming up on (3 weeks as of this morning per display) A 0 1 2. Updated the firmware and software to the latest, set the car up with a battery charger set to Boost at 20 A. Booted up to what appears to be 3.102.054.ENG.WIN32 and found data on items 2, 3, 4, and 5.
I also have a Foxwell and Autel diagnostics tools that have gotten me by with what I needed to be done.
It took some tinkering to get it to work right out of the box via updated software and firmware for our Honda, but vxdiag immediately paid itself in return for the problem I was diagnosing on that car.
It's a trade off there is definitely increased functionality vs the Foxwell NT710 Elite or the Autel ITS600 (Pro functions enabled,) which are easier to use.
The most helpful so far has been occasionally signing up for Honda's Tech Info and compiling what I need via PDFCreator (in the 74,xxx mi) that we have on our Clarity:
I do almost all services for our Clarity personally, except warranty/recalls and the first free oil change. I even rotated tires when the tire store started asking me to replace them until I felt they were really worn down."
How to Reinstall VXDIAG VCX SE BMW ICOM Driver?
If your vxdiag vcx se SE BMW has no communication with any vehicle using our hard drive/sold drive (ista+ 4.39/4.41 versions), need to uninstall and reinstall BMW ICOM Driver.

How to Reinstall VXDIAG BMW ICOM Driver?
Connect VCX SE with laptop. Enable network connection.
Run VX Manager on the desktop
Go to Diagnostic
Select BMW ICOM driver
Uninstall driver
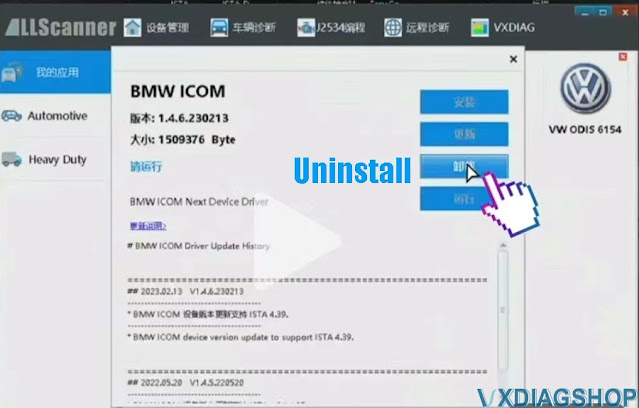
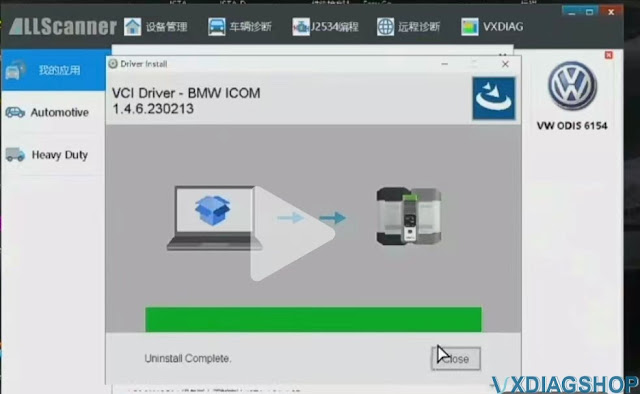
Then Install BMW ICOM driver again
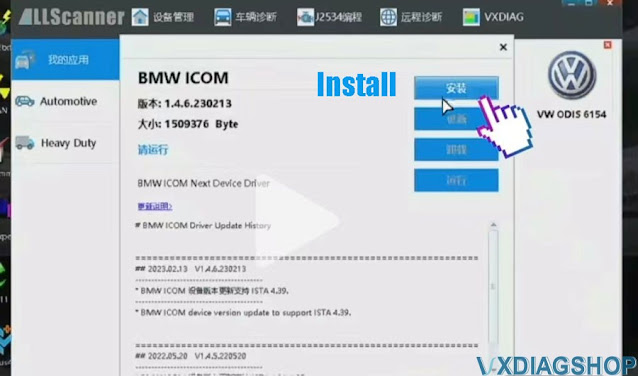
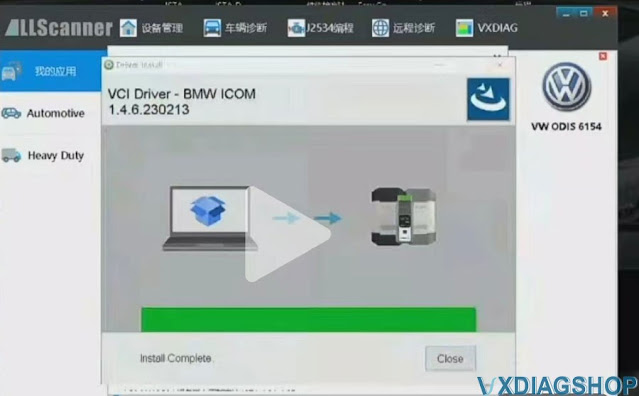
Connect vxdiag vcx se BMW scanner with vehicle again. It should be fine.
VXDIAG JLR DoIP SDD Works Pathfinder No Connection Solution
Problem:
I got the vxdiag vcx se JLR DoIP scanner with hard drive. SDD reads VIN no problem on older model. But Pathfinder has no VCI cummunication with DoIP models.
JLR DoIP driver was installed. Tried to renew license and update firmware, still no luck. Any solution?

Solution:
If SDD works, Pathfinder has no connection, the Bosch VCI driver is broken or damaged.
Contact us to download Bosch VCI Driver Installer R2_4_22_59.exe driver.
Copy and paste the driver on the desktop, then install it.
After
installing Bosch VCI driver, install JLR DoIP driver in vx manager (close
Pathfinder software when installing driver).
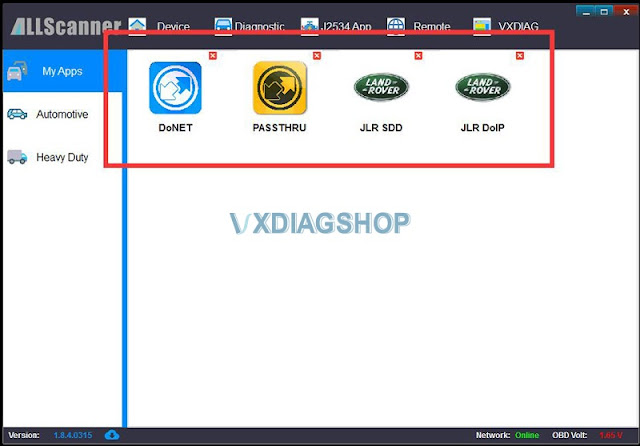
Start Pathfinder and test again.