VXDIAG IDS Adds Ford F150 2016 Keyless Entry Key
If your Ford F150 has no keyless entry/push-button start, it is possible to add that. Here is the instruction on how to add keyless entry remote start using dealer software.
It is not our work. Share for education purpose. You are at your risk.
Model example: F-150 XL year 2016
What you will need:
- BCM from an IA equipped F150. I used part # FL3T-15604-AK
- VXDIAG VCX Nano Ford or similar programming tool. You CAN NOT use a regular OBD device like you would use with Forscan, it HAS to be compatible with FDJS/FDRS/IDS
- THE MOST IMPORTANT PART: Someone who has an IDS login.
- Forscan
- Driver Door Handle (Paint to match): FL3Z-1522405-GBPTM
- Center Antenna: DS7Z-19D596-A
- Rear Antenna: DS7Z-15603-D
- Push button Start: DG9Z-10B776-AB
- RTM: FL3Z-15607-L
- Keys (x2) from Amazon
- Male/Female pins. I used an old APIM connector for the female connectors, and had the 4 male on another connector. Should be able to lookup what the APIM uses to get the TE part number
- Female pins for the antenna/door handle, I used 2.54mm dupont style
connectors, something like this kit:

- Wire
- Optional:
- Push button start jumper harness: FL3Z-14A411-E
- Passenger door handle
- Tailgate handle
- Tailgate antenna
- Keyless entry pad on the door. If you don't have this already, do yourself a flavor and add it. More on that later….
Process:
- Disconnect your battery when ever you are working with the BCM
- BCM Connector Locations, keep in mind BCM is Upside down from picture, so C2280H is by the floor

3. Create the center antenna harness if your existing harness does not have the antenna runs. In my case with the XL and Jumpseat, I did not.
- You will use connector C2280B at the BCM
- Pin 40 goes to Pin 1 on the Antenna
- Pin 27 goes to Pin 2 on the Antenna
- I ran from the BCM up following a small harness across (behind the glove box) the A/C, down the right side of the radio under the carpet and pulled it up through the hole where the jump seat connector is (C3133 if looking at a diagram)
- If you have the jump seat vs console, there is a provision for the antenna in the bottom plastic tray. You will want to flip up the bottom seat to access the storage area (aka the plastic tray) and remove the front two screws. The tray should lift up and out. Here is what it will look like with the antenna installed and back in place. I used a zip tie on each peg to hold it in place. I need to look into the proper hold down, probably a speed nut or the like as the zip ties came loose when plugging in the connector.


4. Create the rear antenna harness if you do not have it in the harness already. Mine did not. Something to note, I did not have this created nor hooked up originally, so technically this is not required, but probably a very good thing to have…
-
- Antenna goes on the back wall of the cab
- It connects to the BCM using connector C2280D
- Pin 16 goes to Antenna Pin 1
- Pin 15 goes to Antenna Pin 2
5. Create the drive door handle harness. Just like the rear antenna harness, I skipped this at first to make sure I could get the keyless start working.
-
- You will need to create two harnesses, one that goes between the BCM and the connector at the A pillar (Connector C510) and another that goes in the door.
- To go through the conduit between the A pillar into the door, I pulled out the rubber part from the door, removed the tape at the end and shoved a long rod through it with the wire taped to it. Once fished through, I re-taped it at the end and shoved it back in the door
- From the BCM to the A pillar, you will use the top of the two connectors,
referred to as 'B'
- BCM Pin 13 to C510 B12
- BCM Pin 28 to C510 B13
- BCM Pin 20 to C510 B14
- BCM Pin 21 to C510 B15
- From the A pillar to the door handle
- C510 B12 to Handle Pin 2
- C510 B13 to Handle Pin 3
- C510 B14 to Handle Pin 4
- C510 B15 to Handle Pin 1
6. Create the push button start harness. I used the jumper wire listed in Optional and cut the end off
- You will have 5 wires going to the BCM (Connector C2280A and C2280B) and 1
that just needs grounded, whether that's at the BCM or around the button area is
up to you. I grabbed onto the metal plate that the OBD port bolts to. Also, the
pin numbering for the pushbutton is AT THE PUSHBUTTON, do NOT get it confused on
the jumper lead as they are pinned different.
- BCM C2280B Pin 51 to Pushbutton Pin 1
- BCM C2280B Pin 39 to Pushbutton Pin 2
- BCM C2280B Pin 45 to Pushbutton Pin 5
- BCM C2280B Pin 5 to Pushbutton Pin 6
- BCM C2280A Pin 12 to Pushbutton Pin 4 (I cut mine an inch or so back from the connect and spliced into it. The other end just goes to the keyed ignition so it can be left disconnected)
- Pushbutton Pin 3 to Ground
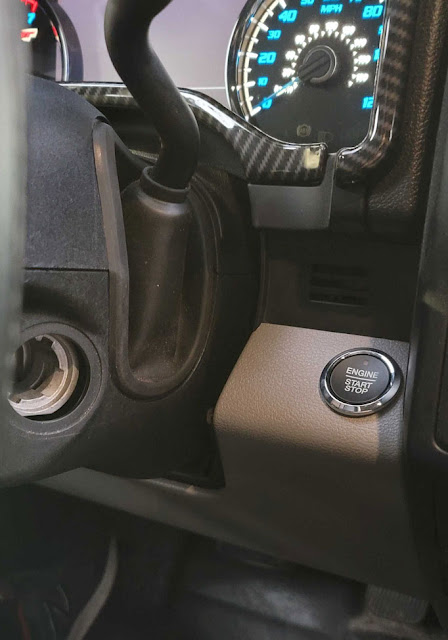
- As far as mounting the Pushbutton, you can order the lower shroud with the hole, or like I did, drill a 1 3/8 (might be able to get by with 1 1/4) hole in your existing one
7. Once you have all the harnesses in place and they are connected to the antennas/handle(s)/Pushbutton (which can be done before you swap the BCM), it's time to swap in the BCM.
- Before you disconnect your battery, use Forscan to backup your BCM as built data.
- Disconnect the battery
- Make sure you have one of the two keys in the special place Ford wants you to put it if your fob battery is dead. It's in the plastic try if you have the jumpseat (check your owners manual for specific placement)
- If you bought a used BCM, make sure (don't ask me how I know…) to check ALL the fuses. I had a handful blown which led to programming frustration
- Pull all the plugs on the BCM
- Undo the screw and pull out the old BCM
- Before installing new BCM, take a picture of the sticker on the back and pay special attention to the Key Code
- Drop in new BCM and screw it down
- Reconnect all connectors
- Under the hood fuse box, unplug the horn relay
- Reconnect the battery
- This is where I said add the keyless entry pad if you don't already have it.
The Ford instructions walk you through two ways of reprogramming the BCM
- Punch in the keycode (The one of the NEW BCM, not the old one) and make sure you hear it unlock the truck
- OR, if you don't have the keypad, you get to play the fun game of waiting 10 minutes and having 60 seconds at the end of it to program, and having to mess with opening the door at 4.5 minutes to make sure the alarm is still going off
- Now is where you will connect up your programmer and laptop and have to run
TWO operations, which not only require IDS/FDRS/FDJS, but an actual IDS login.
So either have the dealership on board with this, or have someone remote in to
program it.
- You will need to go into the program of choice and go into PATS operations
- You will need to delete and re-add keys as the first operation
- Go through the walkthrough and you should now have two keys programmed
- The second operation is the Parameter Reset, which cannot be run until the keys are programmed
- You will need to delete and re-add keys as the first operation
- From here, you should be able to start the truck with the pushbutton, if not, something is wrong.
- You will need to go into the program of choice and go into PATS operations
8. With the Keys programmed to the BCM and the Parameter Reset run, you will want to remove the the ignition tumbler so you do not have the steering lock up on you
9. From here, you will want to go in and update the BCM as built data to be a closer match to your truck than what it came out of. DO NOT simply load up your original As Built and write it as it will disable keyless components.
- I used an as-built data compare tool to compare the as built of my original BCM to the new one, I don't remember everything I changed, but it was mainly things like lights since I don't have the upper level LEDs just the base model lights, and didn't have things like the 360 camera
- Make sure to write your VIN number to the BCM, easiest to use the non-as built mode for that
- Run "PCM: Module initialization and relearn vehicle data" in Forscan
Credit to nickstewartroc.


