Reset steering angle sensor with VXDIAG Subaru?
Question:
My DCCD light is on open since I have installed my aftermarket steering wheel. I have reset the position of the steering angle sensor/roll connector per service guide, but the light is still blinking. Do I need to re-calibrate the sensor using the subaru select monitor (SSM)?
Working Experience:
The cheap FreeSSM wasn’t able to access the TCM only the ECM. I purchased the VXDIAG Subaru box that come with SSM-III and got everything working. It’s exactly what I needed! It came with what’s copy version of SSM-III but this software is sweet, you have access to absolutely everything. I was able to see the TCM codes, clear them, check and reset the steering angle. Problem solved without needing to replace any sensors.
VXdiagshop.com engineer confirmed VXDIAG will calibrate SAS on Subarus.
SSM that can read the codes for the TC/VDC/SAS, etc. It is able to reset the SAS value back to zero as long as your alignment is proper and steering wheel is straight.
Main Steps Listed:
1. VDC sensor midpoint setting mode
CAUTION:
·When the skid control computer (brake actuator ASSY) has been replaced, make sure to perform VDC sensor midpoint setting.
·Make sure to perform [VDC sensor midpoint setting mode] on a level surface (grade of 1 % or less). While centering, do not shake the vehicle or open/close a door
Note: When performing [VDC sensor midpoint setting mode], make sure to set zero point of yaw rate sensor & G sensor (brake actuator ASSY is integrated) and steering sensor.
(1) Turn the ignition switch to OFF.
(2) Shift into neutral and apply the parking brake.
(3) Connect the Subaru SSM3 to the DLC3.
(4) Turn the ignition switch to ON.
(5) Set the steering wheel in a straight position.
(6) On the SSM3 screen, select [ABS/VDC System]→[Work Support]→[VDC sensor midpoint setting mode].
(7) Following the SSM3 screen, perform [VDC sensor midpoint setting mode].
Possible to use ICOM Software with VXDIAG VCX SE BMW?
The VXDIAG VCX SE BMW HDD only supports English language. If you desire multi-language ISTA-D ISTA-P, go for BMW ICOM HDD which has been tested working by vxdiagshop.com engineer.
The latest ICOM software goes to V2020.11 with ISTA-D 4.25.40 ISTA-P 3.67.1.006, both HDD and SDDare available.
Software including:
ISTA-D 4.25.4
SDP Programming Database 4.25.4, Multilingual
VIN: 2020.06.08
ISTA-P 3.67.1.006, supports BMW motorcycle and electric vehicle programming.
for BMW ETK 2019.12
for BMW KSD 2019.11
INPA 5.00, winkfp 5.2.3, NCS 3.5.1
BMWAi Refresh Hidden 4.6
E-SYS V3.30 and V3.30, database V67.0, Chinese version software added
DR.GINI B020
The latest FSC navigation code software and IBAC coder
Added DISV57 and DISV44 for old B.M.W cars, diagnostic and programming
ISTA-D Diagnostic Software Language: Czech, Dutch, French, German, Greek, Italian, Japanese, Korean, Polish, Portuguese, Russian, Spanish, Sweden, Thai, Turkish
*Install language pack you desired.

ISTA-P Programming Software Language: English, Chinese, Czech, Dutch, French, German, Greek, Indonesian, Italian, Japanese, Korean, Polish,
Portuguese, Russian, Spanish, Swedish, Thai, Turkish

http://blog.vxdiagshop.com/2020/12/30/vxdiag-vcx-se-bmw-verified-working-with-icom-hdd/
VXDIAG Tech2Win erase GMC Sierra Check Engine Light
As we know, VXDIAG VCX NANO for GM is a diagnostic tool. As long as it is connected to your computer, Tech2Win can be used. Today, I’ll show you how to use VXDIAG GM Tech2Win to diagnose a 2007 GMC sierra truck check engine light.
Steps:
- Plug the VXDIAG GM into the computer.
- Open up VX Manager software and that’ll get it licensed. You will hear the beeping in the background. It says there’s a firmware upgrade. If you want to upgrade the firmware, you just click that “Upgrade” button. If you don’t want to upgrade, just skip it.

- Anyway, you go up to the tab of “Diagnostic”. That’s our issue, this GDS2 is not active. So click on “GM GDS2/T2W” button, and then click “Install” button, you can see it installing.


- Now, we’ve got the green check mark.

- All right, guys, so we are out in the truck. We’ve got the VXDIAG GM plugged into the OBD port of the truck.
- We’re gonna try troubleshoot why we’ve got this check engine light on.

- Click on Tech2Win, and choose “North America”, and then choose “GM-MDI, D-PDU API by Bosch”.


- Choose the interface that has the serial number of your VXDIAG VCX NANO GM, say “22124788- USB”.
- Once Tech2 screen comes up, you hit “ENTER”. Hit “ENTER” again to go to “Diagnostics”.

- Select the model year, vehicle type and product make. My truck is a 2007 light duty truck, GMC truck, so choose the information according to the screen.

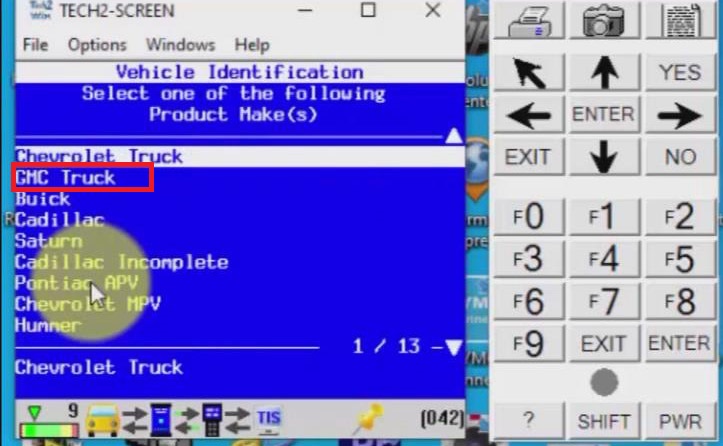
- Select the product line and product series. In my case, my product line is a “K”, and my product series is a Sierra. So, choose the information according to the screen.


- Now, we’ll go into “Powertrain” and select the engine type. The engine digit is the eighth digit of your VIN. In my case, it’s a three for the LC9, aluminum block 5.3.

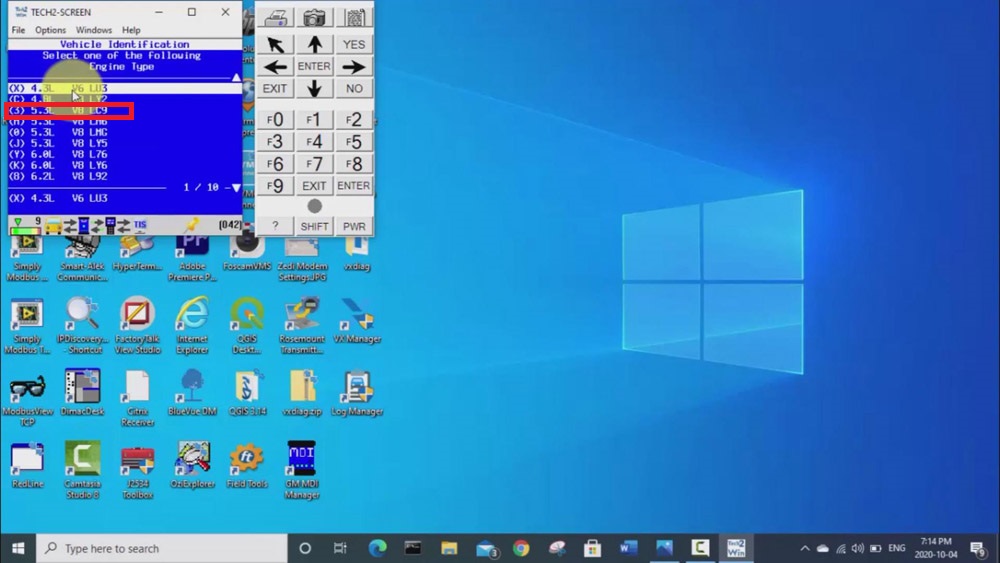
- We do not have a “Manual Transfer Case”, so choose “No”.
- We’re gonna look at the “Engine Control Module” >> “Diagnostic Trouble Codes(DTC)” >> DTC display.


- Now it’s gonna start communicating with the truck and getting those codes out of the engine control module.
- So, now you can see it’s pulled one code here, we can click on “View All DTCs” to view all DTCs.
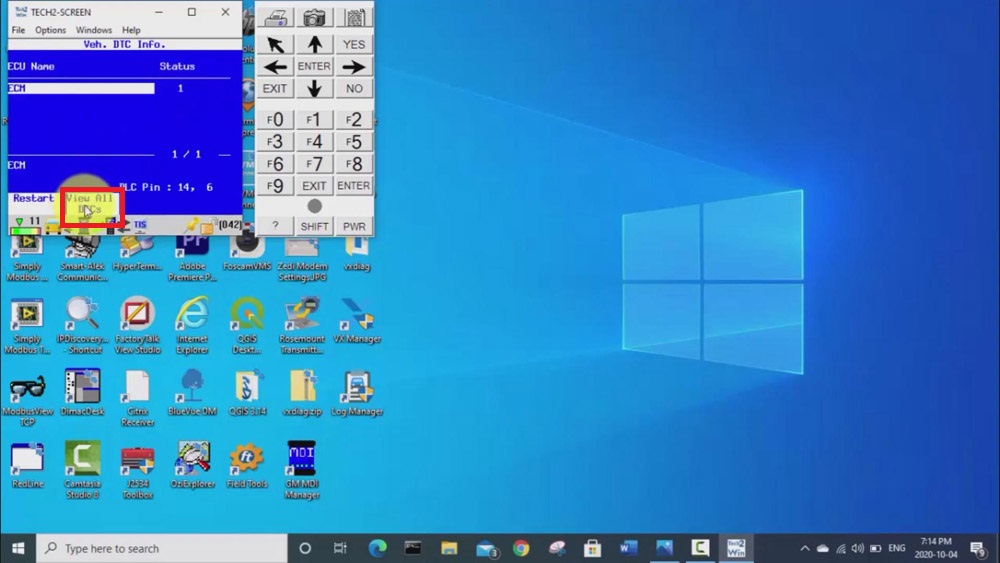
- Now, we can see it’s an ECM diagnostic trouble code p0455, which is a EVAP system large leak detected. It’s some kind of error with the EVAP system which is kind of to do with the gas tank and preventing odors and stuff from your gas tank. Then we will click “Clear DTCs”>> “Clear ECU DTC”>>“Yes”.

- Now we can see that we have zero DTCs.

- Look at the dash. The check engine light has gone out.

So that’s how we use the VXDIAG GM Tech2Win for diagnosing check engine light on GMC Truck.
http://blog.vxdiagshop.com/2020/12/28/vxdiag-gm-tech2win-diagnose-gmc-truck/
Solved VXDIAG VCX NANO GDS2 with Virus
This is my VXDIAG VCX NANO for GM.

When it is plugged into your computer, it can allow you to use Tech2Win & GDS2.
Every time I do the installation of VXDIAG VCX NANO for GM software, it seems to have changed a little bit.
When you install GDS2 software that comes with the VXDIAG GM, it installs some kind of virus or malware or trojan. If you try to install this software without turning off your antivirus, you’ll get the warning like this.

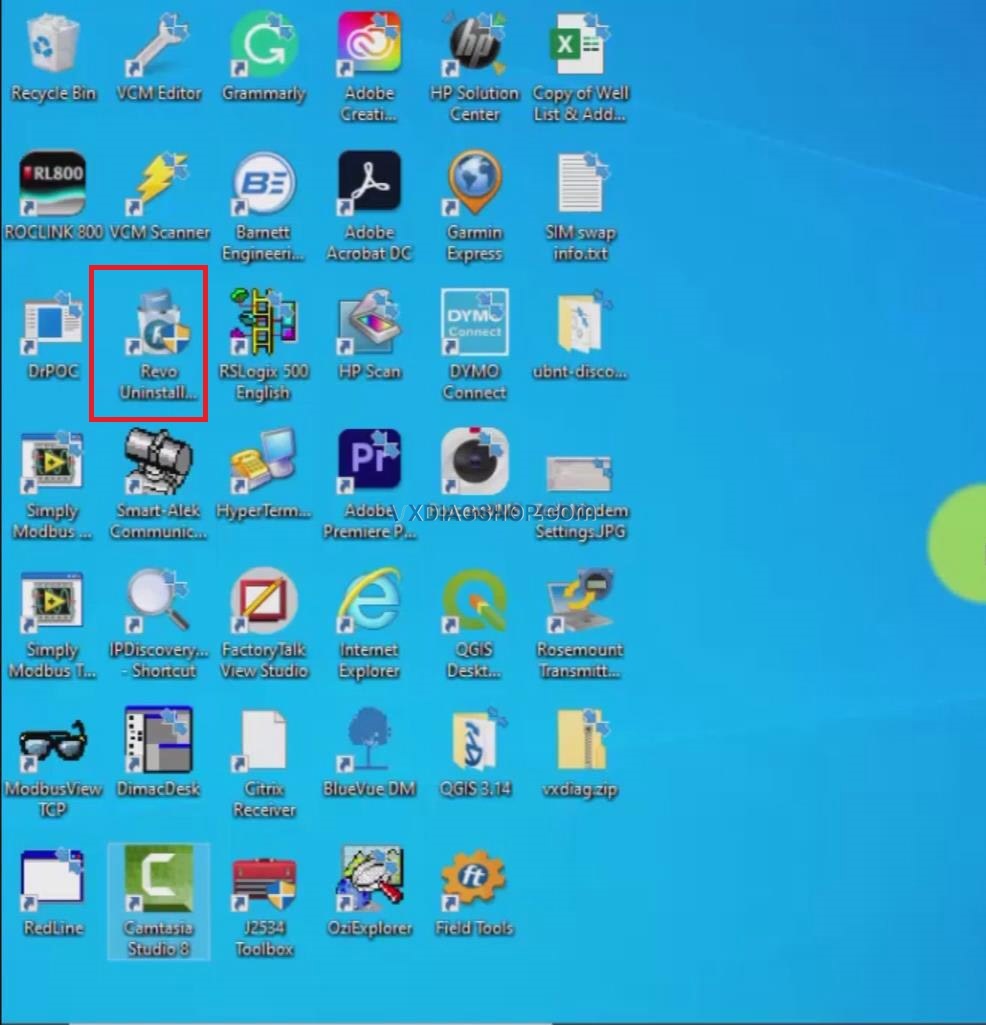
I think somebody from somewhere can remotely access my computer and nasty things. And the software doesn’t work without bypassing this virus protection. So the way I get around that is basically installing the software by the time I need it. When I finish, I use a good uninstaller like “Revo Uninstaller” and uninstall the software, and then do a virus scan and malware scan and get rid of any viruses.
So, that’s why I have to reinstall the software several times. And every time it seems to change a little bit.
Suggestion:
Before installing VXDIAG GM GDS2 and Tech2Win, you have to ensure that your virus and threat protection is turned off, otherwise it wouldn’t install correctly.

VXDIAG VCX SE for JLR Function Overview
For those who want to know the features of VXDIAG VCX SE for JLR, you will find the answer in the following table.
Features of VXDIAG VCX SE JLR

| Item | VXDIAG VCX SE for JLR | |
| Image |  | |
| Price | US$269 | |
| Customer rating | ||
| Compatible Software | SDD 160, Pathfinder 303 | |
| Add-on software | Single Software | |
| Supported language | English/Dutch/Spanish/French/Italian/German /Portuguese/Russian/Japanese/Korean/Chinese | |
| Software Update | By Link or HDD (N.B.:HDD don’t need to install software) | |
| Firmware Update | Yes | |
| Operating System | Win7 32bit | |
| Support USB & Wifi Connection | Yes | |
| Supported vehicle | SDD supports JLR models from 2007-2016. Pathfinder supports JLR models after year 2017. VCX DoIP supports all Jaguar and Land Rover car models and year. | |
| Diagnosis | Yes | |
| Reset maintenance service | Yes | |
| Program Keys | Yes | |
| Change a car’s configuration CCF | Yes | |
| Program New Module | Yes | |
| Read and clear fault codes | Yes | |
| Read data stream | Yes | |
| Test parts function | Yes | |
| Flash programming of control units | Yes | |
| Reset fault software/hardware number | Yes | |
| Manual input parameter reading module | Yes | |
| ECU version upgrade/downgrade | Yes | |
| ECU repair after ISSS programming failure | Yes | |
| Read vehicle data | Yes | |
| Change vehicle configuration and activation code | Yes | |
| Brush hiding function | Yes | |
| Circuit parts drawing query | Yes | |
| Accessories query | Yes | |
| License | Single license (can’t add other car brands to VCX SE JLR, but you can add other car brands to VCX JLR DOIP)
|
Please be informed: VXDIAG offers free DoNET authorization for life (the promotion only lasts for 2 months). If you find it troublesome to use DoNET, you can also consult VXDIAG engineer for local authorization (not free).